5.5. Python Tutorial
This tutorial shows how to implement processes which use the Python API. It assumes that you have just read the preceding chapter on Designing a Modularized System by an Example, because we will continue the elevator example given there, sticking closely to it, and for brevity we will not repeat any explanation on it. (In case you really would like more to program in C++, you can just continue to C++ Tutorial without missing out on needed conceptual information).
5.5.1. Setting up the Environment
Before you can start, you possibly need to set up
your environment so that the ln_manager program
as well as the Python libraries are found.
This can be done by setting the environment variable
PYTHONPATH to the folder where
LN was installed. For a local install using SCons,
this will be something like /usr/local/lib/python.... .
5.5.2. Writing the LN Manager Configuration
Following our example, we can now write the main LN manager configuration, by starting with copying from the example given in Grouping Processes, in the tutorial introduction on process management:
 1instance
 2name: starting_hierarchical _processes for %(env USER)@%(hostname)
 3manager: :%(get_port_from_string "%(instance_name)")
 4enable_auto_groups: true
 5
 6push_name_prefix: monitoring
 7
 8push_name_prefix: time
 9
10process watch date
11command: /usr/bin/watch /bin/date
12node: localhost
13
14process watch uptime
15command: /usr/bin/watch uptime
16node: localhost
17depends_on: watch date
18
19pop_name_prefix
20
21process top
22command: /usr/bin/top
23node: localhost
24depends_on: time/watch date, time/watch uptime
It comes handy that we already have three processes. We just need to rename these and change the command lines so that they match our system written in Python:
 1instance
 2name: elevator python sample processes for %(env USER)@%(hostname)
 3manager: :%(get_port_from_string "%(instance_name)")
 4enable_auto_groups: true
 5
 6push_name_prefix: elevator
 7
 8push_name_prefix: elevator_hardware
 9
10process elevator
11command: elevator_simulation.py
12node: localhost
13
14process controller
15command: controller.py
16node: localhost
17depends_on: elevator
18
19pop_name_prefix
20
21process ui
22command: ui.py
23node: localhost
24depends_on: elevator_hardware/controller
Here, we placed both the hardware and sensor control into the process group elevator_hardware, and let the UI depend on the elevator_hardware/control process, which in turn depends on the elevator_hardware/elevator process. That process is implemented by the elevator_simulation Python program.
Among communicating processes, which process should depend on another?
In respect to the depends_on directive, you might wonder which is the right order of dependencies in such cases, when one process is a service client and another is a service provider?
The general rule is: Low-level processes like hardware controllers which provide a service or data should be started before higher-level ones, and service providers should be started before clients of that service. This is especially important for the case of services, because service calls do block by default, and mutual calls could cause a deadlock (see [2] for details and on how to fix that).
In practical terms, this means:
The elevator simulation is the lowest-level process, so it should be started first and depend on no other process. (If we had real actors controlled by firmware, and sensors, we would start both of them independently from each other, as the bottom level of the system.)
The controller depends on the simulation, and should be started after it.
The UI depends on the controller as its service provider, and is started last.
In order to synchronize hardware simulation, controller and UI, we use
the “ready-regexp” directive introduced in section
By Terminal Output: ready-regex, which
causes the LN manager to wait until a process that it started prints a
certain string. For example, the elevator_simulation process will
print “elevator hardware running”, and with this directive in line 13,
the LN manager will wait until it has reached this point:
 1instance
 2name: elevator python sample processes for %(env USER)@%(hostname)
 3manager: :%(get_port_from_string "%(instance_name)")
 4enable_auto_groups: true
 5
 6push_name_prefix: elevator
 7
 8push_name_prefix: elevator_hardware
 9
10process elevator
11command: python3 elevator_simulation.py
12node: localhost
13ready_regex: elevator hardware running
14
15process controller
16command: python3 controller.py
17node: localhost
18depends_on: elevator
19ready_regex: ready to receive service calls
20
21pop_name_prefix
22
23process ui
24command: python3 ui.py
25node: localhost
26depends_on: elevator_hardware/controller
If you focus for a moment on the implementation of the hardware part, and the communication within it, there is a difference between the real elevator and the simulated elevator: In a real elevator, sensors and actors are independent, the former just deliver information, and the latter just perform actions. In a simulation however, the actions should move and adjust the simulated sensor readings. This is why we place them into a single process.
There are two things which we need to change so that the Python programs can run. One is that we need to invoke the Python interpreter to run our scripts written in Python. We will use Python3 here:
 1instance
 2name: elevator python sample processes for %(env USER)@%(hostname)
 3manager: :%(get_port_from_string "%(instance_name)")
 4enable_auto_groups: true
 5
 6push_name_prefix: elevator
 7
 8push_name_prefix: elevator_hardware
 9
10process elevator
11command: python3 elevator_simulation.py
12node: localhost
13ready_regex: elevator hardware running
14
15process controller
16command: python3 controller.py
17node: localhost
18depends_on: elevator
19ready_regex: ready to receive service calls
20
21pop_name_prefix
22
23process ui
24command: python3 ui.py
25node: localhost
26depends_on: elevator_hardware/controller
Second, we need to provide Python with the right environment. This can
be done by passing the PYTHONPATH environment variables with which the
LN Manager is running, and adding the user_execvpe flag, which
tells the LN manager to pass the needed environment to the Python3
interpreter. Also, we need to adjust the work directory (CWD)
to the current directory the LNM is running in, and thirdly, we need
tell Python in which sub-directory the different scripts can be found,
so that we can use paths relative to the CWD, like so:
With this, our program looks like this:
 1instance
 2name: elevator python sample processes for %(env USER)@%(hostname)
 3manager: :%(get_port_from_string "%(instance_name)")
 4enable_auto_groups: true
 5
 6push_name_prefix: elevator
 7
 8push_name_prefix: elevator_hardware
 9
10
11process elevator
12pass_environment: PATH, PYTHONPATH, LD_LIBRARY_PATH
13add flags: use_execvpe
14change_directory: %(CURDIR)
15command: python3 python/elevator_simulation.py
16node: localhost
17
18process controller
19pass_environment: PATH, PYTHONPATH, LD_LIBRARY_PATH
20add flags: use_execvpe
21change_directory: %(CURDIR)
22command: python3 python/controller.py
23node: localhost
24depends_on: elevator
25
26pop_name_prefix
27
28process ui
29pass_environment: PATH, PYTHONPATH, LD_LIBRARY_PATH
30add flags: use_execvpe
31change_directory: %(CURDIR)
32command: python3 python/ui.py
33node: localhost
34depends_on: elevator_hardware/controller
One more thing is missing: we need to tell the LNM where to find our message definitions which we are going to use. We do this by inserting this line after line 4:
1instance
2name: elevator python sample processes for %(env USER)@%(hostname)
3manager: :%(get_port_from_string "%(instance_name)")
4enable_auto_groups: true
5
6add_message_definition_dir: %(CURDIR)/msg_defs/
This directive is a global directive, we place it between the instance section and the process sections.
5.5.2.1. Testing the new configuration
We can already run this configuration like this:
ln_manager -c examples/tutorial/example_python_elevator/code-snippets/elevator-4.lnc
we get:
The LN manager running the draft elevator configuration
Well, when we try to start the elevator UI, the response will be this:
Error indication when LN tries to run a non-existent program
Error messages and diagnosis in the LN manager
Dang, what went wrong? If we click the “log” tab, the LN manager shows this error message:
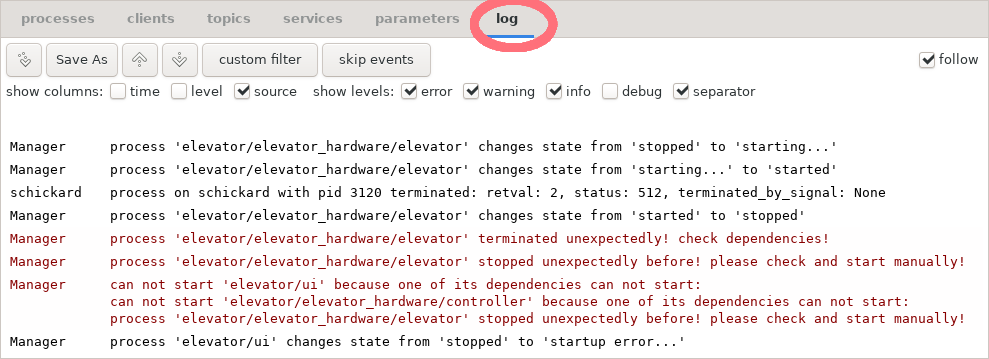
Error message when LN tries to run a non-existent program
The solution to this is easy: Of course, the LN manager cannot start programs which do not yet exist. So, next thing we do is we are going to write them.
But before that, it is useful to give you a rough sketch of each client API and how it works.
5.5.3. Using the Communication Functions in the Client API: A First Overview
Before we go into the details how the different processes can communicate with each other, here a bird’s eye view how it all works:
Whenever a program wants to use LN for inter-process communication, it first needs to instantiate a client object which registers the module with the LN manager. The parameters if the client object are a unique name for the client instance, and optionally the program’s command line arguments.
Now, there are two fundamental mechanisms for communication, publish/subscribe communication and LN services.
In the case of publish/subscribe communication, the process first needs to create a port object. This is done with one of two methods of a client object, either the client.publish() method, or the client.subscribe() method.
Both the
publish()and thesubscribe()methods are called with two arguments. The first is the topic to which the client wants to attach to, and the second is a message definition, which defines the data type of the message. Usually, message definitions are associated with topics.Note
As with all other facilities for inter-process communication, in time-critical or performance-critical code, this initialization of communication should be done only once at the start of the program, because it is much slower than the actual communication.
Both the
publish()andsubscribe()methods create a port object. A port object is an object instance that consists of a data member into which the parts of a message can be copied, and one of two I/O methods, eitherport.write(), or port.read()``. Thewrite()method is available for output ports which publish data, and theread()methods are available for input ports which were subscribed to a topic.The
read()method can be either blocking (which means that it wait until data has been transmitted), or non-blocking (which means they only try without waiting to communicate), or it can also have a time-out parameter (which means that they wait, but only up to a maximum time).before a
write(), and after aread(), the data which is to be transmitted can be copied into or out of thepacketmember of the port object, whose members correspond to the elements of the message definition, and also have their respective type.Success of the communication is indicated by the Boolean return values of
read()orwrite(), whereTruemeans that new data was transmitted, andFalsethat there was no data.both
read()andwrite()also transport time stamps which allow to related different messages with each other.
In the case of LN service communication, both clients and service providers need to retrieve a service object after instantiating the LN client object. For this, there exist two methods, one called
links_and_nodes.client.get_service()for getting a service object for the service client, andlinks_and_nodes.client.get_service_provider()for a service provider program, to get an object reference to a service provider. There are two kind of service objects, client service objects, and provider service objects. Both belong to an initialized LN client, and have the name of the service and the name of the corresponding message definition for requests of that service as parameters.Then, the service client class can define methods for calling services. Each of them has to assign the call parameters to a request buffer, perform the call using a call method, and read back the response data from the request buffer object.
Setting up the service provider class is a little more complex. After getting the direct provider handle, two functions need to be called on that handle:
set_handler(), which sets a specific method to be called when a service call request is received.do_register(), which tells the LN manager and the rest of the LN system that the process which callsdo_register()will handle these service requests.
After this registration step, the handler method that is called when a service request arrives needs to be implemented.
All of this might sound still a bit abstract, and your head might be a bit spinning from all these new terms. Don’t give up, we will address that right now by going step by step through the concrete example of the elevator service.
After that section aimed to make the interface tangible, we will in a detailed summary section return to the LN client API methods and discuss their properties and interface in a bit more detail, and also link to the more formal and detailed descriptions in the Python API Reference chapter, so that you can look up further information when needed.
5.5.4. Implementing the Elevator Control Processes
This section covers the two processes which control the elevator - the
elevator_simulation.py program and the controller.py program.
5.5.4.1. Communicating with publish/subscribe topic messages
We set up the communication between controller and hardware via public/subscribe messages on topics. Because programs do not need to wait for messages, this is a good match to real-time control loops. Also, it is often possible to avoid threads just by checking for new messages and processing them quickly in a main event loop.
5.5.4.1.1. The Elevator Hardware Simulation
If you look again at our
Elevator control system with component processes and message types, there are two
components of the hardware which send messages: The floor count
sensor, which is a general example for a sensor, and the motor, which
is an actor. Because they share some state, we implement them in a
single program. Nevertheless, they communicate via two different
topics. We will name these topics``elevator03.actors`` and
elevator03.sensors, because we want to use elevator number 3 for
our hardware tests, when the hardware arrives. Both topics will
transmit different messages, which would make it easier to de-couple
them in later implementations, and also would make it straightforward
to add other sensors (for example, an emergency stop button) if we
need to do that.
We can implement both sensor and motor as two functions which share one element of global shared state, the current position. (In a more complex program, such shared-state elements should be made members of an elevator object, to avoid globally shared values. But we do not need this for this short example.) But before we do that, we need to cover the basics of registering, sending and receiving messages.
So, let’s write a program called python/elevator_simulation.py First, the
program needs to use the links_and_nodes Python module. So, we
just need to import it:
1import links_and_nodes as ln
We assign the links_and_nodes module the short name ln. This is a convention,
which is useful to adhere to because we will need to type a lot less.
Important
If the import links_and_nodes statement fails when running the program
later, this is almost certainly because of some missing environment
setup.
5.5.4.1.2. Publishing and receiving Data in the elevator process
Next, we need to connect to the topics. This is done by creating two clients, and creating ports:
1#!/usr/bin/env python3
2import links_and_nodes as ln
3
4_sensor_clnt = ln.client("elevator, floor count sensor")
5_sensor_port = sensor_clnt.publish("elevator.sensors", "elevator/sensors/floor_count")
6
7_actor_clnt = ln.client("elevator, motor drive controller")
8_actor_port = actor_clnt.subscribe("elevator.actors", "elevator/actors/motor_control")
These two instruction sequences each do two things:
First, they instantiate and register an LN client. We need to instantiate such a client in every program in order to communicate via LN. Each client needs an unique name. As you see, a program can register more than one client. We do this here just to emphasize that the two functions of sensors and actors are in principle separate things which could run in separate programs.
Second, they create a port object by registering with a topic either as a publisher (line 4) or as a subscriber (line 7). In the hardware simulation, we register as a publisher for the sensor data, and as a subscriber for motor control commands. In addition to the topic, we also need to register a message definition which specifies the type of messages that we want to send.
Note that we begin the port and client objects with an underscore - this means that they are internal to the module.
Now, we need two functions which publish and receive data. We go the way to show you the core operation first, and go on to embed them in a more structured way after that.
5.5.4.1.3. Publishing the Sensor Data
First, write a function that publishes the current floor count:
 1#!/usr/bin/env python3
 2import links_and_nodes as ln
 3
 4_sensor_clnt = ln.client("elevator, floor count sensor")
 5_sensor_port = sensor_clnt.publish("elevator.sensors", "elevator/sensors/floor_count")
 6
 7_actor_clnt = ln.client("elevator, motor drive controller")
 8_actor_port = actor_clnt.subscribe("elevator.actors", "elevator/actors/motor_control")
 9
10
11def publish_current_count(floor_number, movement_direction):
12
13    _sensor_port.packet.floor_number = floor_number
14    _sensor_port.packet.movement_direction = movement_direction
15
16    _sensor_port.write()
There is some magic involved here but fortunately, it is easy to
explain. Here is what happens: When initializing a ``port`` object,
it gets a ``package`` member, and this in turn has member variables
which correspond one-to-one to each element in the message definition
which the port was connected with. To these elements, we assign the
data which we want to send, and then we call the write() method of
the port, which sends the data. This is all we need to do.
There is one more detail needed: As mentioned, we have an alarm system
for fire detection, and it is important that fire-related exceptions
are handled correctly. So, we need to add this to the
simulation. However, testing with real smoke on the premises turned
out to be a bit hazardous, even when using KN95 masks. So, instead of
checking for the appearance of physical smoke, we just look for
“smoke” in the file system, more precisely, in the current work
directory (CWD) – using path.exists(). The resulting
code is this:
 1#!/usr/bin/env python3
 2import links_and_nodes as ln
 3from os import path
 4
 5_sensor_clnt = ln.client("elevator, floor count sensor")
 6_sensor_port = _sensor_clnt.publish("elevator.sensors", "elevator/sensors/floor_count")
 7
 8_actor_clnt = ln.client("elevator, motor drive controller")
 9_actor_port = _actor_clnt.subscribe("elevator.actors", "elevator/actors/motor_control")
10
11
12def publish_current_count(floor_number, movement_direction):
13
14    _sensor_port.packet.floor_number = floor_number
15    _sensor_port.packet.movement_direction = movement_direction
16
17    # if we find smoke, we raise a fire alarm
18    _sensor_port.packet.smoke_detected = path.exists("smoke")
19
20    _sensor_port.write()
5.5.4.1.4. Receiving Motor Control Commands as a Subscriber
We can do just the same with the motor control port, by writing
a function receive_commands(), that uses the port.read() method
to receive a message:
 1#!/usr/bin/env python3
 2import links_and_nodes as ln
 3from os import path
 4
 5_sensor_clnt = ln.client("elevator, floor count sensor")
 6_sensor_port = sensor_clnt.publish("elevator.sensors", "elevator/sensors/floor_count")
 7
 8_actor_clnt = ln.client("elevator, motor drive controller")
 9_actor_port = actor_clnt.subscribe("elevator.actors", "elevator/actors/motor_control")
10
11
12def publish_current_count(floor_number, movement_direction):
13
14    _sensor_port.packet.floor_number = floor_number
15    _sensor_port.packet.movement_direction = movement_direction
16    # if we find smoke, we raise a fire alarm
17    _sensor_port.packet.smoke_detected = path.exists("smoke")
18
19    _sensor_port.write()
20
21
22def receive_commands():
23    packet = _actor_port.read()
24    return packet.move_command
Here, the port.read() method returns either None (if no data
was received, we will come soon to this case), or a packet
object which contains the new data.
To make the meaning of the commands easier to understand, we add a class which serves as an enumeration:
 1#!/usr/bin/env python3
 2import links_and_nodes as ln
 3from os import path
 4
 5_sensor_clnt = ln.client("elevator, floor count sensor")
 6_sensor_port = sensor_clnt.publish("elevator.sensors", "elevator/sensors/floor_count")
 7
 8_actor_clnt = ln.client("elevator, motor drive controller")
 9_actor_port = actor_clnt.subscribe("elevator.actors", "elevator/actors/motor_control")
10
11
12class Enum_MovementDirection:
13    UP = 1
14    DOWN = -1
15    STOP = 0
16
17
18def publish_current_count(floor_number, movement_direction):
19
20    _sensor_port.packet.floor_number = floor_number
21    _sensor_port.packet.movement_direction = movement_direction
22    # if we find smoke, we raise a fire alarm
23    _sensor_port.packet.smoke_detected = path.exists("smoke")
24
25    _sensor_port.write()
26
27
28def receive_commands():
29    packet = _actor_port.read()
30    return packet.move_command
Now, we can write a very simple control loop:
 1#!/usr/bin/env python3
 2import links_and_nodes as ln
 3from os import path
 4import numpy
 5import time
 6
 7_sensor_clnt = ln.client("elevator, floor count sensor")
 8_sensor_port = sensor_clnt.publish("elevator.sensors", "elevator/sensors/floor_count")
 9
10_actor_clnt = ln.client("elevator, motor drive controller")
11_actor_port = actor_clnt.subscribe("elevator.actors", "elevator/actors/motor_control")
12
13
14class MovementDirection:
15    UP = 1
16    DOWN = -1
17    STOP = 0
18
19
20def publish_current_count(floor_number, movement_direction):
21
22    print(
23        "the current floor number is {}, the movement direction is {}".format(
24            floor_number, movement_direction
25        )
26    )
27
28    _sensor_port.packet.floor_number = floor_number
29    _sensor_port.packet.movement_direction = movement_direction
30    # if we find smoke, we raise a fire alarm
31    _sensor_port.packet.smoke_detected = path.exists("smoke")
32
33    _sensor_port.write()
34
35
36def receive_commands():
37    packet = _actor_port.read()
38    cmd = packet.move_command
39    print("got command move to {}".format(cmd))
40    return cmd
41
42
43current_floor_number = 0
44current_command = float(MovementDirection.STOP)
45print("Started!")
46
47
48while True:
49    current_movement_direction = int(numpy.sign(current_command))
50    publish_current_count(current_floor_number, current_movement_direction)
51    print("The current command is to move by {}".format(current_command))
52
53    if current_movement_direction != 0:
54        step = current_movement_direction / 16.0
55        print("moving elevator by {}".format(step))
56
57        current_floor_number += step
58        current_command -= step
59        time.sleep(0.2)
60
61    else:
62        print("elevator_simulator: waiting for commands...")
63        current_command = receive_commands()
Note
For brevity, we have used the numpy.sign() function here. For our
purpose, it simply returns -1 if a number is negative, +1 if a
number is positive, and 0 if it is zero (this numpy function also
has well-defined edge cases for symbolic floating point values
which we are not using here).
(For more specific information on this function, here is a link to the numpy docs.)
5.5.4.1.5. Extracting API Constants from the Hardware Simulation
As we mentioned before, the constants which define the movement direction are used in the messages. As such, they are part of the public API of the software modules, and should be documented and kept separate from the implementation.
Therefore, we extract lines 10 - 13 of the elevator.py process
into a Python module that we call ElevatorConstants.py. We also add
constants which cover the possible errors of the system. They are part
of the interface, too.
Note
Why do we add them that early? Adding error codes or new exceptions breaks backward-compatibility of an interface, because clients which rely on earlier versions cannot handle these errors without change. So, it is a good idea to clearly define all possible errors from the start, so that interfaces can be kept stable later.
Here, we add both error messages, and numerical error codes. They have double purpose: Error messages are nicer to work on for humans, while discrete error codes are necessary for programmatical error handling. Later, we will show how to transport an exception across the interface, which will conveniently bundle together these two pieces of information.
 1class MovementDirection:
 2    UP = 1  # means to move the elevator up, or it is moving up
 3    DOWN = -1  # means to move the elevator down, or it is moving down
 4    STOP = 0  # means to not move the elevator, or it is not moving
 5
 6
 7# numerical error codes
 8class ElevatorErrorStatus:
 9    NO_ERROR = 0  # no error happened
10    FLOOR_NUMBER_TOO_HIGH = 1  # the floor number was too large
11    FLOOR_NUMBER_TOO_LOW = 2  # the floor number was too small
12    OUT_OF_ORDER = 3  # the hardware is not working properly
13    FIRE_ALARM_OPERATION_STOPPED = 4  # Fire alarm, elevator has stopped at ground floor
14
15
16class ElevatorException(Exception):
17    def __init__(self, msg, error_code):
18        Exception.__init__(self, "Error {}: {}".format(error_code, msg))
19        self.error_code = error_code
20
21
22class Elevator_Floor_too_small_Error(ElevatorException):
23    def __init__(self, msg=""):
24        ElevatorException.__init__(
25            self,
26            "floor number is too small" + msg,
27            ElevatorErrorStatus.FLOOR_NUMBER_TOO_LOW,
28        )
29
30
31class Elevator_Floor_too_large_Error(ElevatorException):
32    def __init__(self):
33        ElevatorException.__init__(
34            self,
35            "floor number is too large",
36            ElevatorErrorStatus.FLOOR_NUMBER_TOO_HIGH,
37        )
38
39
40class Elevator_OutOfOrderError(ElevatorException):
41    def __init__(self, msg=""):
42        ElevatorException.__init__(
43            self,
44            "currently, hardware does not work" + msg,
45            ElevatorErrorStatus.OUT_OF_ORDER,
46        )
47
48
49class Elevator_Fire_Alarm_Exception(ElevatorException):
50    def __init__(self, msg=""):
51        ElevatorException.__init__(
52            self,
53            "fire detected - elevator stopped at ground floor!" + msg,
54            ElevatorErrorStatus.FIRE_ALARM_OPERATION_STOPPED,
55        )
5.5.4.1.6. The Controller Process
The controller process, which we name python/controller.py, has
essentially three parts:
One part communicates with the hardware simulation (or when the elevator hardware finally arrives, it will communicate with the real hardware). This code is almost completely symmetrical to the corresponding controller code - with one exception: Publisher and subscriber of the messages are swapped.
The second part communicates with the user interface module. This is done with an LN service, which we will show soon.
The third part is a bit of actual logic which converts UI requests into meaningful commands to the hardware, and returns when these are completed.
So, let’s start with the hardware communication:
5.5.4.1.7. Receiving Sensor Messages
For receiving sensor messages, this code does what we need:
import collections

ElevatorStatus = collections.namedtuple(
    "ElevatorStatus", ["floor_number", "movement_direction", "smoke_detected"]
)

_clnt = ln.client("elevator, floor count sensor")
_sensor_port = clnt.subscribe("elevator03.sensors", "elevator/sensors/floor_count")


def receive_current_sensor_data():

    _sensor_port.read()

    return ElevatorStatus(
        _sensor_port.packet.floor_number,
        _sensor_port.packet.movement_direction,
        _sensor_port.packet.smoke_detected,
    )
Hint
The call to collections.namedtuple defines a new container class with class name ‘ElevatorStatus’ with conveniently named members. See the official standard library documentation for collections.namedtuple for details.
5.5.4.1.8. Using Time-Outs
There is something which we have to consider now:
We are reading the sensor data in a single event loop.
This makes things a lot easier. However, if we use port.read()
without parameters, this will cause a blocking call,
which means that the program will suspend execution
here and wait until some data arrives.
For real-time control purposes, this is often not what we need.
In such cases, we need to use either non-blocking calls,
or set a time-out. Non-blocking calls do not wait at
all, and they are used if the read() method
is passed a Boolean False as an argument. For simplicity,
we are going to use time-outs. They are invoked when
the read() method gets a floating point number passed;
the value determines the maximum number of seconds until
the function returns, when it has not received data.
def receive_current_sensor_data(timeout=0.1):

    _sensor_port.read(timeout)

    return ElevatorStatus(
        _sensor_port.packet.floor_number,
        _sensor_port.packet.movement_direction,
        _sensor_port.packet.smoke_detected,
    )
If the port.read() call times out, the packet
data is unchanged, so it simply returns the old state.
5.5.4.1.9. Sending Command Messages
For sending commands to the elevator motor, we can just use:
_actor_port = clnt.publish("elevator03.actors", "elevator/actors/motor_control")

def send_hw_command(move_command):
    actor_port.packet.move_command = move_command
    _actor_port.write()
As you see, here we use the same client instance to create another port.
The port.write() method does not have time-outs, because it just
writes the data to a buffer, which will never block, and in a correct
set-up will never fail (it could raise an exception if something goes
wrong).
5.5.4.2. Connecting UI and Controller with a Service
Now, we can talk with the hardware. But what is still missing, is the connection with the user interface. We start with the client side, and create this now as follows:
5.5.4.2.1. Calling the Service from the UI
For the user interface, we create a new program python/ui.py.
First thing, we need to import the links_and_nodes as usual:
import links_and_nodes as ln
Then, we create a service client and a service client handle from it as follows:
17class ElevatorServiceClient:
18    def __init__(self):
19        self.clnt = ln.client("elevator_service_client")
20
21        self.elevator_call_svc = self.clnt.get_service(
22            "elevator03.prompt", "elevator/request/elevator_call"
23        )
24
This creates a new client for elevator03.prompt, and defines an
object reference to a LN service client instance, using the method
links_and_nodes.client.get_service(). We have chosen the
service name elevator03.prompt to just make a point that topic and
service names are really not required to be the same as the names of
message definitions which are used by them - as explained in section
Message Definition Names, they are different things
which can have different names if convenient (similar as the name of a
file on disk, and a variable designating a file object in a program
are different things).
What is needed now is a method of ElevatorServiceClient
that calls the service. Here it is:
25    def prompt(self, floor_number):
26        svc = self.elevator_call_svc
27        svc.req.requested_floor = floor_number
28        svc.call()
29        if len(svc.resp.error_message) or bool(svc.resp.error_code):
30            raise Exception(svc.resp.error_message)
31        return {
32            "error_code": svc.resp.error_code,
33            "arrived_floor": svc.resp.arrived_floor,
34        }
35
36
What happens here is as follows:
In line 26, we simply get a shorter name to the service object that we got from the LN client, and call it
svc.The service request has in our case a single parameter, with the name
requested_floor. In line 27, we assign this single parameter to the corresponding member in the buffer for call parameters. This buffer which has been set up automatically, and is calledsvc.req, with a member for each field of the message definition. So, because our message definition contained a parameterrequested_floor, we assign the value of the method parameter “floor_number” to the fieldsvc.req.requested_floor. The fields have been generated automatically from the message definition, and the buffer was provided with the above call toget_service.In line 28, we call the service, using the function
links_and_nodes.service.call(). What is does is as follows: It copies the data in the request parameters into an internal buffer, sends a message with its content to a service provider, and waits for the result, which is then copied back. The resulting parameters will appear as members of the fieldsvc.resp.Before we return the result, we need to check for errors, which should usually raise an exception. This is done by testing whether
svc.resp.error_messagehas a length larger than zero, orsvc.resp.error_codehas a non-zero value. If that is the case, we raise the exception witherror_messageanderror_codeas its constructor parameters.Otherwise, we return the result data record in a dictionary, which holds both the error code, and the number of the floor where we arrived at. (This is the more general form. In the example, we could also just return the resulting floor number, because the error code will always be zero).
Now we are almost done for the client part of the service
communication. What this code does is that it first connects the
newly constructed service client (which was created in the constructor
of ElevatorServiceClient) to the message definition
elevator/request/elevator_call, and also to a registered method
prompt. The call to the prompt() method will then be forwarded to
the controller program, which takes the role of the LN service
provider.
5.5.4.2.2. The Response Method in the Controller
As the counterpart, the controller process needs some code which
provides the service and registers it with LN. This is done as
follows by using the
links_and_nodes.client.get_service_provider() method, then
calling set_handler() and do_register() on the returned direct
provider handle
[3]:
47class ElevatorProvider(object):
48    def __init__(self):
49        self.clnt = ln.client("elevator_provider")
50
51        self.elevator_call_svc = self.clnt.get_service_provider(
52            "elevator03.prompt", "elevator/request/elevator_call"
53        )
54        self.elevator_call_svc.set_handler(self.prompt)
55        self.elevator_call_svc.do_register("default group")
56
57        self.current_status = receive_current_sensor_data(timeout=-1)
58
As in the case of the service client, this code registers the message
provider process to LN by instantiating a
links_and_nodes.client() object. The parameter is as
before the suggested name for the client.
Then, it gets a service object reference, using
links_and_nodes.client.get_service_provider(), connecting
it to a service name and message definition. Here, “elevator03.prompt”
is the service name. It needs to be equal to the name used in the
client. The second parameter of this method is the name of the message
definition of the service call for the message definition named
elevator/request/elevator_call, which resides in
msg_defs/elevator/request/elevator_call. [4]
Calling set_handler() on the direct provider handle connects an
instance method with the service object reference, telling LN that the
method self.prompt (for ElevatorProvider.prompt()) will handle
the requests.
Finally, the do_register() method call makes the service provider
known to the LN manager and the clients in the system, so that it can be
found and called.
The parameter of the method default group assigns the
handler method to a so-called service group, which is
a group or set of handlers that are processed together
in one and the same thread (usually the main thread).
Now, we can turn to the method that actually implements the service handler as well as our control logic. We first show the skeleton that handles the request, omitting the logic part:
64    def prompt(self, conn, req, resp):
65
66        MAX_FLOOR = 50
67        MIN_FLOOR = -3
68
69        requested_floor = req.requested_floor
70
71        while True:
72
73            ## control logic is still missing here
74
75            # in case the elevator is moving, wait for it to stop
76            resp.arrived_floor = round(self.current_status.floor_number)
77            resp.error_code = 0
78            resp.error_message = None
79
80            conn.respond()
81            return 0
82
83
Focusing on the LN API elements used in the prompt() method, there
are three interesting parts linked to the method’s three arguments
conn, req and resp:
First, the argument req holds the request parameters as its data
members in a parameter buffer. Second, the argument resp has the
purpose to capture the return values in a response data buffer. And
thirdly, the request is responded and finished with calling
conn.respond(). This method is defined as
links_and_nodes.connection.respond(), and sends the data
back to the service client.
The still missing remaining parts of the method consists of error
handling and the logic of the elevator control. We will explain them
soon. But before, we need to complete a little bit of wiring to start
the controller program as a service provider. This is done
defining a run() method, as follows:
59    def run(self):
60        print("ready to receive service calls")
61        while True:
62            self.clnt.wait_and_handle_service_group_requests("default group", 0.5)
63
The run() method starts handling of the service, by calling the LN
client method
links_and_nodes.client.wait_and_handle_service_group_requests(). This
methods waits for a service call to arrive, then processes it by
calling the registered service handler, and then returns.
The while loop ensures that requests are served continuously.
The method has two parameters. The first is the name of the
service group for which handlers should be processed. We use
the same name for that group as we used in the do_register()
method call, "default group". The second parameter is a time-out
value which sets a maximum waiting time for any service call to that
group to arrive, before wait_and_handle_service_group_requests()
returns. Here, we could sequentially add several calls more to the
method with other group names. (It is also possible to run service
handlers from different groups so that they are executed in parallel,
which requires the code of the handlers to be thread-safe, and
is much more complex.)
Do not use multiple application threads to poll the same service group
with wait_and_handle_service_group_requests(). LN serializes such
calls internally as a safety measure, but the recommended design is
one dispatcher thread per service group. If handlers should execute in
parallel, use the service-group thread-pool API instead.
As a last element of the handler skeleton, we need to call the run() method from the main part of the program, like so:
if __name__ == "__main__":
    p = ElevatorProvider()
    p.run()
The prompt() method is where the program has to invoke the motor
control and use the sensor readings to actually get the elevator to
the requested place; We will fill that out in a minute. Before that,
we will have a look at how the service client can actually be used.
Having defined the outer structures, we can now fill the service client and handlers with application code.
5.5.4.2.3. Invoking The Service from the UI program
To use the service from the user interface, we need to do nothing more than to get the number of the requested floor, and send it with the service call method. For our first tests, we do not use a full-blown GUI but just read the floor number from the keyboard, using the input() function from the Python3 standard library [5].
Also, we need to catch any exceptions which may crop up. This is done by this code:
if __name__ == '__main__':
    service_client = ElevatorServiceClient()

    while True:
        floor_string = input("type the number of the floor you want to go to!")
        try:
            floor_number = int(floor_string)
        except ValueError:
            print("seems that was not a valid number")
            continue

        print("OK, sending request to go to floor", floor_number)
        result = service_client.prompt(floor_number)
        print("The result is: {}".format(result))
5.5.4.2.4. Implementing the Elevator Control Function
Now, there now only two main aspects missing: First, the implementation of the service call in controller.py needs to be filled out. Second, we need to get the error handling straight, especially the case of a fire alarm (we do not want the elevator to be used during in a fire, or even worse, carry unsuspecting people into a floor that is burning!). We will do this in two parts, first the implementation of the main handler function. The second part will show how to handle failures in Python, using exceptions, and how to communicate them to the service caller.
Here is a very simple implementation, which uses the functions
receive_current_sensor_data() and send_hw_command()
that we defined in section Receiving Sensor Messages
to provide the service.
First, we add an initialization to the constructor of the service provider class, which initializes the state correctly:
self.current_status = receive_current_sensor_data(timeout=-1)
In this case, we disable the time-out, because we want a correct value
to start with. We can do this by setting the time value to -1, as
here, or by passing the Boolean value False.
Here is the elevator control logic in the filled-out body of the
prompt() method:
 64    def prompt(self, conn, req, resp):
 65
 66        MAX_FLOOR = 50
 67        MIN_FLOOR = -3
 68
 69        fire_alarm_op = False
 70
 71        requested_floor = req.requested_floor
 72
 73        print("controller: request to go to floor {}".format(requested_floor))
 74        while True:
 75            # in case the elevator is moving, wait for it to stop
 76            while True:
 77                self.current_status = receive_current_sensor_data()
 78                if self.current_status.smoke_detected:
 79                    print(
 80                        "while moving, there was smoke detected, going to the ground floor"
 81                    )
 82                    if requested_floor != 0:
 83                        requested_floor = 0
 84                        fire_alarm_op = True
 85
 86                print(
 87                    "we are at level {}, going to floor {}".format(
 88                        self.current_status.floor_number, requested_floor
 89                    )
 90                )
 91                if self.current_status.movement_direction == MovementDirection.STOP:
 92                    break
 93
 94            # check whether we are already at the requested floor
 95            if self.current_status.floor_number == requested_floor:
 96                # ... and if so, return
 97                print(
 98                    "huzza, we have successfully arrived at floor {}!".format(
 99                        requested_floor
100                    )
101                )
102
103                resp.arrived_floor = round(self.current_status.floor_number)
104                resp.error_code = 0
105                resp.error_message = None
106                conn.respond()
107                return 0
108
109            # request motor to move
110            if self.current_status.floor_number < requested_floor:
111                command = MovementDirection.UP
112                cstr = "UP"
113            else:
114                command = MovementDirection.DOWN
115                cstr = "DOWN"
116            print("sending command to go {}".format(cstr))
117
118            send_hw_command(command)
119
120            # wait for command to kick in
121            while self.current_status.movement_direction == MovementDirection.STOP:
122                # wait for new command to kick in
123                self.current_status = receive_current_sensor_data()
124
125
Our “elevator algorithm” is very basic: If the elevator is still moving, we wait for it to stop. (This can happen if the controller process is re-started during movement). Then, the algorithm checks whether we are already at the target floor. In that case, it returns; otherwise, it sends a hardware command and waits that the hardware sensor messages that it is at the desired state.
The counterpart is the algorithm in the elevator simulator
elevator_simulation.py, which we already wrote. Because the system
is more responsive with it, we convert the received_commands()
function to use a time-out of one second if no new commands were
given.
38def receive_commands():
39    _actor_port.packet.move_command = MovementDirection.STOP
40    packet = _actor_port.read(1.0)
41    return _actor_port.packet.move_command
Note
If you have read the example for the control code carefully, you
might just have noted that in line 95 of the prompt()
method of the controller, and in lines 22, 27, and 31 of the elevator
simulation, we are comparing to floating point values which are
successively incremented by small values.
How can this work? Haven’t we learned that one must never compare for equality to floating point values? The answer is simple: IEEE-754 Floating point numbers can in fact represent some values precisely, and here we are incrementing and decrementing by 1/16, which is a power of two. And such values can be represented exactly in the binary mantissa of floating point values. (If you are interested to learn more about this, you should definitely read David Goldberg’s What Every Computer Scientist Should Know About Floating Point Arithmetic (March, 1991 Issue of Computing Surveys, Association for Computing Machinery)).
5.5.4.2.5. Error Handling using Exceptions
Now, we can fix the last missing element of the implementation, handling errors.
We need to do three things:
check whether the input is in a correct range
handle alarms from the smoke detector correctly, so that the elevator goes straight to the ground floor, and any people in it can leave
pass the information about the error to the elevator client
For the internal handling of these errors, we use exceptions, which are used to communicate any kind of failure or unexpected error within Python code. Here the adapted code for the controller process:
  1#!/usr/bin/env python3
  2import time
  3import collections
  4import links_and_nodes as ln
  5
  6from ElevatorConstants import (
  7    MovementDirection,
  8    ElevatorException,
  9    Elevator_Floor_too_small_Error,
 10    Elevator_Floor_too_large_Error,
 11    Elevator_Fire_Alarm_Exception,
 12)
 13
 14_clnt = ln.client("elevator controller")
 15_sensor_port = _clnt.subscribe("elevator03.sensors", "elevator/sensors/floor_count")
 16
 17# This defines a container class with class name 'ElevatorStatus'
 18# with conveniently named members.
 19# See https://docs.python.org/3/library/collections.html#namedtuple-factory\
 20#     -function-for-tuples-with-named-fields for details.
 21
 22ElevatorStatus = collections.namedtuple(
 23    "ElevatorStatus", ["floor_number", "movement_direction", "smoke_detected"]
 24)
 25
 26
 27def receive_current_sensor_data(timeout=0.1):
 28
 29    if not _sensor_port.read(timeout):
 30        print("warning: no sensor data received from hardware!")
 31
 32    return ElevatorStatus(
 33        _sensor_port.packet.floor_number,
 34        _sensor_port.packet.movement_direction,
 35        _sensor_port.packet.smoke_detected,
 36    )
 37
 38
 39_actor_port = _clnt.publish("elevator03.actors", "elevator/actors/motor_control")
 40
 41
 42def send_hw_command(move_command):
 43    _actor_port.packet.move_command = move_command
 44    _actor_port.write()
 45
 46
 47class ElevatorProvider(object):
 48    def __init__(self):
 49        self.clnt = ln.client("elevator_provider")
 50
 51        self.elevator_call_svc = self.clnt.get_service_provider(
 52            "elevator03.prompt", "elevator/request/elevator_call"
 53        )
 54        self.elevator_call_svc.set_handler(self.prompt)
 55        self.elevator_call_svc.do_register("default group")
 56
 57        self.current_status = receive_current_sensor_data(timeout=-1)
 58
 59    def run(self):
 60        print("ready to receive service calls")
 61        while True:
 62            self.clnt.wait_and_handle_service_group_requests("default group", 0.5)
 63
 64    def prompt(self, conn, req, resp):
 65
 66        MAX_FLOOR = 50
 67        MIN_FLOOR = -3
 68
 69        fire_alarm_op = False
 70
 71        requested_floor = req.requested_floor
 72
 73        try:
 74            if requested_floor < MIN_FLOOR:
 75                raise Elevator_Floor_too_small_Error()
 76
 77            if requested_floor > MAX_FLOOR:
 78                raise Elevator_Floor_too_large_Error()
 79
 80            print("controller: request to go to floor {}".format(requested_floor))
 81            while True:
 82                # in case the elevator is moving, wait for it to stop
 83                while True:
 84                    self.current_status = receive_current_sensor_data()
 85                    if self.current_status.smoke_detected:
 86                        print(
 87                            "while moving, there was smoke detected, going to the ground floor"
 88                        )
 89                        if requested_floor != 0:
 90                            requested_floor = 0
 91                            fire_alarm_op = True
 92
 93                    print(
 94                        "we are at level {}, going to floor {}".format(
 95                            self.current_status.floor_number, requested_floor
 96                        )
 97                    )
 98                    if self.current_status.movement_direction == MovementDirection.STOP:
 99                        break
100
101                # check whether we are already at the requested floor
102                if self.current_status.floor_number == requested_floor:
103                    # ... and if so, return
104                    if fire_alarm_op:
105                        raise Elevator_Fire_Alarm_Exception()
106
107                    print(
108                        "huzza, we have successfully arrived at floor {}!".format(
109                            requested_floor
110                        )
111                    )
112
113                    resp.arrived_floor = round(self.current_status.floor_number)
114                    resp.error_code = 0
115                    resp.error_message = None
116                    conn.respond()
117                    return 0
118
119                # request motor to move
120                if self.current_status.floor_number < requested_floor:
121                    command = MovementDirection.UP
122                    cstr = "UP"
123                else:
124                    command = MovementDirection.DOWN
125                    cstr = "DOWN"
126                print("sending command to go {}".format(cstr))
127
128                send_hw_command(command)
129
130                # wait for command to kick in
131                while self.current_status.movement_direction == MovementDirection.STOP:
132                    # wait for new command to kick in
133                    self.current_status = receive_current_sensor_data()
134
135        except ElevatorException as exc:
136            print("Error: {}".format(exc))
137            resp.arrived_floor = round(self.current_status.floor_number)
138            resp.error_code = exc.error_code
139            resp.error_message = str(exc)
140            conn.respond()
141            return 0
142
143
144if __name__ == "__main__":
145    p = ElevatorProvider()
146    p.run()
In lines 76 and 135, we wrap the service response function
into a try-except statement. For the case of an
out-of-range floor number, we check the range in
lines 66 to 76, and raise an ElevatorException if it
is wrong. The arguments to the exception are both
the corresponding error message, and the error code
defined in ElevatorConstants.py. In the
except clause of the try-except statement in line
135 to 140, we return the floor number, the error code
from the exception, and the error message. The latter
is the string representation of the exception object.
It contains also the error code - we will see soon why both
error code and message go to the message part of the response.
The remaining case happens when the field “smoke_detected” of the sensor data packet becomes true. In this case, the first part of the error response is handled within the controller process: The target floor is set to the ground floor with number zero, and the elevator is moved to it. When the ground floor is reached, another exception is raised. [6]
One last thing: The prompt() method has gotten
a bit long. To make it better to read, we refactor
it into two smaller methods, to get to our final code:
  1#!/usr/bin/env python3
  2import time
  3import collections
  4import links_and_nodes as ln
  5
  6from ElevatorConstants import (
  7    MovementDirection,
  8    ElevatorException,
  9    Elevator_Floor_too_small_Error,
 10    Elevator_Floor_too_large_Error,
 11    Elevator_Fire_Alarm_Exception,
 12)
 13
 14_clnt = ln.client("elevator controller")
 15_sensor_port = _clnt.subscribe("elevator03.sensors", "elevator/sensors/floor_count")
 16
 17# This defines a container class with class name 'ElevatorStatus'
 18# with conveniently named members.
 19# See https://docs.python.org/3/library/collections.html#namedtuple-factory\
 20#     -function-for-tuples-with-named-fields for details.
 21
 22ElevatorStatus = collections.namedtuple(
 23    "ElevatorStatus", ["floor_number", "movement_direction", "smoke_detected"]
 24)
 25
 26
 27def receive_current_sensor_data(timeout=0.1):
 28
 29    if not _sensor_port.read(timeout):
 30        print("warning: no sensor data received from hardware!")
 31
 32    return ElevatorStatus(
 33        _sensor_port.packet.floor_number,
 34        _sensor_port.packet.movement_direction,
 35        _sensor_port.packet.smoke_detected,
 36    )
 37
 38
 39_actor_port = _clnt.publish("elevator03.actors", "elevator/actors/motor_control")
 40
 41
 42def send_hw_command(move_command):
 43    _actor_port.packet.move_command = move_command
 44    _actor_port.write()
 45
 46
 47class ElevatorProvider(object):
 48    def __init__(self):
 49        self.clnt = ln.client("elevator_provider")
 50
 51        self.elevator_call_svc = self.clnt.get_service_provider(
 52            "elevator03.prompt", "elevator/request/elevator_call"
 53        )
 54        self.elevator_call_svc.set_handler(self.prompt)
 55        self.elevator_call_svc.do_register("default group")
 56
 57        self.current_status = receive_current_sensor_data(timeout=-1)
 58
 59    def run(self):
 60        print("ready to receive service calls")
 61        while True:
 62            self.clnt.wait_and_handle_service_group_requests("default group", 0.5)
 63
 64    def move_elevator(self, requested_floor):
 65        """Move elevator to the floor given by requested_floor, and return the
 66        number of the final floor.  If a fire is detected, first
 67        return to the ground floor, and then throw an exception of
 68        type Elevator_Fire_Alarm_Exception.
 69
 70        """
 71
 72        fire_alarm_op = False
 73
 74        while True:
 75            # in case the elevator is moving, wait for it to stop
 76            while True:
 77                self.current_status = receive_current_sensor_data()
 78                if self.current_status.smoke_detected:
 79                    print(
 80                        "while moving, there was smoke detected, going to the ground floor"
 81                    )
 82                    if requested_floor != 0:
 83                        requested_floor = 0
 84                        fire_alarm_op = True
 85
 86                print(
 87                    "we are at level {}, going to floor {}".format(
 88                        self.current_status.floor_number, requested_floor
 89                    )
 90                )
 91                if self.current_status.movement_direction == MovementDirection.STOP:
 92                    break
 93
 94            # check whether we are already at the requested floor
 95            if self.current_status.floor_number == requested_floor:
 96                # ... and if so, return
 97                if fire_alarm_op:
 98                    raise Elevator_Fire_Alarm_Exception()
 99
100                print(
101                    "huzza, we have successfully arrived at floor {}!".format(
102                        requested_floor
103                    )
104                )
105
106                return round(self.current_status.floor_number)
107
108            # request motor to move
109            if self.current_status.floor_number < requested_floor:
110                command = MovementDirection.UP
111                cstr = "UP"
112            else:
113                command = MovementDirection.DOWN
114                cstr = "DOWN"
115            print("sending command to go {}".format(cstr))
116
117            send_hw_command(command)
118
119            # wait for command to kick in
120            while self.current_status.movement_direction == MovementDirection.STOP:
121                # wait for new command to kick in
122                self.current_status = receive_current_sensor_data()
123
124    def prompt(self, conn, req, resp):
125
126        MAX_FLOOR = 50
127        MIN_FLOOR = -3
128
129        requested_floor = req.requested_floor
130
131        try:
132            if requested_floor < MIN_FLOOR:
133                raise Elevator_Floor_too_small_Error()
134
135            if requested_floor > MAX_FLOOR:
136                raise Elevator_Floor_too_large_Error()
137
138            print("controller: request to go to floor {}".format(requested_floor))
139
140            arrived_floor = self.move_elevator(requested_floor)
141
142            resp.arrived_floor = arrived_floor
143            resp.error_code = 0
144            resp.error_message = None
145            conn.respond()
146            return 0
147
148        except ElevatorException as exc:
149            print("Error: {}".format(exc))
150            resp.arrived_floor = round(self.current_status.floor_number)
151            resp.error_code = exc.error_code
152            resp.error_message = str(exc)
153            conn.respond()
154            return 0
155
156
157if __name__ == "__main__":
158    p = ElevatorProvider()
159    p.run()
5.5.4.2.6. Error Handling across Service Messages
Here is what happens when the error_message
field in the response data has a non-zero length:
The value of the field error_message_len is
set to the length of the string. When a message
with this special field arrives at a LN service
client in Python, another Exception is thrown, of
type Exception.
Here we show how it is handled in the ui.py client:
 1from ElevatorConstants import (
 2    ElevatorErrorStatus,
 3    ElevatorException,
 4    Elevator_Floor_too_small_Error,
 5    Elevator_Floor_too_large_Error,
 6    Elevator_Fire_Alarm_Exception,
 7)
 8
 9
10class ElevatorServiceClient:
11    def __init__(self):
12        self.clnt = ln.client("elevator_service_client")
13
14        self.elevator_call_svc = self.clnt.get_service(
15            "elevator03.prompt", "elevator/request/elevator_call"
16        )
17
18    def prompt(self, floor_number):
19        svc = self.elevator_call_svc
20        svc.req.requested_floor = floor_number
21        svc.call()
22        if len(svc.resp.error_message) or bool(svc.resp.error_code):
23            raise Exception(svc.resp.error_message)
24        return {
25            "error_code": svc.resp.error_code,
26            "arrived_floor": svc.resp.arrived_floor,
27        }
28
29
30if __name__ == "__main__":
31    elevator_client = ElevatorServiceClient()
32
33    while True:
34        floor_string = input("type the number of the floor you want to go to! > ")
35        try:
36            floor_number = int(floor_string)
37        except ValueError:
38            print("seems that was not a valid number")
39            continue
40
41        print("OK, sending request to go to floor {}".format(floor_number))
42
43        try:
44            result = elevator_client.prompt(floor_number)
45
46        except Exception as exc:
47            # needed for LN up to version 2.0.x:
48            # parse str(exception) to get error code and message
49            # (will also work with C++ service providers)
50            msg_parts = str(exc).split(":")
51            message = msg_parts[1].strip()
52            try:
53                error_code = int(msg_parts[0].strip().split()[1])
54            except TypeError:
55                error_code = -1
56
57            print(
58                """Info: An error occurred: message = "{}", error_code = {}""".format(
59                    message, error_code
60                )
61            )
62
63            if error_code == ElevatorErrorStatus.FLOOR_NUMBER_TOO_HIGH:
64                print("floor number out of range, try a smaller number!")
65
66            elif error_code == ElevatorErrorStatus.FLOOR_NUMBER_TOO_LOW:
67                print("floor number out of range, try a larger number!")
68
69            elif error_code == ElevatorErrorStatus.FIRE_ALARM_OPERATION_STOPPED:
70                print("fire detected, please take the stairs to leave the building")
71                exit(-1)
72
73            else:
74                raise
75
76        else:
77            # print resulting dictionary
78            if result["error_code"] == 0:
79                print("The resulting floor is: {arrived_floor}".format(**result))
80            else:
81                print(
82                    "The resulting floor is: {arrived_floor} with "
83                    "error code {error_code}".format(**result)
84                )
What happens here is as follows:
If the Python service client receives a result message where the field
“error_message” is not empty, it generates an exception of type
“Exception”, with the error message being the exception argument.
This exception is caught in line 35, where the name exc becomes
bound to the exception object. [8]
Because we constructed the error message from the str()
representation of the initial exception, the message contains a tuple
which consists of the two arguments of the Exception.__init__()
constructor: The initial error message, and the error code. The
function ast.literal_eval() from the Python ast module
[7] parses this string in line 36, returning its
components again into the variables message and error_code.
Using these two, we can handle errors programmatically. [9]
If we forgot to handle an error (or somebody adds another error code to the service, which is so far not handled by the current client code), the initial exception is thrown again in line 54, so that we will not overlook it.
See also
It is also possible to use the “wrapped” Python API to handle error responses in a concise way, see Configuring the Response for Error Returns for details. Essentially, this adds an automatically generated wrapper function, that checks the return values and raises exceptions if some configured fields indicate an error.
Footnotes
5.5.4.2.7. Running the Example
You can run the example with:
cd documentation/examples/tutorial/example_pythonelevator
ln_manager -c elevator.lnc
In the case that you need to set your environment with conan, you can use:
cd documentation/examples/tutorial/example_pythonelevator
conan install ./conanfile.txt
source activate*sh
ln_manager -c elevator.lnc
Here, you should replace e.g.
links_and_nodes_manager/[~2]@common/stable by the current LN
version, which is links_and_nodes_manager/[~2.6]@common/stable.
5.5.5. Using the LN Manager GUI to control the Elevator Example
5.5.5.1. Starting all Processes
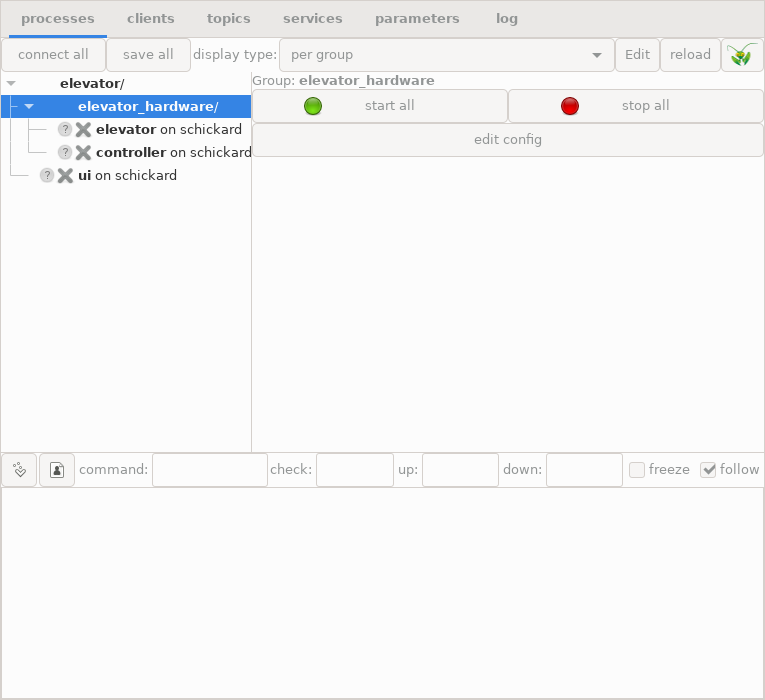
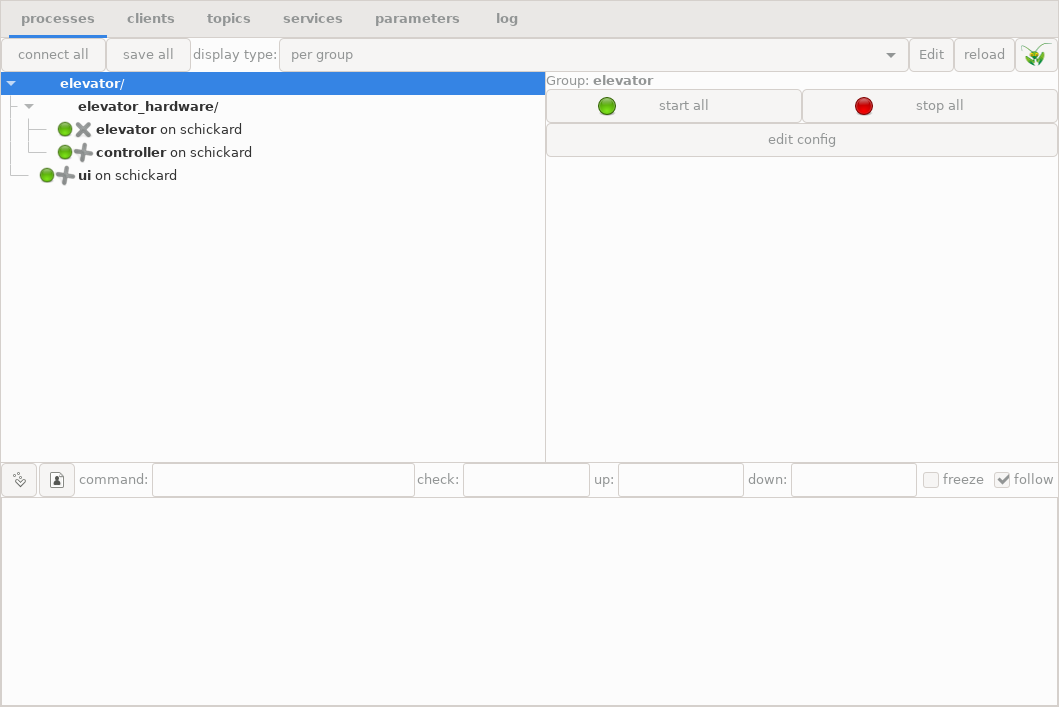
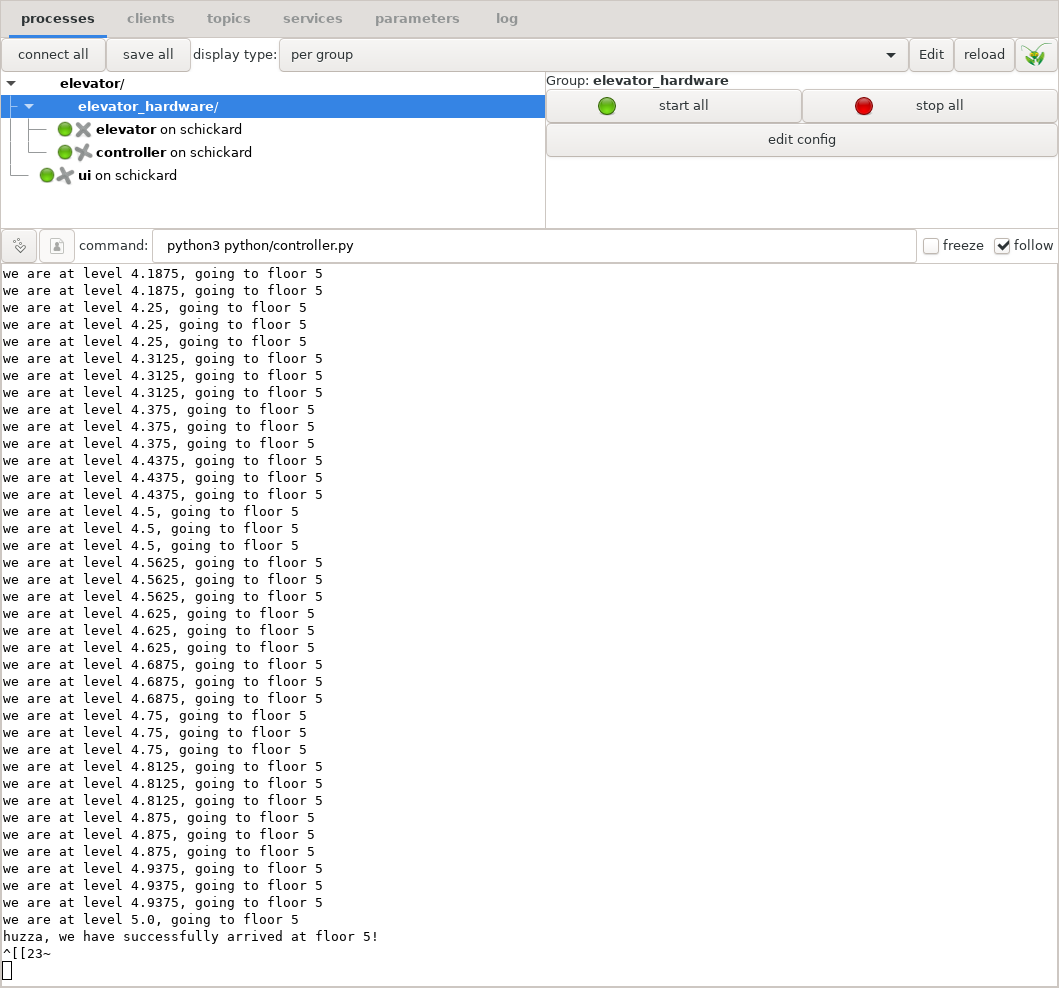
When you have started the LNM GUI as instructed in the last paragraph, you can start the whole system by clicking at the “elevator” process group and pressing the button “start all” in the process control panel at the upper right half:
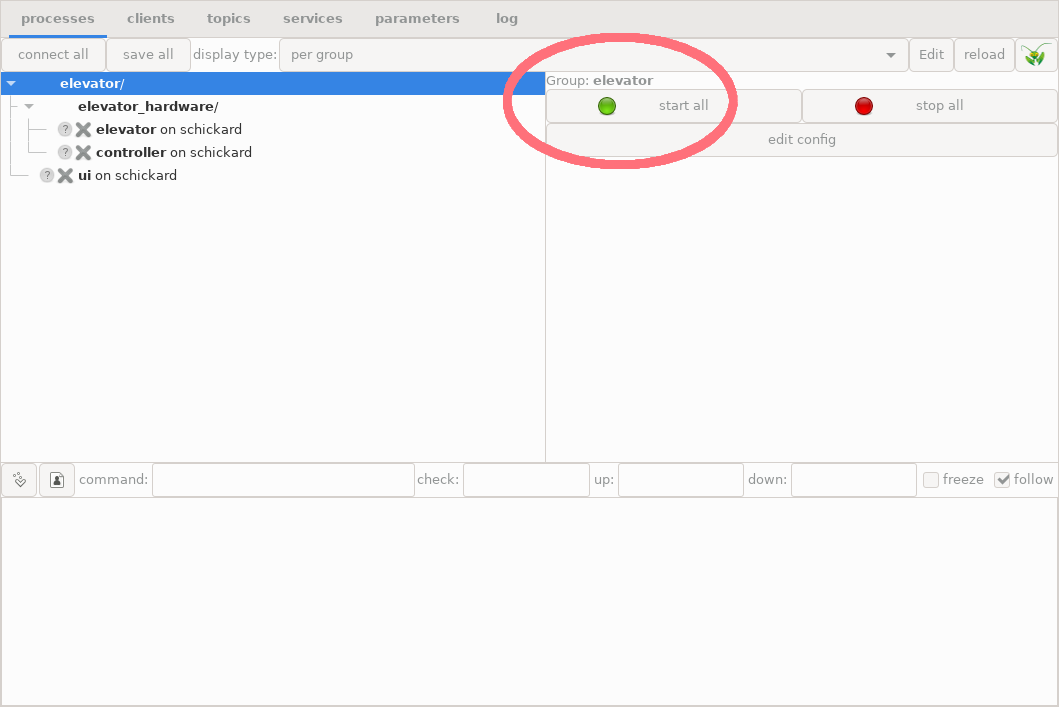
Process group with all three example processes and the green “start all” LED button in the top right panel.
Do you remember our first unsuccessful attempt? It failed because the processes to start did not exit yet. This time, if you press the “start all” button, all processes turn to green:
Elevator example after all processes have been successfully started
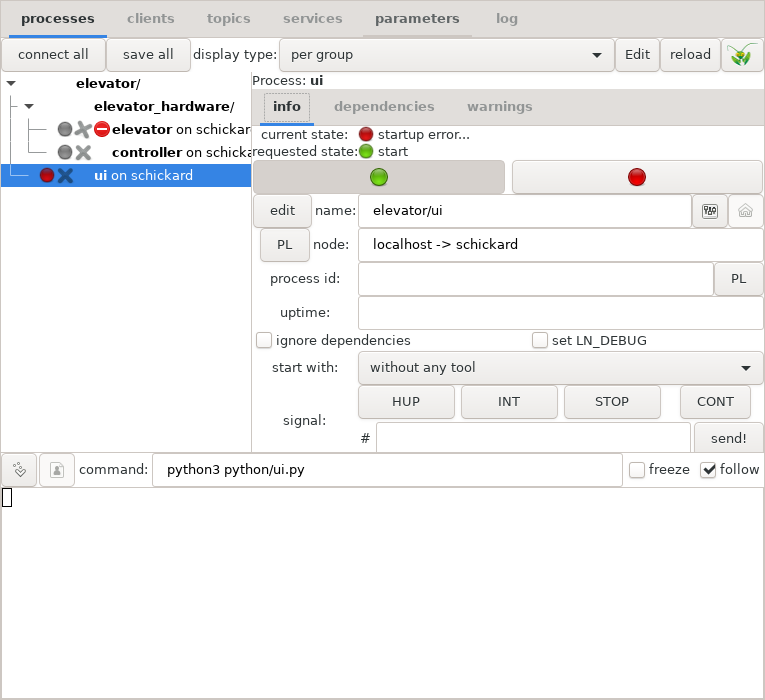
5.5.5.2. Inspecting the processes
We can click the “ui” process, and look at its terminal output:
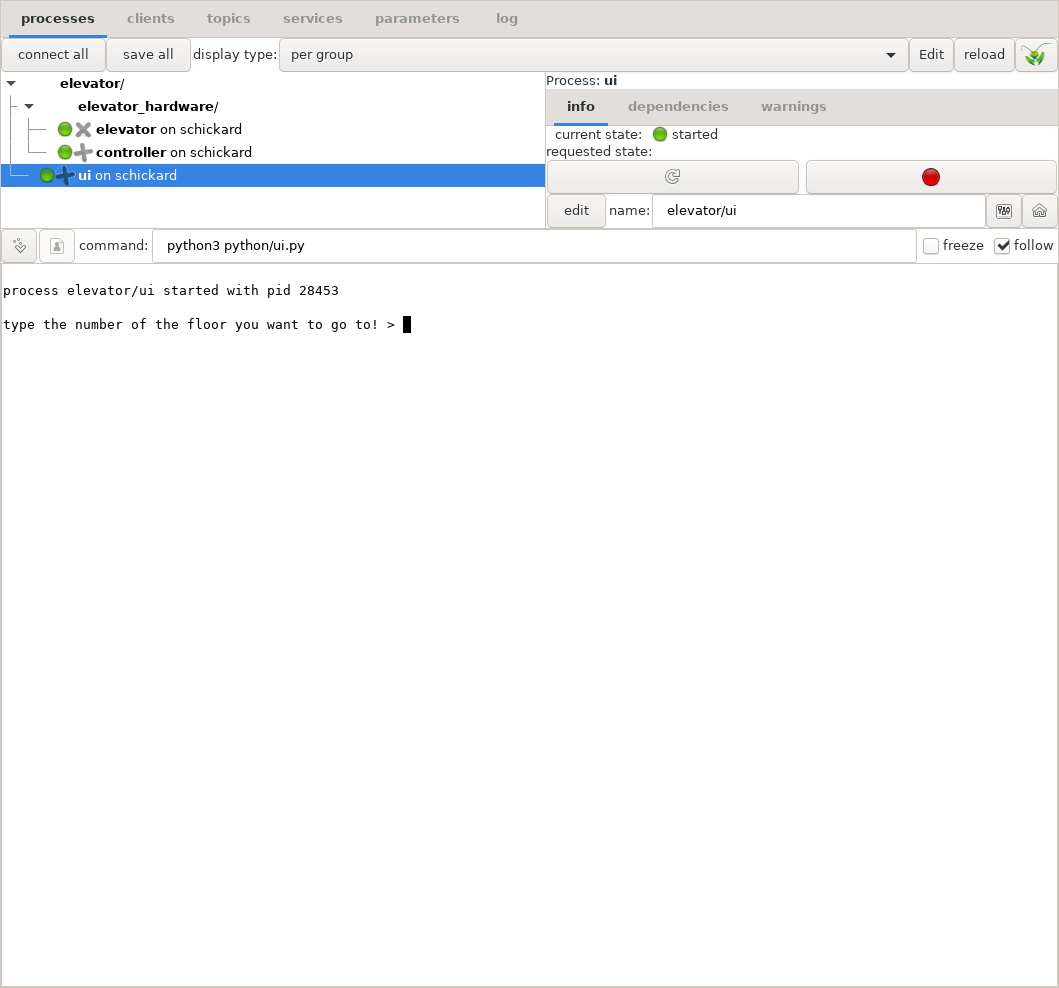
The console user interface of the elevator
Because the output window in the bottom half is a fully functional terminal, we can just click the pane, type in a number as an elevator request, and hit “Enter”. Here is what happens then:
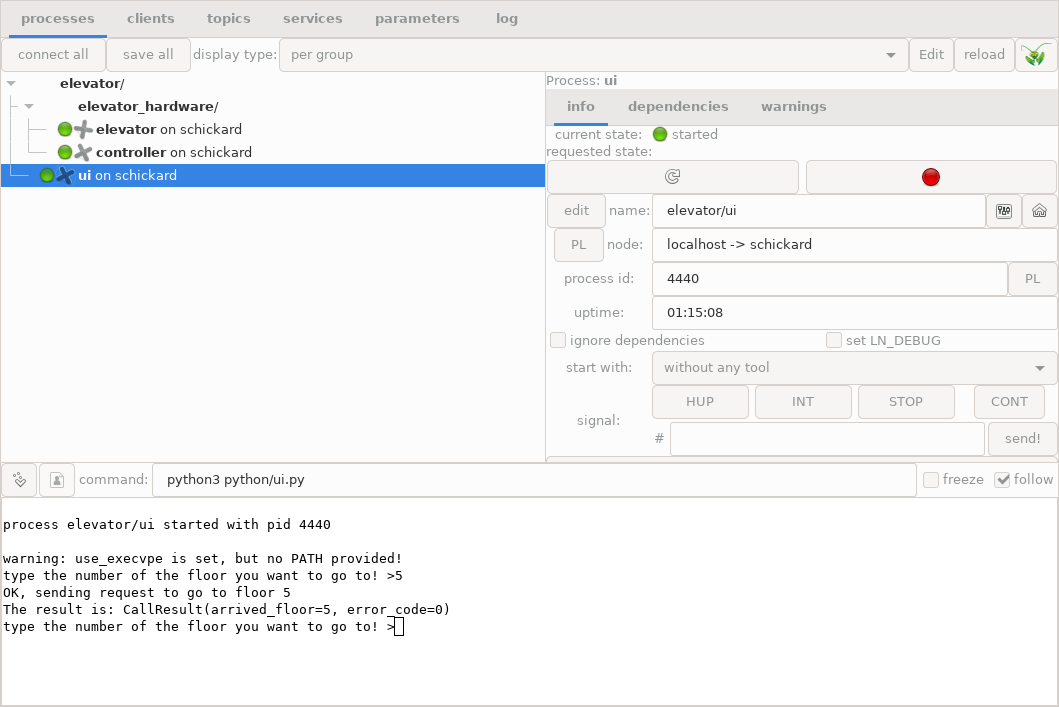
Result of elevator request in the command line interface
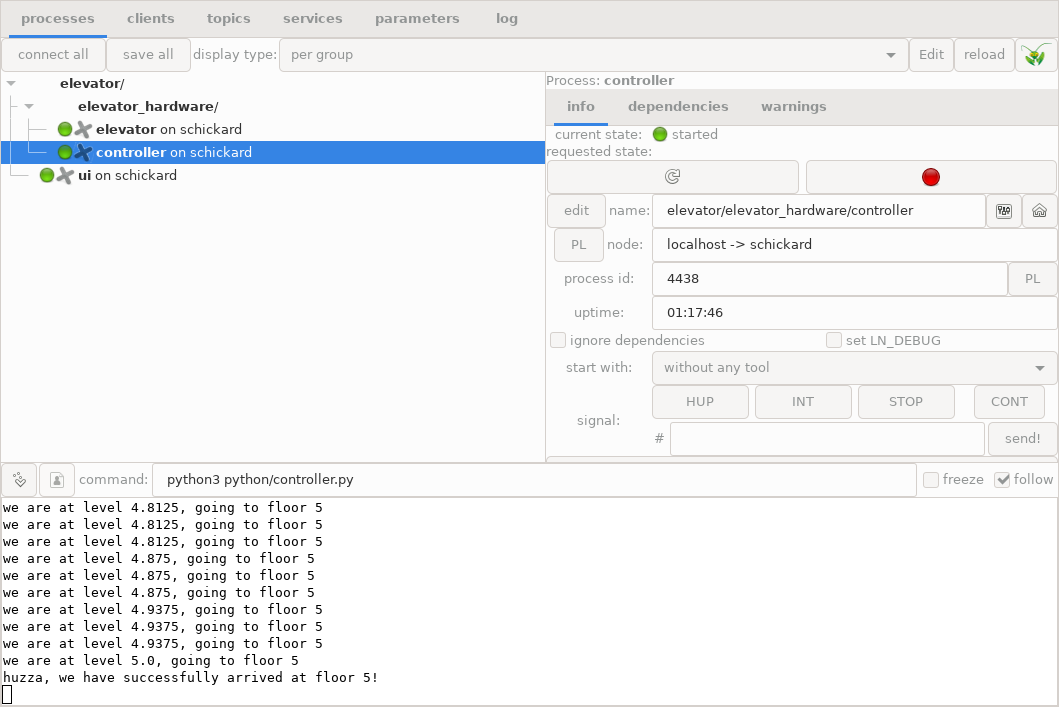
If we click the controller process, the terminal output is this:
Terminal output of the controller process in the bottom pane
We might want to see more of the terminal output. In order to do that, we need to make the bottom pane a bit higher. We can do that by placing the mouse on the upper border of that pane, grabbing it and moving it upwards, like this:
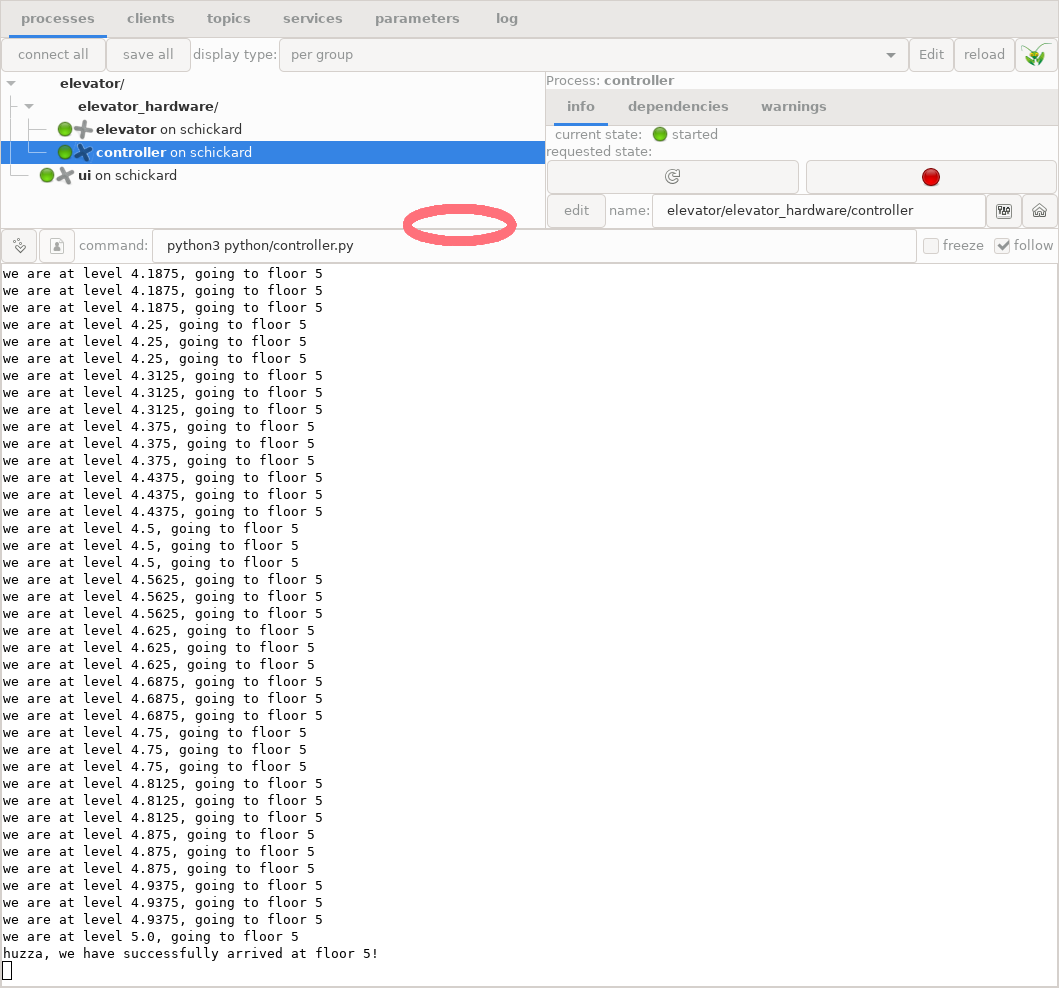
Enlarged terminal output of the controller process; the red circle shows where to grab the border
If we click the “elevator” process label on the upper left pane, we can see the elevator output:
Output of the simulator
5.5.5.3. Inspecting Topics communication
If we click on the “topics” tab, we can inspect topics communication:
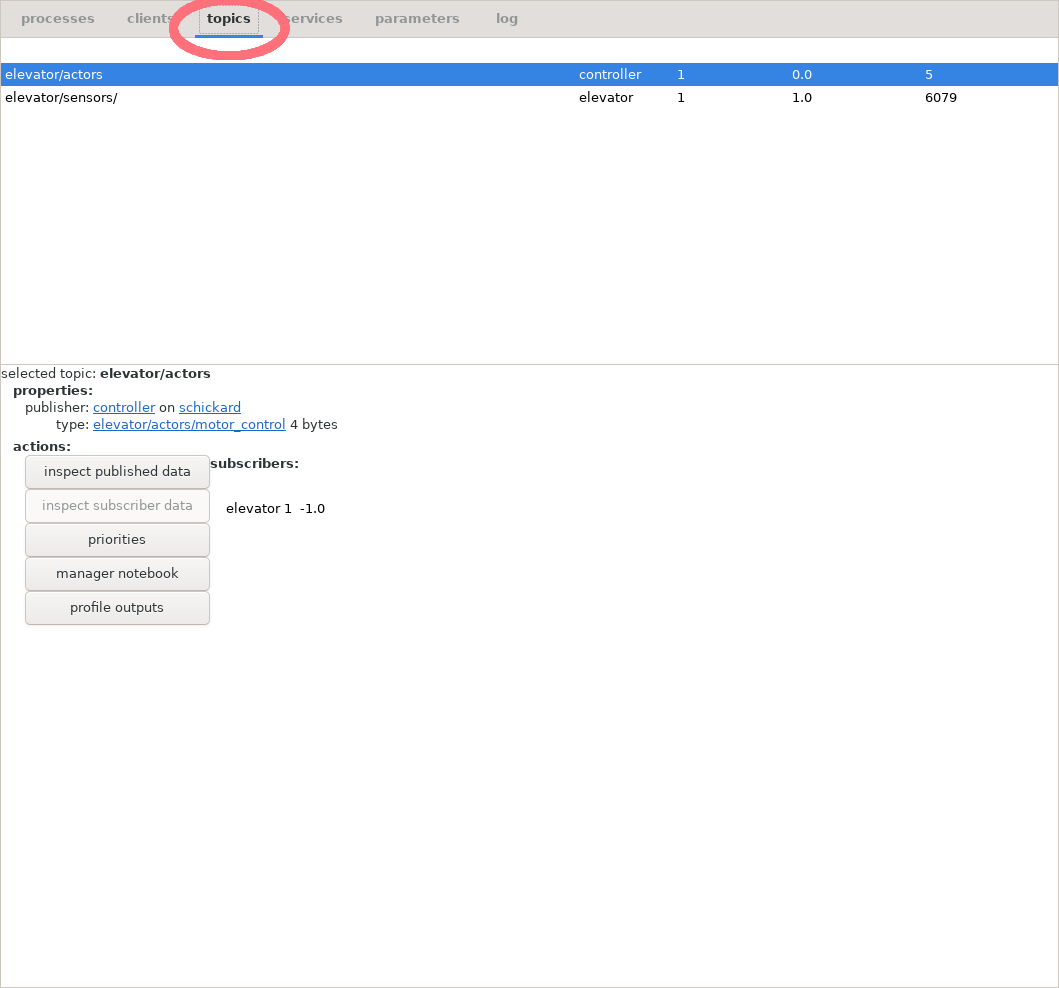
Topics tab and UI elements
Now, we can click for example the “elevator03.sensors” topic, and then the button “inspect published data”:
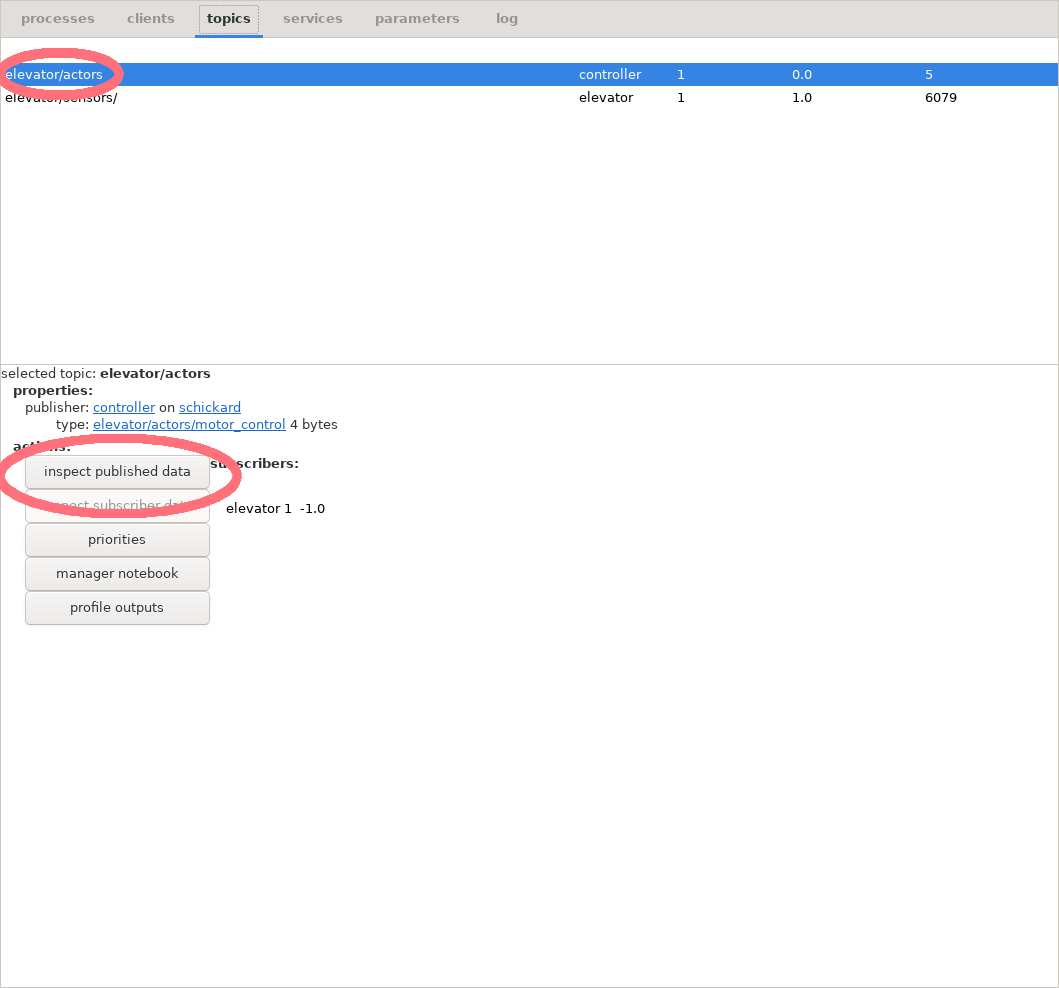
Button and label for inspecting sensors
We get this output box:
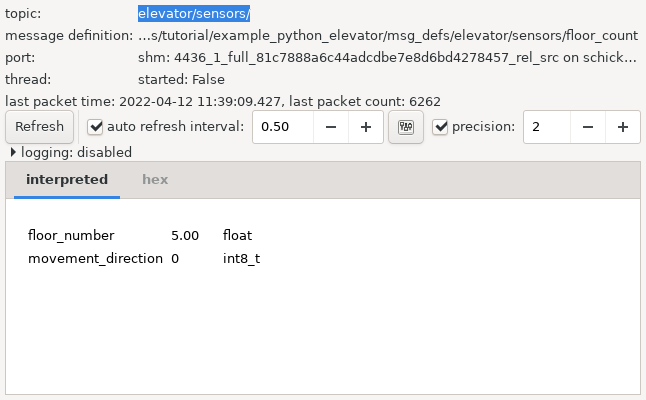
Sensor data from the elevator
5.5.5.4. Inspecting Service Calls
We can also run service and inspect calls from the LN Manager.
If we click the “services” tab, and then double-click the label “request_elevator”, we get a new iPython window which looks like this:
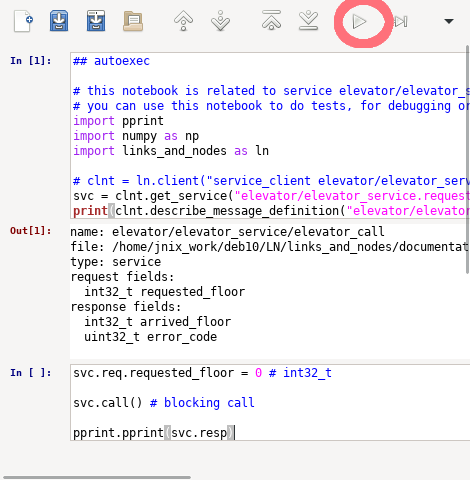
Inspecting the call_elevator service interactively.
We can, type interactive Python code into the “In” panel. For example:
svc.req.requested_floor = 3
svc.call()
pprint.pprint(svc.resp)
After we press the triangular run button (symbol ‘▷’) which is marked with the red circle, this will request the elevator and print the response. In the other terminal windows, we can watch closely how our system operates.
The latter is also explained in more detail in chapter Components and their Usage in section Inspecting services.
5.5.5.5. Reloading the LN Manager Configuration
As described in section Reloading the Configuration in the LN manager tutorial, we can also stop a running process, change its configuration (for example, by changing the command to a modified script), and re-start the process, without exiting the LN manager or restarting the whole system. This allows it to easily test and debug LN client programs.
5.5.6. Detailed Summary on the Python Client API which we have used
This section takes up again the topic started in section Using the Communication Functions in the Client API: A First Overview near the start of this chapter, and tries to condense and sort some of the heap of information that it gave.
While that section had the purpose of a bird’s eye view on the Python API, here we will try to give you a kind of a road map to navigate it.
It will summarize the API functions which we have used, and how they fit together. At the same time, it will not try to bury you alive with all the details on these functions and how to use them. Giving you all the details is in fact the stated purpose of the Client API Reference part. You are invited to peruse this reference later, to become more familiar with the system.
(The second purpose of this chapter, explanation of concepts, is continued in the Introduction on using the Client APIs part of the user guide, which will also give more details on specific topics.).
5.5.6.1. Client Processes
Client processes are programs which use functions the LN API for inter-process communication.
When they are started, they need to contact the LN manager to register. For this, they need to know the host name and port number of the LN manager. Both can be passed either via an environment variable, or via command-line arguments (Python´s sys.argv), which are passed to the LN API functions to evaluate the relevant options. Setting the right environment variable values is done automatically when the client is started by the LN manager.
This happens when the client process is configured in the LN manager configuration file to be managed by the LNM. In section Division into processes and modules, we explained how to do that. In this case, you do not need to worry about how they contact the LN manager.
(The specifics of connection to the LN manager, the LN daemon, and the LN arbiter are in detail complex, but we will not dig into that here - it is described in the Concepts chapter in case you need it).
5.5.6.2. The Python Module
The name of the Python module which contains the client API is
links_and_nodes. It is available for both Python 2 and Python 3.
It is strongly recommended to import it always like this:
import links_and_nodes as ln
Important
If importing the module fails, this is almost always causes by either a faulty installation, or by a bug in the environment setup. See section Getting Started and Fixing Common Problems for how to diagnose and correct these.
See also
Using the links_and_nodes Module: Public API in the reference.
5.5.6.3. LN Client Instance
links_and_nodes.client objects are needed for any use of the LN communication,
be it with topics, services, or parameters.
5.5.6.3.1. Constructor
Client objects are created with the client
constructor, like this:
clnt = ln.client("elevator, floor count sensor")
The argument is the name of the client with with it is preferably registered by the LN Manager.[#note-client-registration-name]_
It is also possible to pass the program’s command line arguments to set options to the client:
clnt = ln.client("elevator_service_client", sys.argv)
You only need one LN client object in a program (but you are allowed to use more).
See also
client Constructor in the reference.
5.5.6.4. Message Definitions
Message definitions are needed to initialize any objects that provide communication services (for example, publish/subscribe or remote procedure calls). Therefore, we want to quickly recapitulate what you need to know to start using them here:
They are small pieces of text which define data types and element names of message elements, very much like a struct in C, or a dictionary or namedtuple in Python. They are independent of the programming language in which a program is implemented.
Message definitions do have names which are ASCII-encode strings which serve to identify them. They form part of a system’s API and should not be changed after they have been published to other users.
See also
Message definitions in the tutorial.
5.5.6.4.1. Publish/Subscribe Definitions
As we have seen above, message definitions for publish/subscribe communication are simply a list of elements, one for each line, with the element type first, and the element name second.
See also
Message definition for hardware actors in the tutorial.
5.5.6.4.2. Service Message Definitions
Service message definitions have a slightly more complex syntax. They start with the line “service”, followed by the line “request” and the request parameters, and finally the line “response” and the response parameters.
Request and response parameters work very much like function arguments and return values in a function call. If more than parameter is returned, it is passed as a Python dictionary.
See also
Message definition for UI service requests in the Python tutorial.
5.5.6.5. Port Objects
Port objects are generated by member functions of a LN client object.
When creating them, we need to distinguish between subscriber ports
and publisher ports.
5.5.6.5.1. Subscriber Ports
Subscriber ports are created using the client.subscribe()
method, like here:
actor_port = actor_clnt.subscribe("elevator03.actors", "elevator/actors/motor_control")
Here, the first parameter is called the “topic” of the message, which is a string identifier for the meaning and context of the message, and the second string parameter is the name of the message definition which must be retrievable by the LN Manager somewhere along its configured search path.
5.5.6.5.2. Publisher Ports
Publisher ports are created using client.publish().
An example for a publisher port is this:
sensor_port = sensor_clnt.publish("elevator03.sensors", "elevator/sensors/floor_count")
The parameters are the same as when creating a subscriber port: The first string is a topic name, and the second string is the message definition which the port will use to send messages. The only difference between the two types of ports are the methods which they provide in order to communicate (which we will describe soon).
See also
Port Objects in the reference.
5.5.6.6. Parameter Blocks
Python clients can also provide LN parameter blocks. A provider creates a
block with client.parameter_block(), adds all scalar, vector, or matrix
signals during setup, and then calls update() once in each provider loop
iteration. Parameter users can query the block, set overrides, and clear
overrides through the manager UI or the existing Python parameter client API.
The full provider example, including callbacks, NumPy arrays, attribute access
such as paramsA.sig1.input and paramsA.sig1.output, and threading notes
is in Parameters.
See also
links_and_nodes.client.parameter_block() in the reference.
5.5.6.7. Port Members
Any port (both subscriber and publisher ports) have a single
data member, which is the port.packet member.
5.5.6.7.1. port.packet
The port.packet member has itself one or more members which
correspond with name and type to each element of the message
definition with which the port has been initialized. (There is some
type translation going on, but roughly one can say that the types
correspond to each other).
These members can be assigned to and read from, using simple assignments statements with “=”, such as:
port.packet.floor_count = 1
See also
port.packet in the reference.
5.5.6.8. Port Methods
Ports have specific methods, depending on whether they are an input
port or an output port: Publisher ports (also called output ports)
have a port.write() method, and subscriber ports (also called
“input ports” ) have a port.read() method.
5.5.6.8.1. port.write()
The port.write() method transfers the data in the
port.packet member to the LN messaging system. It always
returns immediately.
If there is any data in the message buffer which has not been read, it is overwritten.
The port.write() method has an optional second parameter
which is a timestamp value, a floating point number that
can be used to identify the message if similar messages
have been sent before.
See also
outport Methods in the reference.
5.5.6.8.2. port.read()
The port.read() method reads the data for all elements of
the port.packet data members from the LN communication
buffer. The method has an optional timeout parameter,
which can be either a Boolean or floating-point number.
If data was already sent, the method returns without blocking and atomically. In this case, the data is always transferred completely, and copied into the receiving buffer. Otherwise, the buffer is untouched.
After such a successful transfer, the method always returns a value
evaluating to True. More specifically, it returns the packet that
was read (the port.packet member), which evaluates to Boolean
True.
If no data is there, then one of three things happen, strictly
depending on the type and value of the optional
blocking_or_timeout parameter of the function:
By default, if the method has no parameter, then the call is blocking. This means that it waits for data an unlimited amount of time. When data arrives, it returns with the new data in the request member variable.
If the parameter has the Boolean type and is set to
True, the call is blocking as well, and the method waits an unlimited time for data, just as in the case of no parameter.If the type of the parameter is Boolean and set to
False, then read is non-blocking. This means that if there is data, the call returns immediately, and with a return value evaluating toTrue(returning the packet that was read). Otherwise, the call returns also immediately with aNonevalue (equivalent to a Boolean value ofFalse), which means that no new data was read.If the type of the parameter is a positive floating point number, the
read()methods uses a time-out: It waits for that number of seconds for data to arrive. If that happens, it transfers the data and returns the data packet (equivalent to BooleanTrue). Otherwise, when the waiting time expires, it returns with a return value ofNone.In case of a zero or negative floating point number, the call is also non-blocking, as if a Boolean
Falsewas passed.
See also
inport methods in the reference.
5.5.6.9. Service Providers and Service Clients
For using LN services, the Python links_and_nodes module provides a “direct API” which essentially first retrieves a handle to that service, then registers the service name and the used message definition, and in the case of the service provider also registers a handler function, which is called with specific arguments when a service request arrives.
5.5.6.9.1. Service Provider
5.5.6.9.1.1. Setup
As we have seen in the code example for the service provider, the provider to initialize an LN client instance, using the class:`client() constructor, which we already did describe above.
Then, the provider needs to get a service provider handle by calling
links_and_nodes.client.get_service_provider().
The parameters of this call are the service name and the name
of the used message definition.
After this, the provider needs to set a handler function, using the
set_handler() method on the direct provider handle. Its argument is a
Python method which will handle the service request.
Finally, it has to call do_register() on the direct provider handle
to register the service with the LN manager. The argument to the method
is the name of a service group.
5.5.6.9.1.2. Service Handling
The handling of the service is done by the method which
was passed with the set_handler call. This method
has three call paremeters, conn, req, and resp.
The first is a connection object, the second
is an instance with the request paremeters, and the
third is an instance which will take the
response parameters. The request is responded
and finished by calling links_and_nodes.connection.respond().
Finally, the defined provider instance needs to be run. In our example,
this happened by defining a new method run() which repeatedly calls
the client method
links_and_nodes.client.wait_and_handle_service_group_requests(),
and calling run() with an instance of our new class after program
start-up, like so:
class ElevatorProvider(ln.service_provider):

    # [ ... ]

    def run(self):
        timeout = 0.5
        while True:
            self.clnt.wait_and_handle_service_group_requests(
                "default group", timeout
            )

    # [ ... ]

if __name__ == "__main__":
    p = ElevatorProvider()
    p.run()
See also
Service Client Wrapper Class in the reference.
links_and_nodes.connection.respond()in the Python APIlinks_and_nodes.client.wait_and_handle_service_group_requests()in the Python APIClasses for instantiating Services in the reference.
5.5.6.10. Service Clients: Wrapper Class and Service Objects
For the client, as we have seen in our service client example, the approach is similar.
After instantiationg a links_and_nodes.client object,
the client needs to call the method links_and_nodes.client.get_service()
in order to get a service client handle. This method has the
service name and the message definition name as parameters.
Calling the service happens in three steps:
First, the request parameters are assigned to the member req of the service client handle.
Second, the
call()method of the service client handle is invoked.Third, the response parameters can be read from the
respfield of the client handle.
A minimal example code looks like this:
svc.req.requested_floor = 3
svc.call()
pprint.pprint(svc.resp)
See also
links_and_nodes.client.get_service()in the Python APIlinks_and_nodes.service.call()in the Python API
See also
Using the direct API for calling LN Services in Python for using the direct API in the user guide. Client Objects in the reference.