5.6. C++ Tutorial
This tutorial shows how to implement processes which use the LN clientn API for C++. It assumes that you have just read the last but one chapter on Designing a Modularized System by an Example, because we will continue the elevator example given there, sticking closely to it, and for brevity we will not repeat any explanation given there.
Conversely, the present chapter repeats any important information from Python Tutorial, so you do not need to read it to program clients in C++. The library bindings are in fact very similar for both Python and C++, because both are object-oriented languages.
As a difference to the Python tutorial, we will put slightly more emphasis on using code patterns that achieve a good performance and are suitable to yield low latencies, because this is one of the main reasons to use C/C++. For similar reasons, we will also need to have a quick look on multi-threading and object life times.
Finally, in our concrete example, we will be careful that we implement exactly the same interface as in the Python example, so that it is possible to actually swap out processes written in Python and C++ with each other. In the last part, we will show that both implementations are in fact fully interoperable. Using this capability could be very helpful if you are drafting a complex system in Python and need to translate performance-critical parts of it to C++.
5.6.1. Setting up the Programming Environment for C++
Before we start to write code, we need to set the environment for
compiling and running LN client programs written in C++. If you did a
standard local install via SCons, the LN libraries and header were
probably installed with /usr/local as installation prefix.
In this case, you need to make sure that the C++ compiler finds both
headers and libraries, by setting the environment variables
CPPFLAGS, CXXFLAGS and LDFLAGS to point
to the right folders. Standard Makefile default definitions do this.
Here, you should, if necessary, replace
“links_and_nodes_manager/[~2]@common/stable” by the current LN
version, which is links_and_nodes_manager/[~2.6]@common/stable.
Please see the chapter Getting Started if you need more information on how to set up and check your environment.
5.6.2. Writing the LN Manager Configuration
Following our example from Designing a Modularized System by an Example, we can now write the main LN manager configuration piece by piece. We start with copying from the example given in Grouping Processes, in the tutorial introduction on process management:
 1instance
 2name: starting_hierarchical _processes for %(env USER)@%(hostname)
 3manager: :%(get_port_from_string "%(instance_name)")
 4enable_auto_groups: true
 5
 6push_name_prefix: monitoring
 7
 8push_name_prefix: time
 9
10process watch date
11command: /usr/bin/watch /bin/date
12node: localhost
13
14process watch uptime
15command: /usr/bin/watch uptime
16node: localhost
17depends_on: watch date
18
19pop_name_prefix
20
21process top
22command: /usr/bin/top
23node: localhost
24depends_on: time/watch date, time/watch uptime
Looking at the partition of our example into three modules, as shown by the figure in section Division into processes and modules, it comes handy that we already have three processes.
In order to get the configuration working, in a first step, we need to rename these and change the called commands so that they match our system written in C++.
In the LNM config file, we will put a dot-slash in front of the
executable names name so that they are found, because they are in the
folder with the config file. Also, among some other things, we need
to adjust the working directory of the process (CWD) to the
directory of the config file. To do that, we use the
change_directory directive with the %(CURDIR) variable. This
variable always refers to the directory of the currently processed
config file [6]:
 1instance
 2name: elevator simulation (C++) for %(env USER)@%(hostname)
 3manager: :%(get_port_from_string "%(instance_name)")
 4enable_auto_groups: true
 5
 6push_name_prefix: elevator
 7
 8push_name_prefix: elevator_hardware
 9
10process elevator
11change_directory: %(CURDIR)
12command: ./elevator_simulation
13node: localhost
14
15process controller
16change_directory: %(CURDIR)
17command: ./controller
18node: localhost
19depends_on: elevator
20
21pop_name_prefix
22
23process ui
24change_directory: %(CURDIR)
25command: ./ui
26node: localhost
27depends_on: elevator_hardware/controller
Here, we placed both the hardware and sensor control into the process group elevator_hardware, and let the UI depend on the elevator_hardware/control process, which in turn depends on the elevator_hardware/elevator process. That process is implemented by the elevator_simulation C++ program.
Among communicating processes, which process should depend on another?
In respect to the depends_on directive, you might wonder which is
the right order of dependencies in such cases, when one process is a
service client and another is a service provider?
The general rule is: Low-level processes like hardware controllers which provide a service or data should be started before higher-level ones, and service providers should be started before clients of that service. This is especially important for the case of services, because calling a service that is not started will cause an error. (Also, service calls are blocking by default, and mutual calls could cause a deadlock. See [15] for details and on how to fix that).
And of course, we do not want to have circular dependencies, so the dependency graph should be, in computer-science lingo, a so-called directed acyclic graph, or DAG.
In practical terms, this means:
The elevator simulation is the lowest-level process, so it should be started first and depend on no other process. (If we had real actors controlled by firmware, and sensors, we would start both of them independently from each other, as the bottom level of the system.)
The controller depends on the simulation, and should be started after it.
The UI depends on the controller as its service provider, and is started last.
In order to synchronize hardware simulation, controller and UI, we use
the “ready-regexp” directive introduced in section
By Terminal Output: ready-regex, which
causes the LN manager to wait until a process that it started prints a
certain string. For example, the elevator_simulation process will
print “elevator hardware running”, and with this directive in line 7,
the LN manager will wait until it has reached this point:
10process elevator
11pass_environment: PATH, LD_LIBRARY_PATH
12add flags: use_execvpe
13change_directory: %(CURDIR)
14command: ./elevator_simulation
15node: localhost
16ready_regex: elevator hardware running
If you focus for a moment on the implementation of the hardware part, and the communication within it, there is a difference between the real elevator and the simulated elevator: In a real elevator, sensors and actors are independent, the former just deliver information, and the latter just perform actions. In a simulation however, the actions should move and adjust the simulated sensor readings. This is why we place them into a single process.
Tip
As an aside, when we want later to test and compare with Python
scripts, we need to use the PATH variable to search for the Python
interpreter. This can be done by adding the use_execvpe flag,
which tells the LN manager to use the execvpe sys call, which
observes the PATH variable when starting a
program. Otherwise, the Python interpreter would not be found. For
our C++ programs alone, this is not needed, so we will add them
when we test with Python modules.
With this, our config file looks like this:
 1instance
 2name: elevator simulation (C++) for %(env USER)@%(hostname)
 3manager: :%(get_port_from_string "%(instance_name)")
 4enable_auto_groups: true
 5
 6push_name_prefix: elevator
 7
 8push_name_prefix: elevator_hardware
 9
10
11process elevator
12pass_environment: PATH, LD_LIBRARY_PATH
13add flags: use_execvpe
14change_directory: %(CURDIR)
15command: ./elevator_simulation
16node: localhost
17ready_regex: elevator hardware running
18
19process controller
20pass_environment: PATH, LD_LIBRARY_PATH
21add flags: use_execvpe
22change_directory: %(CURDIR)
23command: ./controller
24node: localhost
25depends_on: elevator
26ready_regex: ready to receive service calls
27
28pop_name_prefix
29
30process ui
31pass_environment: PATH, LD_LIBRARY_PATH
32add flags: use_execvpe
33change_directory: %(CURDIR)
34command: ./ui
35node: localhost
36depends_on: elevator_hardware/controller
One more thing is missing: we need to tell the LNM where to find our message definitions which we are going to use. We do this by inserting this line after line 4:
 1instance
 2name: elevator simulation (C++) for %(env USER)@%(hostname)
 3manager: :%(get_port_from_string "%(instance_name)")
 4enable_auto_groups: true
 5
 6add_message_definition_dir: %(CURDIR)/msg_defs/
 7
 8
 9push_name_prefix: elevator
10
11push_name_prefix: elevator_hardware
12
13
14process elevator
This directive is a global directive, we place it between the instance section and the process sections.
5.6.2.1. Testing the new configuration
We can already run this configuration like this:
ln_manager -c examples/tutorial/example_cpp_elevator/code-snippets/elevator-2.lnc
we get:
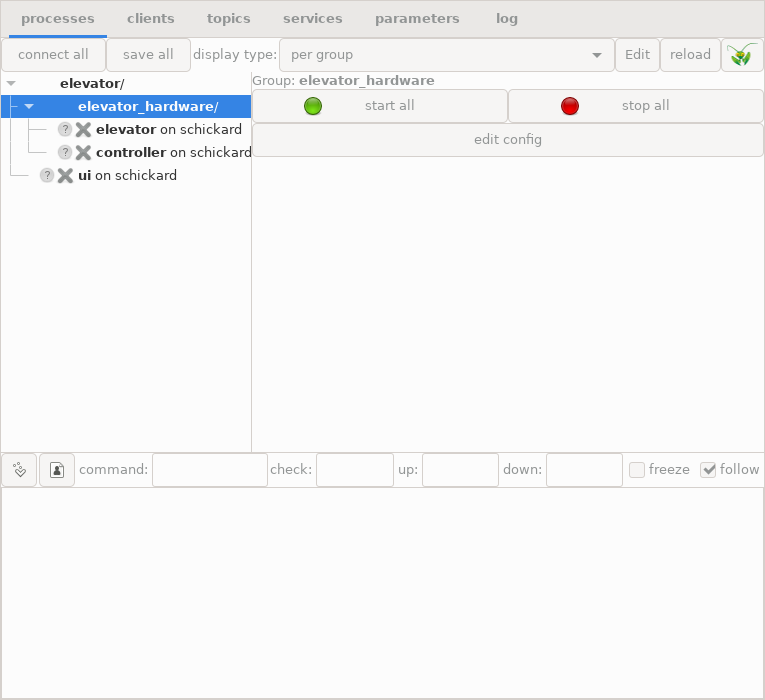
The LN manager running the draft elevator configuration
Well, when we try to start the elevator UI, the response will be this:
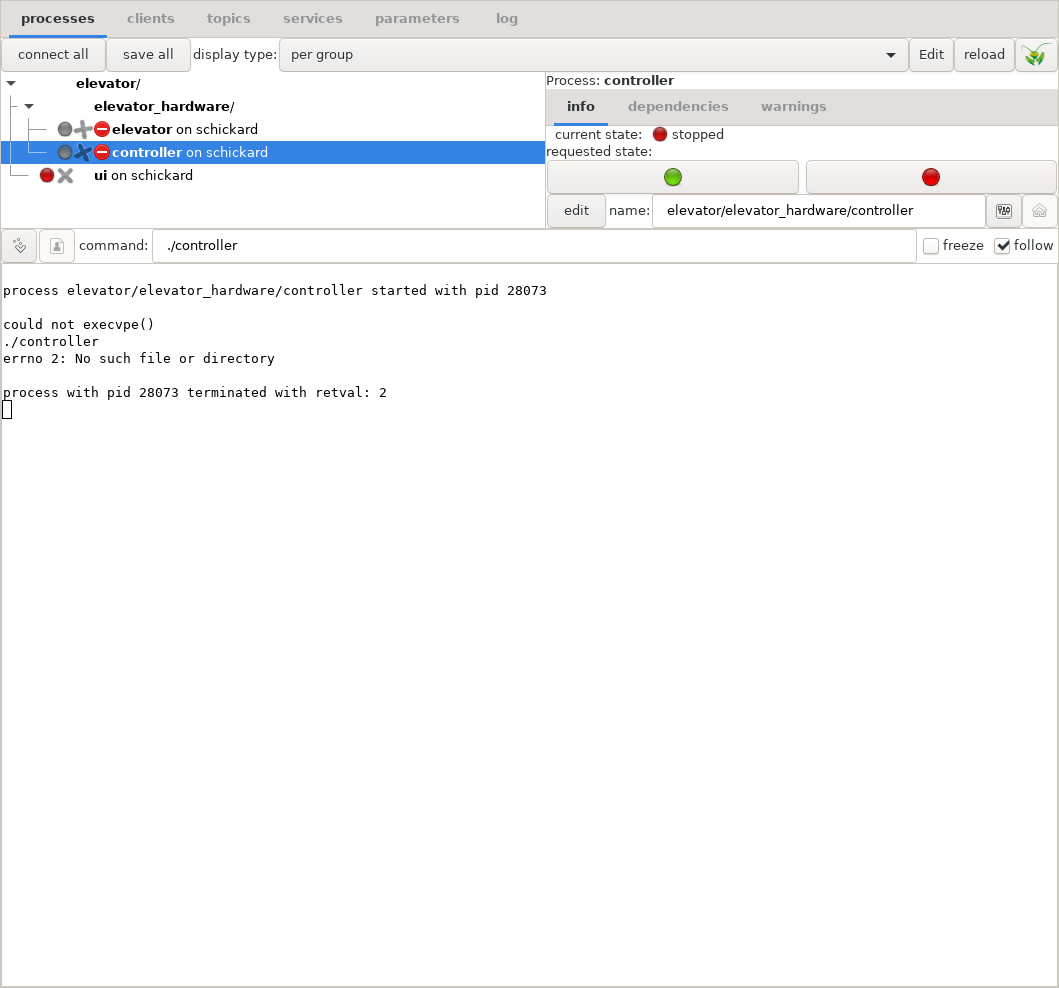
Error indication when LN tries to run a non-existant program
Error messages and diagnosis in the LN manager
Dang, what went wrong? If we click the “log” tab, the LN manager shows this error message:
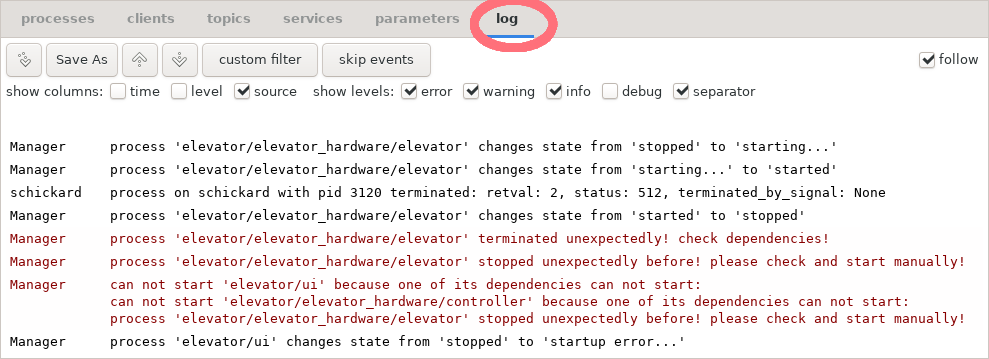
Error message when LN tries to run a non-existant program
The solution to this error is easy: Of course, the LN manager cannot start executables which do not yet exist. So, next thing we do is we are going to write them.
But before that, it is useful to give you a rough sketch of the LN client API and how it works.
5.6.3. Using the Communication Functions in the Client API: A First Overview
5.6.3.1. Code generation step
In C/C++ code, the memory layout of data structures is usually defined by header files, which are processed by the C/C++ compiler and turned into fast native code. The messages which are exchanged via LN are precisely such data structures (often called POD to differentiate them from C++ classes). This means that in order to use LN with C/C++, a code generation step is necessary: The message definitions are used to generate C code that defines structs which represent our messages. Also, for defining services in C++, class methods are generated, which take these structs that represent messages as parameters.
These structures and types are written into a header file that is
usually named ln_messages.h. That file is automatically
generated from all the relevant message definition by a tool called
ln_generate. Essentially, ln_generate is called
with the names of the message definitions as parameters, and it
generates structs that have the fields (or elements) of these messages
as their members, with the right types (for details on how message
definitions are looked up, see chapter Message Definitions in the
reference part).
The LN system makes not only sure that the same message definitions can be used by programs in Python as well, but also that they use the exact same memory layout both in Python and C, so that Python and C++ programs can exchange messages (which also mean that you can comfortably and interactively draft a software component in Python, and re-write it in C++ when you need a high performance and very low latencies).
5.6.3.2. Clients and Topics
Before we go into the details how the different processes can communicate with each other, here a bird’s eye view how it all works:
Whenever a program wants to use LN for inter-process communication, it first needs to instantiate a client object which registers the module with the LN manager. The parameters of the client object are a unique name for the client instance, and optionally the program’s command line arguments. [14]
Now, there are two fundamental mechanisms for communication, publish/subscribe communication and LN services.
5.6.3.3. Topics communication with publish / subscribe
In the case of publish/subscribe communication, the process first needs to create a port object. This is done with one from two specific methods of a client object, either the client.publish() method, or the client.subscribe() method.
Both the
publish()and thesubscribe()methods are called with two arguments. The first is the name of the topic to which the client wants to attach to, and the second is the name of a message definition, which defines the data type of the message. Often, message definitions are closely associated with specific topics, but since a message definition essentially defines a kind of data type, one can also use general-purpose message definitions.Note
As with all other facilities for inter-process communication, in time-critical or performance-critical code, this initialization of communication should be done only once at the start of the program, because it is much slower than the actual communication.
Both the
publish()andsubscribe()methods create a port object. A port object is an object instance that consists of a data space into which the parts of a message can be copied, some resources needed for the communication, and one of two I/O methods, eitherport.write(), orport.read(). Thewrite()method is available for output ports which publish data, and theread()methods are available for input ports which were subscribed to a topic.The
read()method can be either blocking (which means that it waits until data has been received), or non-blocking (which means they only try without waiting to communicate), or it can also have a time-out parameter (which means that they wait for new data, but only up to a maximum time).Before a
write(), and after aread(), the data which is to be transmitted needs to be copied into a C++ struct which has members that correspond exactly to the fields of the message definition. It is defined in the header fileln_messages.h, that was created by ln_generate which we explained above.The user needs to define a variable with the type of such a struct for each kind of message, and pass it to the
port.read()orport.write()method.Success of the communication is indicated by the Boolean return values of
read(), wheretruemeans that new data was transmitted, andfalsethat there was no data, or a time-out was hit.write()is always successful unless there is a system error, in which case an exception would be raised.Both
read()andwrite()exchange time stamps which allow to relate different messages with each other.
5.6.4. Implementing the Elevator Control Processes
This section covers the two processes which control the elevator - the
elevator_simulation program and the controller program.
5.6.4.1. Communicating with publish/subscribe topic messages
We set up the communication between controller and hardware via publish/subscribe messages on topics. Because programs do not need to wait for messages, this is a good match to real-time control loops. Also, it is often possible to avoid threads just by checking for new messages and processing them quickly in a main event loop.
5.6.4.1.1. The Elevator Hardware Simulation
If you look again at our
Elevator control system with component processes and message types, there are two
components of the hardware which send or receive messages: The floor
count sensor, which is a general example for a sensor, and the motor,
which is an actor. Because they share some state in the simulation, in
this case we implement them in a single program. Nevertheless, they
communicate via two different topics, elevator03.actors and
elevator03.sensors, and send different messages, which would make
it easier to de-couple them in later implementations, and also would
make it straightforward to add other sensors (for example, an
emergency stop button) if we need to do that.
We can implement both sensor and motor as two functions which share one element of global shared state, the current position. (In a more complex program, such shared-state elements should be made members of an elevator object, to avoid globally shared values. But we do not need this for this short example.) But before we do that, we need to cover the basics of registering, sending and receiving messages.
5.6.4.1.2. Generating the ln_messages.h header
For writing our program, we can start to generate the headers with ln_generate - this is helpful because we can just look up the exact type names which we need. We do this with the following Makefile:
CPPFLAGS += --std=c++14

elevator-simulation: elevator-simulation.cpp  ln_messages.h
    g++ $(CPPFLAGS) $(CXXFLAGS) $(LDFLAGS) elevator-simulation.cpp -lln -o elevator-simulation


NEEDED_MDS = \
  elevator/sensors/floor_count \
  elevator/actors/motor_control

OWN_MDS_DIR = msg_defs/

VPATH = $(OWN_MDS_DIR)

ln_messages.h: $(NEEDED_MDS)
    ln_generate -o $@ --md-dir $(OWN_MDS_DIR) $(NEEDED_MDS)
This tells make that the program
elevator-simulation.cpp will be compiled for C++14, that it
depends on ln_messages.h, and that the latter has to be
generated by running ln_generate on the message definitions
for floor_count and motor_control. The VPATH directive
tells make where the message definition files can be found.
If we type:
make ln_messages.h
it already creates the include file for us.
So, let’s write a program called elevator-simulation
First, the program needs to use the links_and_nodes C++ library.
So, we just need to import its headers:
1#include <ln/ln.h>
5.6.4.1.3. Publishing and receiving Data in the Elevator Process
Next, we need to create a client instance, and to connect to the
topics. This is done by creating an ln::client instance,
and creating two port objects, using ln::client::subscribe() and
ln::client::publish():
1	ln::client clnt("elevator simulation", argc, argv);
2
3	ln::outport* oport = clnt.publish("elevator03.sensors", "elevator/sensors/floor_count");
4	ln::inport* iport = clnt.subscribe("elevator03.actors", "elevator/actors/motor_control");
These two instruction sequences do two things:
First, they instantiate and register an LN client. We need to instantiate at least one such a client in every program in order to communicate via LN. Each client needs an unique name. (A program can register more than one client.) The first parameter in the
ln::client()constructor is a name suggestion which the LN manager can use to uniquely label things (however, the LN manager can set another name, typically by passing an environment variable which uses the name of a process section).Second, they create a port object by registering with a topic name either as a publisher (line 3) or as a subscriber (line 4). In the hardware simulation, we register as a publisher for the sensor data, and as a subscriber for motor control commands. In addition to the topic, both parties also need to bind the topic name to a message definition which specifies the type of messages that we want to send. The LN manager will check to make sure that both parties which are trying to attach, do agree to the same message definition and topic name.
The result of this registration is a handle which allows to either send, or receive data of the specified type.
Now, we need two functions which publish and receive data. We go the way to show you the core operation first, and go on to embed them in a more structured way after that.
5.6.4.1.4. Publishing the Sensor Data
First, we write a function that publishes the current floor count:
 1#include <ln/ln.h>
 2#include "ln_messages.h"
 3
 4using t_sensors = elevator_sensors_floor_count_t;
 5
 6
 7void publish_current_count(ln::outport* out_port, float floor_number,
 8                           int8_t movement_direction)
 9{
10	t_sensors out_data {};
11	out_data.floor_number = floor_number;
12	out_data.movement_direction = static_cast<int8_t>(movement_direction);
13	out_port->write(&out_data);
14}
Here, elevator_sensors_floor_count_t is the type of the message
struct, that was generated with ln_generate. We give it the
short name t_sensors, to save a bit of typing.
What happens here? The struct type elevator_sensors_floor_count_t,
which we shortened to t_sensors, was automatically generated by
ln_generate from the message definition elevator/sensors/floor_count
stored in the file /msg_defs/elevator/sensors/floor_count. We included the file
ln_messages.h, and therefore we can use this struct type. It
has the member floor_number, which is a 32-bit IEEE-754
floating point number, equivalent to a float in C++. The
function takes an ln::outport pointer as a parameter, which we had
initialized above, defines an automatic variable of type
t_sensors, which resides on the stack, and assigns the
t_sensors::floor_count member the current simulated sensor
reading. Then, it calls the function ln::outport::write(),
which takes the pointer to the data buffer out_data, and transfers
the data into an internal buffer of the LN system, after which it will
be transported to the subscribers of messages elevator03.sensors
topic.
How does ln::outport::write() “know” how many bytes it
has to transfer? It knows that because the port was created using
the statement
ln::outport* oport = clnt.publish("elevator03.sensors", "elevator/sensors/floor_count");
which we introduced above in the paragraph on port initialization.
Because a port is always associated with a message definition, the port
instance knows what the size of the message definition is, and
therefore we do not need to pass the size to the ln::outport::write()
command.
At a glance, this looks quite similar to file operations that
use read() and write(). And this is true, with a few
subtle but important differences:
The port
write()command returns immediately, it never blocks. The typical time for transmitting data into a buffer is within the nanoseconds range. A write to disk could take much longer, in the time scale of multiple milliseconds.Also, it is possible that a file I/O write transports only part of the data, and needs to be called again. In contrast, the
ln::outport::write()succeeds in an all-or-nothing manner: Either, all data is transmitted, or none.From looking at the code, we cannot tell whether a network connection is used to transmit the data or not. This is because the LN system is designed that way - it is possible to re-configure a system, to move parts of it to another network node, or to move networked nodes into another process on the same multi-core machine. It is even possible to move code around from being in another networked process, to being in another thread or library module in the same process. And, while the location of nodes has certainly influence on latencies and transmission performance, it is not necessary to re-write any of the LN client code for such changes: The LN library functions are designed to work independently from the location of a node. In other words, the LN library is network-transparent. [11]
But back to our example: There is one more detail needed: As
mentioned, we have an alarm system for fire detection, and it is
important that fire-related exceptions are handled correctly. So, we
need to add this to the simulation. However, as mentioned, the
elevator hardware is not yet available, so we cannot yet run smoke
tests. Therefore, instead of checking for the appearance of physical
smoke, we just look for “smoke” in the file system, more precisely, in
the current working directory (CWD) – using the standard
POSIX function access() from <unistd.h>
[12]. The resulting code is this:
 1#include <ln/ln.h>
 2#include <unistd.h>
 3
 4#include "ln_messages.h"
 5
 6
 7using namespace std::chrono_literals;
 8
 9using t_sensors = elevator_sensors_floor_count_t;
10
11using std::cout;
12
13
14void publish_current_count(ln::outport* out_port, float floor_number,
15                           int8_t movement_direction)
16{
17
18	t_sensors out_data {};
19	out_data.floor_number = floor_number;
20	out_data.movement_direction = static_cast<int8_t>(movement_direction);
21	// check whether smoke is found,
22	// represented by a file "smoke" in the CWD
23	out_data.smoke_detected = (access("smoke", F_OK) != -1);
24	out_port->write(&out_data);
25
26}
5.6.4.1.5. Receiving Motor Control Commands as a Subscriber
We can do just the same with the motor control port, by writing a
function receive_commands(), that uses the
ln::inport::read() method to receive a message:
 1#include <ln/ln.h>
 2
 3#include "ln_messages.h"
 4
 5
 6// [ ... ]
 7
 8int32_t receive_commands(ln::inport* in_port, int32_t current_command)
 9{
10	elevator_actors_motor_control_struct in_data {};
11	if (in_port->read(&in_data)) {
12		current_command = in_data.move_command;
13	}
14	return current_command;
15}
The method ln::inport::read() takes a pointer to a message
buffer as a parameter and reads the right amount of data for this type
of message into the buffer. This method returns either false (if
no data was received, we will come soon to this case), or true if
no data was received. In the latter case, we just use it as the return
value of the function.
5.6.4.1.6. Using Time-Outs
There is a further aspect which we have to consider now: We are
reading the motor command messages in a single event loop. This often
makes things a lot easier, because we do not have to use multiple
threads and therefore do not need to think about locks, mutexes,
race conditions, and similar potential
nuisances. However, if we use ln::inport::read() without
parameters, this will cause a blocking call, which means that the
program will suspend execution here and wait until some data arrives.
For real-time control purposes, this is often not what we need. In such cases, we need to use either non-blocking calls, or set a time-out. Non-blocking calls do not wait at all, while calls with a time-out return after a maximum period.
For simplicity, we are going to use time-outs here. In our example,
we use ln::inport::read() with a second parameter, which
sets a time-out. Generally, if no time-out is set, the read method
will work in the blocking mode, and wait indefinitely for new data.
Alternatively, if the second argument is false, it would not wait
for new data, and only will copy the buffer if data has arrived in the
meantime. Using time-outs, it will wait that maximum number of
seconds, and if no message arrives, the function will return with a
false return value.
The modified call to ln::inport::read() looks like that:
 1#include <ln/ln.h>
 2
 3#include "ln_messages.h"
 4
 5using t_motor_control=elevator_actors_motor_control_t;
 6
 7// [ ... ]
 8
 9int32_t receive_commands(ln::inport* in_port, int32_t current_command)
10{
11	double time_out = 0.5;
12	elevator_actors_motor_control_struct in_data {};
13	if (in_port->read(&in_data, time_out)) {
14		current_command = in_data.move_command;
15	}
16	return current_command;
17}
using enumerations to define interface constants
We could handle the commands by comparing them to literals which are hard-coded to several places in the code, but this would make the code harder to read and manage. To make the meaning of the commands easier to understand, we add an enumeration class which encodes the motor control commands:
enum class E_MovementDirection: int8_t {
	UP   =  1,
	DOWN = -1,
	STOP =  0,
};
5.6.4.1.7. The Hardware Control Loop
Now, we can write a very simple control loop:
 1#include <ln/ln.h>
 2#include <iostream>
 3#include <cstdint>
 4#include <chrono>
 5#include <thread>
 6
 7
 8#include "ln_messages.h"
 9
10
11using std::cout;
12using namespace std::chrono_literals;
13
14
15int sign(int32_t value)
16{
17	if (value > 0)
18		return 1;
19	else if (value < 0)
20		return -1;
21	else
22		return 0;
23}
24
25int main(int argc, char* argv[])
26{
27
28	ln::client clnt("elevator simulation", argc, argv);
29
30	ln::outport* oport = clnt.publish("elevator.sensors", "elevator/sensors/floor_count");
31	ln::inport* iport = clnt.subscribe("elevator.actors", "elevator/actors/motor_control");
32
33	float current_floor_number = 0.0f;
34	int32_t current_command = (int32_t) E_MovementDirection::STOP;
35	cout << "elevator hardware running\n";
36	while(true) {
37		int current_movement_direction = sign(current_command);
38		publish_current_count(oport, current_floor_number, current_movement_direction);
39
40		if (current_movement_direction != 0) {
41			float step = current_movement_direction / 16.0f;
42
43			cout << "moving elevator by " << step << '\n';
44
45			current_floor_number += step;
46			current_command -= step;
47
48			std::this_thread::sleep_for(200ms);
49		} else {
50			cout << "elevator_simulator: waiting for commands...\n";
51			current_command = receive_commands(iport, current_command);
52		}
53
54	};
55}
For brevity, we have defined a simple clone of the numpy.sign()
function here. For our purpose, it simply returns -1 if a number is
negative, +1 if a number is positive, and 0 if it is zero. We do not
need to consider edge cases such as NaN values here.
The port initialization is exactly as in the snippet shown above.
In addition, we set the initial floor number to 0.0, and the current command to
E_MovementDirection::STOP.
The main control loop works as follows:
In line 37, the direction of the movement is computed from the currently active command.
then, the current floor count is published (line 38)
If the direction is non-zero, indicating a new or on-going movement, then a step size is computed, which is plus or minus 1/16 (line 41).
Then, that step size is applied to the current floor number (to update the simulation), and subtracted from the current command (lines 45 and 46). (Because we are using small negative powers of two, we can use floating point numbers here).
Then, the thread waits for 200 ms (line 47), to simulate the limited real-life speed of the elevator. (A real hardware driver would probably wait for some events generated by the hardware, and it is usually by far the best way to have a single “source” of timing).
if no command is active (indicated by a
current_movement_directionof zero), then the loop reads a new command from the motor control port.and then, the loop restarts.
As we can see, the I/O part of the hardware simulation and the logic are separated from each other, so that we can read and understand both of them independently.
5.6.4.1.8. Extracting API Constants from the Hardware Simulation
As we mentioned before, the constants which define the movement direction are used in the messages. As such, they are part of the public API of the software modules, and should be documented and kept separate from the implementation.
Therefore, we extract the enumeration definition shown above from the source of the
elevator.cpp process into a source file that we call
elevator_constants.h. We also add constants which cover the
possible errors of the system. They are part of the interface,
too. The resulting include file looks like this:
 1enum class E_MovementDirection: int8_t {
 2	UP   =  1,
 3	DOWN = -1,
 4	STOP =  0,
 5};
 6
 7// numerical error codes (for handling in software)
 8enum class E_ElevatorErrorStatus: uint32_t {
 9	NO_ERROR                     = 0,
10	FLOOR_NUMBER_TOO_HIGH        = 1, // the requested floor number is too high
11	FLOOR_NUMBER_TOO_LOW         = 2, // the requested floor number is too low
12	OUT_OF_ORDER                 = 3, // the hardware is not working properly
13	FIRE_ALARM_OPERATION_STOPPED = 4  // Fire alarm, elevator has stopped at ground floor
14
15};
Note
Why do we add these error codes that early? There is a reason: Adding error codes or new exceptions usually breaks backward-compatibility of an interface, because clients which rely on earlier versions cannot handle these new errors without change. So, it is a good idea to clearly define all possible errors from the start, so that interfaces can be kept stable later.
5.6.4.1.9. The Controller Process
The controller program, which we name controller.cpp, has
essentially three parts:
One part communicates with the hardware simulation (or when the elevator hardware finally arrives, it will communicate with the real hardware). This code is almost completely symmetrical to the corresponding controller code - with one exception: Publisher and subscriber of the messages are swapped.
The second part communicates with the user interface module. This is done with an LN service, we will show soon how.
The third part is a bit of actual logic which converts UI requests into meaningful commands to the hardware, and returns when these are completed.
So, let’s start with the hardware communication in the controller:
5.6.4.1.10. Receiving Sensor Messages
For receiving sensor messages, this code does what we need:
 1#include <ln/ln.h>
 2#include <cstdint>
 3#include "elevator_constants.h"
 4
 5#include "ln_messages.h"
 6
 7using std::cout;
 8using namespace std::chrono_literals;
 9
10
11
12using t_sensors = elevator_sensors_floor_count_t;
13
14ln::inport* sensor_port;
15
16t_sensors sensor_data {};
17
18ln::client clnt ln::client("elevator controller");
19
20sensor_port = clnt.subscribe("elevator03.sensors",
21                             "elevator/sensors/floor_count");
22
23
24void receive_current_sensor_data()
25{
26	sensor_port->read(&sensor_data);
27}
as in the case of the elevator simulation, we add a time-out value to avoid blocking for too much time:
24void receive_current_sensor_data(double time_out=1.0)
25{
26	sensor_port->read(&sensor_data, time_out);
27}
If the ln::inport::read() call times out, the sensor_data
struct is unchanged, so it simply returns the old state.
In the case that no sensor data arrives within a second, we want to
print a warning, which we can add like that, using the return value of
ln::inport::read(), which is false if no new message
data was found:
24using std::cout;
25void receive_current_sensor_data(double time_out=1.0)
26{
27	if (!sensor_port->read(&sensor_data, time_out)) {
28		cout << "Warning: no sensor data was received!\n";
29	}
30
31}
5.6.4.1.11. Sending Command Messages
For sending commands to the elevator motor, we can just use:
 1using t_motor_control = elevator_actors_motor_control_t;
 2
 3ln::outport* actor_port;
 4
 5t_motor_control motor_command {};
 6
 7actor_port = clnt.publish("elevator03.actors",
 8                          "elevator/actors/motor_control");
 9
10void send_hw_command(int32_t command)
11{
12	motor_command.move_command = command;
13	actor_port->write(&motor_command);
14}
As you see, here we use the same client instance to create another port.
The ln::outport::write() method does not have time-outs,
because it just writes the data to a buffer. This will never block,
and in a correct set-up will never fail (it could raise an exception
if something goes seriously wrong - see the C++ API Reference for
details on this).
Before we go on, we will just arrange the statements and function
calls from above into a new class that we call ElevatorServer,
and some structure to form a valid program, without adding any
new function in this step:
 1#include <ln/ln.h>
 2#include <iostream>
 3#include <cstdint>
 4#include <chrono>
 5#include "elevator_constants.h"
 6
 7#include "ln_messages.h"
 8
 9
10using std::cout;
11using namespace std::chrono_literals;
12
13
14
15class ElevatorServer :
16	public elevator::request::elevator_call_base
17{
18
19	using t_sensors = elevator_sensors_floor_count_t;
20	using t_motor_control = elevator_actors_motor_control_t;
21
22	ln::client clnt;
23	ln::inport* sensor_port;
24	ln::outport* actor_port;
25
26	t_motor_control motor_command {};
27	t_sensors sensor_data {};
28public:
29	ElevatorServer() :
30		clnt("elevator controller")
31	{
32
33		sensor_port = clnt.subscribe("elevator03.sensors",
34		                             "elevator/sensors/floor_count");
35
36		actor_port = clnt.publish("elevator03.actors",
37		                          "elevator/actors/motor_control");
38
39
40		cout << "getting hardware state...\n";
41
42		receive_current_sensor_data();
43
44		cout << "floor number is: " << sensor_data.floor_number << '\n';
45
46		cout << "service thread started!\n";
47	}
48
49	int run()
50	{
51		// to be done
52	}
53
54private:
55
56	void receive_current_sensor_data(double time_out=1.0)
57	{
58		cout << "getting state\n";
59		if (! sensor_port->read(&sensor_data, time_out)) {
60			cout << "Warning: no sensor data was received!\n";
61		} else {
62			cout << "getting state ... ok\n";
63		}
64	}
65
66	void send_hw_command(int32_t command)
67	{
68
69		motor_command.move_command = command;
70		actor_port->write(&motor_command);
71	}
72
73
74};
75
76
77int main(int argc, char* argv[])
78{
79	ElevatorServer elevator_server;
80	return elevator_server.run();
81}
Here, the class ElevatorServer is instantiated from main().
We add a public method to run the server, which is called ElevatorServer.run(),
which is called from the main function. We will fill out
that function later, because it needs to connect to
the service requests.
5.6.4.2. Connecting UI and Controller with a Service
Now, we can talk with the hardware. But what is still missing, is the connection with the user interface. This is done with an LN service. We will start with a general description how this is implemented.
5.6.4.2.1. Implementing Service Calls
For implementing LN service communication, both clients and service providers need to define functions which can invoke and handle service requests. In C++, these are usually methods of class instances.
To define them, they need to use type definitions which are automatically generated from the message definitions for a service, as above by the tool ln_generate which was introduced in the last paragraphs. Essentially, ln_generate takes the message definitions which we are going to use as an input, and generates C++ code that defines the right data struct type for the service message.
5.6.4.2.2. Service Clients
In the case of the client, the class which calls the service needs to get a service handle as a pointer to type
ln::serviceusing theln::client::get_service()method. It has the following three parameters:the name of the service which the class wants to implement. In our case, the service name is
"elevator03.prompt", - as you can see, the service name can identify a specific piece of hardware, for example. The dot means that the “prompt” service is part of the “elevator03” name space. [13]the service message definition name.
and the auto-generated signature of the message definition (which is basically a string representation of the data types of the elements of the message definition).
The functions or methods using the service as a client need to define a service request buffer. This is a data structure, that matches the service message definition, and that will transport request parameters as well as response data.
As mentioned, the type of the struct is auto-generated by ln_generate, and in our case has the name
elevator::request::elevator_call_t. It is generated from the name of the message definition, with the slashes “/” being converted to C++ name spaces. To be precise, the name is generated as follows from the name of the message definition:each slash (“/”) in the message definition name is replaced by a name space separator “::”
at the end of the name, a “_t” is appended.
During processing, the client calls the service via a method of the initialized
ln::servicehandle, which has the nameln::service::call(). The request parameters need to be copied into the members of the struct of typeelevator::request::elevator_call_twhich was describe above. After the parameters have been assigned, the client code calls the methodln::service::call()which we just mentioned above.
5.6.4.2.3. Service Provider
5.6.4.2.3.1. Initialization
In the case of the service provider, the user needs to do three things in order to set up a service provider:
It needs to retrieve a handle for a service provider instance, using the client method
ln::client::get_service_provider(). This returns a pointer to anln::servicewhich is able to handle incoming service requests.It then needs to assign a handler function which will process incoming service calls, using the method
ln::service::set_handler(). We will show below the details how such a function is defined.As the last part of the setup, it needs to register itself with the LN manager as a service provider that can receive and process service requests, using the method
ln::service::do_register().
The retrieval of the service provider handle in the first step, which
is done by calling ln::client::get_service_provider(), has
the same parameters as ln::client::get_service() discussed
above.
The handler function allocates and fills a data buffer with the type
elevator::request::elevator_call_t, which contains the incoming call
parameters, and also holds space for the response data.
Setting up the handler function is done with two parameters, a C
function that will later be called when a new message arrives, and a
pointer to a data area which can be used to process the request.
The parameter to
ln::service::do_register()is optional, and sets the name of the service group, which is set to"default group"here [1].
When the call is finished, the service provider code signals that by
calling the method ln::service_request::respond(), which
returns the call. Only when respond() is called, the resulting
response buffer is transmitted back to the caller of the service. This
means that any heap-allocated data that it refers to needs to be kept
alive until the respond() call has returned.
All of this might sound still a bit abstract. We will illustrate all these names right now by going step by step through the concrete example of the elevator service.
After that next section aimed to make the interface tangible, we will in a detailed summary section return to the LN client API methods and discuss in a bit more detail their properties and interface, and also link to the more formal and detailed description in the C++ API Reference chapter.
But now back to our concrete example. We start with the client side, and create this now as follows.
5.6.4.2.4. Calling the Service from the UI
For the user interface, we create a new souce code file ui.cpp.
5.6.4.2.4.1. Code generation for the service interface
As a preparation, we extend the Makefile to compile both the
controller.cpp and the ui.cpp source files. As we
will need the message definitions for the service call to compile it,
we also have to extend the generation of ln_messages a bit,
like this, to include the service message definitions, by adding the
message definition elevator/request/elevator_call, which is stored
in the file elevator/request/elevator_call:
 1all:	elevator-simulation controller ui
 2
 3CPPFLAGS += --std=c++14
 4
 5elevator-simulation: elevator-simulation.cpp elevator_constants.h ln_messages.h
 6	g++ $(CPPFLAGS) $(CXXFLAGS) $(LDFLAGS) elevator-simulation.cpp -lln -o elevator-simulation
 7
 8
 9controller: controller.cpp elevator_constants.h ln_messages.h
10	g++ $(CPPFLAGS) $(CXXFLAGS) $(LDFLAGS) controller.cpp -lln -o controller
11
12ui: ui.cpp ln_messages.h
13	g++ $(CPPFLAGS) $(CXXFLAGS) $(LDFLAGS) ui.cpp -lln -o ui
14
15NEEDED_MDS = \
16  elevator/sensors/floor_count \
17  elevator/actors/motor_control \
18  elevator/request/elevator_call
19
20OWN_MDS_DIR = msg_defs/
21
22VPATH = $(OWN_MDS_DIR)
23
24ln_messages.h: $(NEEDED_MDS)
25	ln_generate -o $@ --md-dir $(OWN_MDS_DIR) $(NEEDED_MDS)
26
27clean:
28	rm -f ln_messages.h *.o controller elevator-simulation ui
Now, we can write ui.cpp. First, we need to include the
headers <ln/ln.h> and ln_messages.h:
1#include <ln/ln.h>
2#include "ln_messages.h"
5.6.4.2.4.2. Client Initialization
Then, we create a service client class as follows, that has a member variable clnt
which points to an instance of ln::client, and another elevator_call_svc
which points to a variable of type ln::service, which is
used to access the service.
 1#include <ln/ln.h>
 2#include "ln_messages.h"
 3
 4#include <iostream>
 5
 6using std::cout;
 7
 8class ElevatorClient
 9{
10	ln::client* clnt;
11	ln::service* elevator_call_svc;
12
13public:
14
15};
The client class constructor needs to define and initialize these members [10]. Here is how the constructor looks:
 1class ElevatorClient
 2{
 3	ln::client* clnt;
 4	ln::service* elevator_call_svc;
 5
 6public:
 7	ElevatorClient(ln::client* _clnt) : clnt(_clnt)
 8	{
 9		elevator_call_svc = clnt->get_service("elevator03.prompt",
10		                                      "elevator/request/elevator_call",
11		                                      elevator_request_elevator_call_signature);
12	}
The ln::client instance named clnt gets initialized
as a constructor parameter. After this, in line 9 the method
ln::client::get_service() is called, which initializes and
returns a client handle to the service.
Parameters of get_service()
get_service() has three parameters: The first is the name of the
service (where components of a name space are separated with dots),
the second is the name of the message definition to which the service
is being bound. The third, which has the name
elevator_request_elevator_call_signature, is a string constant
that describes the signature of the service message defined by that
message definition. This constant was generated by
ln_generate and included in ln_messages.h. It tells
the LN library about the layout of the service message
call. [5]
What the above code does is that it first connects the newly
constructed ElevatorClient instance, to the message definition
named elevator/request/elevator_call, and also to a registered
service with the name elevator03.prompt which will be provided by
the controller program, that has the role of the service provider –
think of it as a kind of object method or C++ function which is called
from the client to the service provider (if needed as a remote
procedure call).
5.6.4.2.4.3. Calling the Service from C++
21	void elevator_call(int called_floor)
22	{
23		elevator::request::elevator_call_t data {};
24
25		data.req.requested_floor = called_floor;
26
27		elevator_call_svc->call(&data);
28
29		std::string err_msg(data.resp.error_message,
30		                    data.resp.error_message_len);
31
32		cout << "the resulting floor is: "
33		     << (int) data.resp.arrived_floor
34		     << ",  with error code "
35		     << (unsigned) data.resp.error_code
36		     << "\n";
37
38	}
The method shown here performs the service request: It takes the
parameter called_floor as a call parameter. Then, it initializes
the buffer for the call by defining a variable with the name data
and the auto-generated type elevator::request::elevator_call_t.
There is one subtle-looking but actually important issue that is worth
being pointed out: in line 23, we see that the data buffer for the
service call, which has the variable name svc and the data type
elevator::request::elevator_call_t, is zero-initialized using
modern C++ “{}” initializers. This is to make sure that all data
fields in the request are initialized. Because data is an
automatic variable allocated on the stack which has a struct type, it
would not be initialized otherwise, and the LN library cannot make
sure it is. (We also use default initialization in other parts of our
example code. For one, this has the advantage that we can add fields
to a message definition and use their default value of zero, rather
than having errors due to uninitialized data.)
Tip
If you need to use an older C++ language standard, you can also use
memset(data, 0, sizeof(data));
with the same effect.
After initialization of the data variable, the method assigns the
call parameter to the corresponding field of data.req.
Then, with invoking elevator_call_svc->call(&data), it executes
the service call: What this method does is that it sends the data,
waits for a response, and then checks and unpacks the response so that
its data end up in the member variable data.resp.
5.6.4.2.4.4. Running the Client
Finally, we need to add the code which gets the request data and starts the main loop of the UI program. That is done by adding a method which runs the client, and starting the method from the main function. First the method that runs the elevator request:
40	int run()
41	{
42		while(true) {
43			int called_floor;
44
45			cout << "type the requested floor number >" << std::flush;
46			std::cin >> called_floor;
47			cout << "waiting for elevator....\n";
48			elevator_call(called_floor);
49		}
50	}
This is a plain C++ method without any LN-specific code, that
just gets an integer number from standard input, and
calls the service by invoking elevator_call() with
that request parameter.
To call this object method, we only need to instantiate
the class, and call ElevatorClient::run() from the
main thread, as shown here:
53int main(int argc, char* argv[])
54{
55	ln::client clnt("elevator_client_cpp");
56	ElevatorClient elevator_client(&clnt);
57	return elevator_client.run();
58}
5.6.4.2.5. The Service Handler in the Controller
5.6.4.2.5.1. Initialization and Registration
In the last section, we implemented calling the service from the client. As the counterpart, the controller process also needs first some code which initializes handling of the service and registers it with LN, and subsequently of course also code which performs the called function.
This is done by registering a class method for the service,
and then running the service from the ElevatorServer::run()
function which we have yet to fill out, like so:
27public:
28	ElevatorServer() :
29		clnt("elevator controller")
30	{
31
32		sensor_port = clnt.subscribe("elevator03.sensors",
33		                             "elevator/sensors/floor_count");
34
35		actor_port = clnt.publish("elevator03.actors",
36		                          "elevator/actors/motor_control");
37
38
39		elevator_call_svc = clnt.get_service_provider(
40		                            "elevator03.prompt",
41		                            "elevator/request/elevator_call",
42		                            elevator_request_elevator_call_signature);
43
44		elevator_call_svc->set_handler(handle_elevator_call, this);
45		elevator_call_svc->do_register("default group");
46
47		cout << "getting hardware state...\n";
48
49		receive_current_sensor_data();
50
51		cout << "floor number is: " << sensor_data.floor_number << '\n';
52	}
53
54	int run()
55	{
56		cout << "ready to receive service calls\n";
57		while (1) {
58			/// processing...
59			double time_out = 0.5; // seconds
60			clnt.wait_and_handle_service_group_requests("default group", time_out);
61		}
62	}
63
64
65private:
66
67	static int handle_elevator_call(::ln::client& clnt, ::ln::service_request& req, void* self_)
68	{
69		ElevatorServer* self = (ElevatorServer*)self_;
70		elevator::request::elevator_call_t data{};
71
72		req.set_data(&data, elevator_request_elevator_call_signature);
73
74		return self->on_elevator_call(req, data);
75	}
Here, in line 39, the class registers that it wants to handle the
calls for the service messages of type elevator03.prompt, by
invoking the method ln::client::get_service_provider()
with exactly the same parameters as the client does in the call to
ln::client::get_service(): The name of the service within
the system that we are defining, the name of the message definition,
and the signature of the message definition that was generated by
ln_generate. (see explanation above)
After this, two more methods need to be called to register
the service handler: First, a handler method needs to be assigned
which will become invoked by the LN messaging system
when a message with that message definition arrives. This
is done by calling the method ln::service::set_handler(),
which registers two things for that service: a C function or C++ method
which can handle the call, and as an optional second
argument a pointer to a data area or an object which
can be used to satisfy the call.
In our case, we simply pass the “this” instance pointer here for that
pointer, and pass a static method of ElevatorServer to be invoked
[2]. We will explain shortly how this method is
defined.
Before that, as a final initialization step, we need to tell the LN
Manager that messages of that type should be directed to arrive at
this process. This is done by invoking the method
ln::service::do_register(). This method essentially tells
the LN manager that for a service request with the service name
“elevator03.prompt”, our process has a registered handler, and that it
expects a message which is defined by the message definition with the
name “elevator/request/elevator_call”. The LN manager will take care
that this registration is unique.
The solo parameter for do_register is the name of the
service group in which our handler will be processed, where we
just set a default name.
5.6.4.2.5.2. The Top-Level Call Handler
In lines 67 to 75 of the above code listing, we have the function which we set as the top-level call handler for our service. Let’s look at it again:
67	static int handle_elevator_call(::ln::client& clnt, ::ln::service_request& req, void* self_)
68	{
69		ElevatorServer* self = (ElevatorServer*)self_;
70		elevator::request::elevator_call_t data{};
71
72		req.set_data(&data, elevator_request_elevator_call_signature);
73
74		return self->on_elevator_call(req, data);
75	}
This function serves as kind of a bridge or adapter function, because
it translates the very general interface of the function that is
argument to ln::service::set_handler() in line 44 to a
method of our server class.
The reason for this is that in the general case, such a top-level
handler does not need to be a C++ method, or needs to have variable
(mutable) data associated with it. It could just be static method, a
const method, a call to a Linux device driver or a function which
writes to a specific memory location. In our case however, we want to
simply call a specific method of ElevatorServer, which has the
name ElevatorServer::on_elevator_call(), which is our
bottom-level call handler.
To do this, the method handle_elevator_call() takes the data
argument pointed to by void *self_, and casts it into an instance pointer
in line 69.
What we however want to pass to that method, is a buffer which
provides the call parameters, and can receive the return values. To do
that, handle_elevator_call() allocates in line 70 a new automatic
variable of type elevator::request::elevator_call_t on the stack,
which we name “data” as before (just to keep it simple). Then, we call
the method ln::service_request::set_data() with the
address of data and the string constant
elevator_request_elevator_call_signature, which has been generated
by ln_generate from the message definition, as described in
section Parameters of get_service(). The result is
that the call parameters get copied into data, and the LN
messaging system registers the address and length of that buffer in
order to send back the result of the request when we are done.
After this, the function calls ElevatorServer::on_elevator_call()
in line 74. The result of that call is returned.
5.6.4.2.5.3. Running the Handler
The handling of services requests, which optionally happens in an own
thread, is started in the run() method in line 75-76, which in
turn is called from the main() function of the program:
54	int run()
55	{
56		cout << "ready to receive service calls\n";
57		while (1) {
58			/// processing...
59			double time_out = 0.5; // seconds
60			clnt.wait_and_handle_service_group_requests("default group", time_out);
61		}
62	}
This method calls the function ln::client::wait_and_handle_service_group_requests().
This method waits for some call for a service request message to arrive,
then processes this message, and then returns. Because we want continuous processing
of service requests here, we need to enclose it in a while(true) loop.
The parameter time_out sets the maximum waiting time
for a new message to 0.5 seconds.
The first parameter is again the name of the service group that we want messages from to be processed - we use again our default name here.
To finally run the service, the main program needs to invoke
ElevatorServer::run(), and for this reason it is a public method
of the class.
Note
In the case that there are several handlers, they can be associated with several service groups, and each of these service group can be assigned to an own thread. This allows to process service requests in parallel. However doing that requires that the service handlers are strcitly thread-safe, because otherwise they could trigger race conditions and similar concurrency bugs which are not desirable to have, and very hard to debug. Because this is not really at beginner level, we do not explain that in more detail here; the C++ API Reference chapter gives full information on the API if you need it.
Alternatively, we can also call
ln::client::wait_and_handle_service_group_requests()
for each service group in a loop iteration, which will
handle all requests sequentially.
5.6.4.2.5.4. Implementing the Elevator Control in the Bottom-Level Handler Method
Now, we are almost done. There are only two aspects missing: First,
the bottom-level handler with the name
elevator_call_base::on_elevator_call(), which will do the actual
work, needs to be implemented.
Second, we need to implement the error handling, especially the case of a fire alarm (we do not want the elevator to be used during a fire, or even worse, carry unsuspecting people into a floor that is burning!).
Because the code would become sligthly lengthy, we will do this in two steps, first the implementation of the main functionality. The second step will show how to robustly handle failures in C++, using exceptions, and how to communicate them to the service client.
Here is a very simple implementation, which uses the functions
receive_current_sensor_data() and send_hw_command() (which we
described in sections Receiving Sensor Messages
and Sending Command Messages) to implement the
service handler.
In the include headers, we need:
1#include <chrono>
2#include "elevator_constants.h"
and the implementation of on_elevator_call() is
 1int on_elevator_call(ln::service_request& req,
 2                     elevator::request::elevator_call_t& data) override
 3{
 4	using MovDir = E_MovementDirection;
 5	while (true) {
 6
 7		while(sensor_data.movement_direction != static_cast<int8_t>(MovDir::STOP)) {
 8			receive_current_sensor_data(0.5);
 9
10		}
11
12		if (data.req.requested_floor == sensor_data.floor_number) {
13			break;
14		}
15
16		MovDir command;
17		if (sensor_data.floor_number < data.req.requested_floor) {
18			command = MovDir::UP;
19		} else {
20			command = MovDir::DOWN;
21		}
22
23		send_hw_command(static_cast<int32_t>(command));
24
25		while(sensor_data.movement_direction == static_cast<int8_t>(MovDir::STOP)) {
26			receive_current_sensor_data(0.5);
27		}
28
29	}
30
31	data.resp.arrived_floor = sensor_data.floor_number;
32	data.resp.error_code = 0;
33	data.resp.error_message = (char*)"";
34	data.resp.error_message_len = 0;
35	req.respond();
36
37	return 0;
38}
First, we need to explain the signature and expected invariants of the
method: It is invoked when a service call arrives, and takes two
parameters, req and data. The object req is of type
ln::service_request and has a .response() method, which needs
to be called once the request is finished. The parameter data,
which we allocated in handle_elevator_call(), is a struct that
contains both the input parameters to the request in data.req, and
can store the response parameters of the call in data.resp. Before
the response() method is called, the response parameters need to
be assigned to by on_elevator_call.
By default, all response values are zero, because data was
zero-initialized in line 70 in handle_elevator_call. (This means
that we do not strictly need to clear the error code or the error
message string if no error occurs; in our example, we still clear it
explicitly to make the code easier to read).
Our “elevator algorithm” is very basic: It enters a loop, receives any available sensor data, and checks for the state of the elevator given by the sensor data. If the elevator is still moving, we wait wait for it to stop. (This can happen if the controller process is re-started during movement). Then, the algorithm checks whether we are already at the target floor. In that case, it returns; otherwise, it sends a hardware command and waits that the hardware sensor messages that it is moving into the desired direction. Then the control loop starts over, until the target floor is reached.
Note
If you have read the example for the control code carefully, you
might just have noted that in line 13 of the on_elevator_call()
method of the controller, and in lines 40, 44, and 45 of
elevator-simulation.cpp shown before, we are comparing to
floating point values which are successively incremented by small
values.
How can this work? Haven’t we learned that one must never compare for equality to floating point values? The answer is simple: IEEE-754 Floating point numbers can in fact represent some non-integer values precisely, specifically small negative powers of two. And here we are incrementing and decrementing by 1/16, which is a small negative power of two. Such values can be represented exactly in the binary mantissa of floating point values. [9]
5.6.4.3. Error Handling using Exceptions
Now, we can fix the last missing element of the implementation: Handling errors. If you want to implement service calls that run robustly and are re-usable in different projects, every service interface will need to document faithfully any error code that is returned, and any client will need to handle equally faithfully any such error condition.
Note
The reason for this can be explained by a probability argument: In a “rigid” system where every component out of \(n\) components has to work without any error for the full system to work, and the probability of an error in one single component is about \(p\), the overall probability that the system works is \((1-p)^n\), which becomes quickly quite small if \(n\) becomes large and \(p\) is not zero.
In idiomatic modern C++, all unexpected errors are communicated by
exceptions, and all code needs to be exception-safe [7]. In the C++ LN
API, we transport exceptions across a service call interface by a
fixed non-zero error code, and a string constant that explains the
error. The name of the corresponding field of the service response
struct is called error_message, and it is mandatory to set it if
an error occurs.
(A side note on cross-language compatibility: If the LN service implemented here is also intended to be used by Python service clients, one should return such an error message also for all failures of a service call [8]. Such an non-empty error message will usually be turned into a Python exception, and idiomatic Python always uses exceptions whenever a call results in failure, such as trying to open a file that does not exist.)
Note
The modern C++ way to handle exceptions has one fantastic advantage and one disadvantage. First the advantage: If you forget to handle an exception, the system will propagate it for you, so the error will not be swallowed like what happens with normal unchecked error codes. This relieves you from the tedious and error-prone chore to document and handle all error codes. Even better, you can task the people which call your code to handle exceptions that come out of code which you call. Sounds pretty comfortable, doesn’t it?
The disadvantage is that if you forgot to handle an exception that might not occur frequently, your distributed system will kick the bucket when it arises. And that, by Murphy’s law, will happen at the least convenient time. This is also true for code that you call and where some sluggard has forgotten to document his exceptions, or the obscure code that he calls. Therefore, if you want actually to build a stable system, you will be obliged to document and handle all exceptions – without exception.
5.6.4.3.1. Adding Exception Handling to the Elevator
Concretely, we need to do three things:
check whether the input is in a correct range
handle alarms from the smoke detector correctly. Our specifications say that in the case of smoke detected, the elevator has to go straight to the ground floor, so that any people in it can leave safely.
pass the information about the error to the elevator client
We will show how to use exceptions for the internal handling of these errors, and how to propagate them to a service client. Here the adapted code for the controller process:
 86int on_elevator_call(ln::service_request& req,
 87                     elevator::request::elevator_call_t& data) override
 88{
 89	using MovDir = E_MovementDirection;
 90
 91	const int MAX_FLOOR = 50;
 92	const int MIN_FLOOR = -3;
 93	bool fire_alarm_op = false;
 94
 95	try {
 96
 97		if (data.req.requested_floor < MIN_FLOOR) {
 98			throw ElevatorFloorNumberTooLowError();
 99		}
100
101		if (data.req.requested_floor > MAX_FLOOR) {
102			throw ElevatorFloorNumberTooLowError();
103		}
104
105		while (true) {
106			while(sensor_data.movement_direction != static_cast<int8_t>(MovDir::STOP)) {
107				receive_current_sensor_data(0.5);
108
109				if (sensor_data.smoke_detected != 0) {
110					fire_alarm_op = true;
111					// go to ground floor
112					data.req.requested_floor = 0;
113				}
114			}
115
116			if (data.req.requested_floor == sensor_data.floor_number) {
117				if (fire_alarm_op) {
118					throw ElevatorFireAlarmException();
119				}
120				break;
121			}
122			MovDir command;
123			if (sensor_data.floor_number < data.req.requested_floor) {
124				command = MovDir::UP;
125			} else {
126				command = MovDir::DOWN;
127			}
128			send_hw_command(static_cast<int32_t>(command));
129			while(sensor_data.movement_direction == static_cast<int8_t>(MovDir::STOP)) {
130				receive_current_sensor_data(0.5);
131			}
132
133		}
134
135		data.resp.arrived_floor = sensor_data.floor_number;
136		data.resp.error_code = 0;
137		data.resp.error_message = (char*)"";
138		data.resp.error_message_len = 0;
139		req.respond();
140
141	} catch (ElevatorException &e) {
142
143		data.resp.error_code = static_cast<uint32_t>(e.error_code);
144		data.resp.error_message = e.what();
145		data.resp.error_message_len = strlen(data.resp.error_message);
146		data.resp.arrived_floor = sensor_data.floor_number;
147		req.respond();
148	}
149
150	return 0;
151}
What have we done in detail, and what is going on?
In lines 70 and 116, we wrap the service response function
into a C++ try-catch statement. For the case of an
out-of-range floor number, we check the range in
lines 72 to 78, and raise an ElevatorException if it
is wrong.
In the catch clause of the try-catch statement in line 116 to 123,
we return the floor number, the error code from the exception, and the
error message. The latter contains both the error message as a string
literal, and the error code as an integer literal, so that a Python
client could parse it, and convert it into an exception again. (Note:
beginning with LN 2.1.x, there will be a more convenient solution
available for passing error codes).
Warning
The length of the error message needs to be explicitly
set by assigning to error_message_len. It is fine
to use the string length to set it. However: the LN C++
library will not set it automatically and does
not handle error_message as an null-terminated
C string (that is, an array of chars with ‘\0’ as a
sentinel value).
5.6.4.3.2. Refactoring the Error Handling
Finally, we do a bit of refactoring, because the request function is becoming uncomfortably lengthy. Therefore, we re-write the request-processing code like this:
 86// Try to move the elevator to the requested floor, by sending
 87// commands to the hardware.
 88// It returns the floor which the elevator has actually arrived at.
 89// Input parameter is the requested floor.
 90//
 91// Attention: This function can throw an exception of the type
 92// EelvatorException, with an error code as documented in
 93// elevator_constants.h and
 94// msg_defs/elevator/request/elevator_call .
 95
 96int32_t request_floor(int32_t requested_floor)
 97{
 98	using MovDir = E_MovementDirection;
 99	bool fire_alarm_op = false;
100
101	while (true) {
102		while(sensor_data.movement_direction != static_cast<int8_t>(MovDir::STOP)) {
103			receive_current_sensor_data(0.5);
104
105			if (sensor_data.smoke_detected != 0) {
106				fire_alarm_op = true;
107				// go to ground floor
108				requested_floor = 0;
109			}
110		}
111
112		if (requested_floor == sensor_data.floor_number) {
113			if (fire_alarm_op) {
114				throw ElevatorFireAlarmException();
115			}
116			break;
117		}
118		MovDir command;
119		if (sensor_data.floor_number < requested_floor) {
120			command = MovDir::UP;
121		} else {
122			command = MovDir::DOWN;
123		}
124		send_hw_command(static_cast<int32_t>(command));
125		while(sensor_data.movement_direction == static_cast<int8_t>(MovDir::STOP)) {
126			receive_current_sensor_data(0.5);
127		}
128
129	}
130	return sensor_data.floor_number;
131}
132
133int on_elevator_call(ln::service_request& req,
134                     elevator::request::elevator_call_t& data) override
135{
136
137	namespace EEM = ElevatorErrorMessage;
138	using EES = E_ElevatorErrorStatus;
139	const int MAX_FLOOR = 50;
140	const int MIN_FLOOR = -3;
141
142	try {
143
144		if (data.req.requested_floor < MIN_FLOOR) {
145			throw ElevatorFloorNumberTooLowError();
146
147		}
148
149		if (data.req.requested_floor > MAX_FLOOR) {
150			throw ElevatorFloorNumberTooHighError();
151		}
152
153		const int32_t arrived_floor = request_floor(data.req.requested_floor);
154
155		data.resp.arrived_floor = arrived_floor;
156		data.resp.error_code = 0;
157		data.resp.error_message = (char*)"";
158		data.resp.error_message_len = 0;
159		req.respond();
160
161	} catch (ElevatorException &e) {
162
163		data.resp.error_code = static_cast<uint32_t>(e.error_code);
164		char msg[512];
165		int len=0;
166		len = snprintf(msg, sizeof(msg), "('%s', %i)", e.what(),
167		               static_cast<uint32_t>(e.error_code));
168		data.resp.error_message = msg;
169		data.resp.error_message_len = len;
170		data.resp.arrived_floor = sensor_data.floor_number;
171		req.respond();
172	}
173
174	return 0;
175}
As you can see, we just split the method into two parts: The outer
part does the parameter check, calls the inner part, and processes any
exceptions. We moved the inner part to a new method, called
request_floor(), which performs the hardware communication
required and returns the actual floor we arrived at. This makes the
code much easier to read. Importantly, we added the description of the
exceptions that can be raised to the method signature. (That’s
something you should always do because errors and exceptions are part
of the signature - the caller of a function needs to know what cases
it might have to handle.)
5.6.4.3.3. Error Handling in Service Clients
Here is what happens when the error_message_len field in the
response data has a non-zero value: For transmission, the content of
the field error_message is copied to the message buffer,
de-referencing the string pointer. After that, the user of the API can
free the error string (or other fields with dynamic lengths), since
the responsibility for the memory management of dynamic memory passed
to the client API functions remains with the user.
When a message with this special field arrives at a LN service client in C++, it points to a buffer that was allocated and is managed by the client library, and the content can be copied from there. In case of an error, probably an exception of a suitable type should be thrown, according to the C++ core guidelines.
Here we show how it is handled in the ui client:
  1#include <ln/ln.h>
  2#include "ln_messages.h"
  3#include "elevator_constants.h"
  4using namespace std::string_literals;
  5
  6#include <iostream>
  7
  8using std::cout;
  9
 10class ElevatorClient
 11{
 12	ln::client* clnt;
 13	ln::service* elevator_call_svc;
 14
 15public:
 16	ElevatorClient(ln::client* _clnt) : clnt(_clnt)
 17	{
 18		elevator_call_svc = clnt->get_service("elevator03.prompt",
 19		                                      "elevator/request/elevator_call",
 20		                                      elevator_request_elevator_call_signature);
 21	}
 22
 23	void elevator_call(int called_floor)
 24	{
 25		elevator::request::elevator_call_t data {};
 26
 27		data.req.requested_floor = called_floor;
 28
 29		printf("calling service...\n");
 30
 31		elevator_call_svc->call(&data);
 32
 33		std::string err_msg(data.resp.error_message,
 34		                    data.resp.error_message_len);
 35
 36		cout << "the resulting floor is: "
 37		     << (int) data.resp.arrived_floor << '\n';
 38
 39		if (data.resp.error_code > 0) {
 40			cout << "request returned  with error code "
 41			     << (unsigned) data.resp.error_code
 42			     << " = \"" << err_msg << "\"\n";
 43		}
 44
 45		const E_ElevatorErrorStatus ecode =
 46		        static_cast<E_ElevatorErrorStatus>(data.resp.error_code);
 47		switch (ecode) {
 48		case E_ElevatorErrorStatus::NO_ERROR :
 49			break;
 50		case E_ElevatorErrorStatus::FLOOR_NUMBER_TOO_LOW :
 51			throw ElevatorFloorNumberTooLowError(err_msg);
 52		/* break omitted, this line is unreachable */
 53		case E_ElevatorErrorStatus::FLOOR_NUMBER_TOO_HIGH :
 54			throw ElevatorFloorNumberTooHighError(err_msg);
 55		/* break omitted, this line is unreachable */
 56		case E_ElevatorErrorStatus::OUT_OF_ORDER :
 57			throw ElevatorOutOfOrderError(err_msg);
 58		/* break omitted, this line is unreachable */
 59		case E_ElevatorErrorStatus::FIRE_ALARM_OPERATION_STOPPED :
 60			throw ElevatorFireAlarmException(err_msg);
 61		/* break omitted, this line is unreachable */
 62		default:
 63			throw ElevatorException("unknown error code", ecode);
 64
 65		}
 66	}
 67
 68	int run()
 69	{
 70		while(true) {
 71			int called_floor;
 72
 73			cout << "type the requested floor number >" << std::flush;
 74			std::cin >> called_floor;
 75			cout << "waiting for elevator....\n";
 76			try {
 77				elevator_call(called_floor);
 78			} catch (ElevatorFloorNumberTooLowError &e) {
 79				cout << "request out of range - try a larger number!\n";
 80				continue;
 81			} catch (ElevatorFloorNumberTooHighError &e) {
 82				cout << "request out of range - try a smaller number!\n";
 83				continue;
 84			}
 85
 86			catch (ElevatorFireAlarmException &e) {
 87				cout << ("Fire alarm - elevator stopped, please "
 88				         "leave the building!\n");
 89				return -1;
 90			}
 91
 92		}
 93		return 0;
 94	}
 95};
 96
 97int main(int argc, char* argv[])
 98{
 99	ln::client clnt("elevator_client_cpp");
100	ElevatorClient elevator_client(&clnt);
101	return elevator_client.run();
102}
This code is pretty straightforward C++ code. There is only one detail
which you should be careful about: In the lines 33 and 34, the error
message string is re-constructed from svc.resp.error_message and
svc.resp.error_message_len. Passing the string length as an extra
parameter is necessary in general, because the LN messages do not use
zero-terminated strings - character arrays are just variable-length
arrays without any specific sentinel value like the ‘\0’ value that C
uses for strings. [3]
5.6.4.3.4. Handling of exceptions across languages
Now, what happens if a Python client receives such a response buffer? The client wrapper code will detect that it has an error message with non-zero length, and should create and raise an exception which will have this error message as an argument. If the optional service wrapper class (which we have not introduced yet) is used, the other components of the message will not be accessible in Python. However, the client code can parse the error message into the string part and the integer error code [4] . Continuing from that, it can construct a new exception from the values, so that the error can be passed on as an specific exception if that is needed, or handled otherwise.
The remaining case happens when the field “smoke_detected” of the sensor data packet becomes true. This would be detected in line 83. In this case, the first part of the error response is handled within the controller process: The target floor is set to the ground floor with number zero, and the elevator is moved to it. Only when the ground floor is reached, another exception is raised.
One more detail on the error handling: In lines 134 to 136, we set the
empty fields for error code and error message explicitly. This is
actually not needed in a C++ service provider, since the return
message buffer is always zeroed out before it is passed to the
on_elevator_call() method. This can be used to make code a bit
shorter.
Footnotes
5.6.5. Running the Example
You can run the example with:
cd documentation/examples/tutorial/example_cpp_elevator
make
ln_manager -c elevator.lnc
5.6.6. Using the LN Manager GUI to control the Elevator Example
5.6.6.1. Starting all Processes
When you have started the LNM GUI as instructed in the last paragraph, you can start the whole system by clicking at the “elevator” process group and pressing the button “start all” in the process control panel at the upper right half:
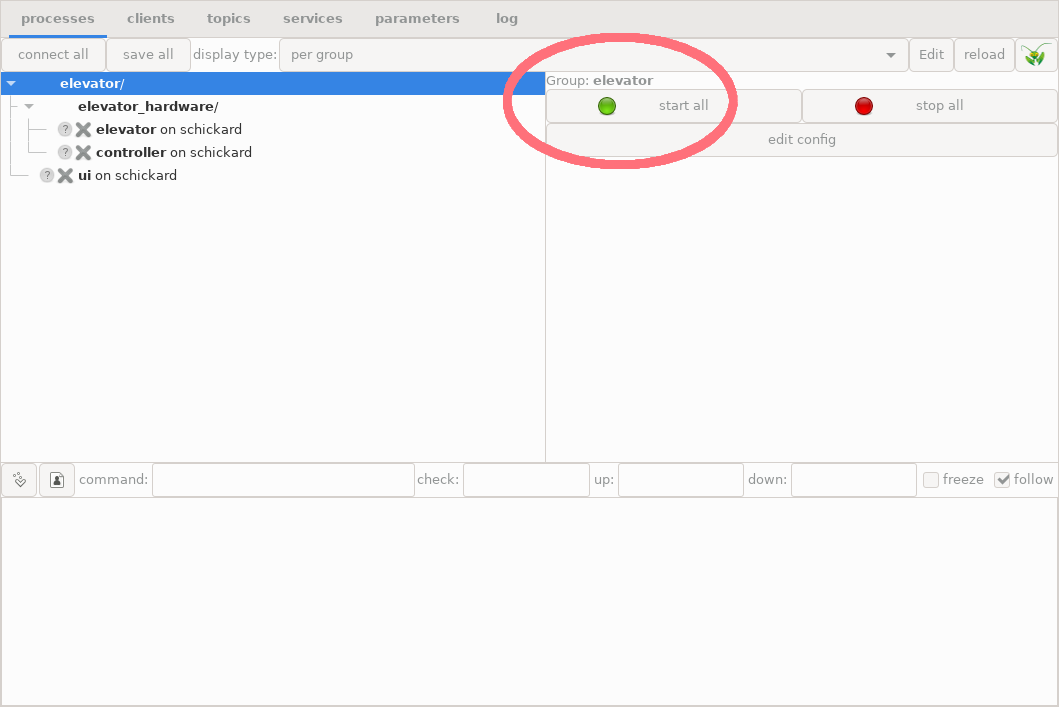
Process group with all three example processes and the green “start all” LED button in the top right panel.
Do you remember our first unsuccessful attempt? It failed because the processes to start did not exit yet. This time, if you press the “start all” button, all processes turn to green:
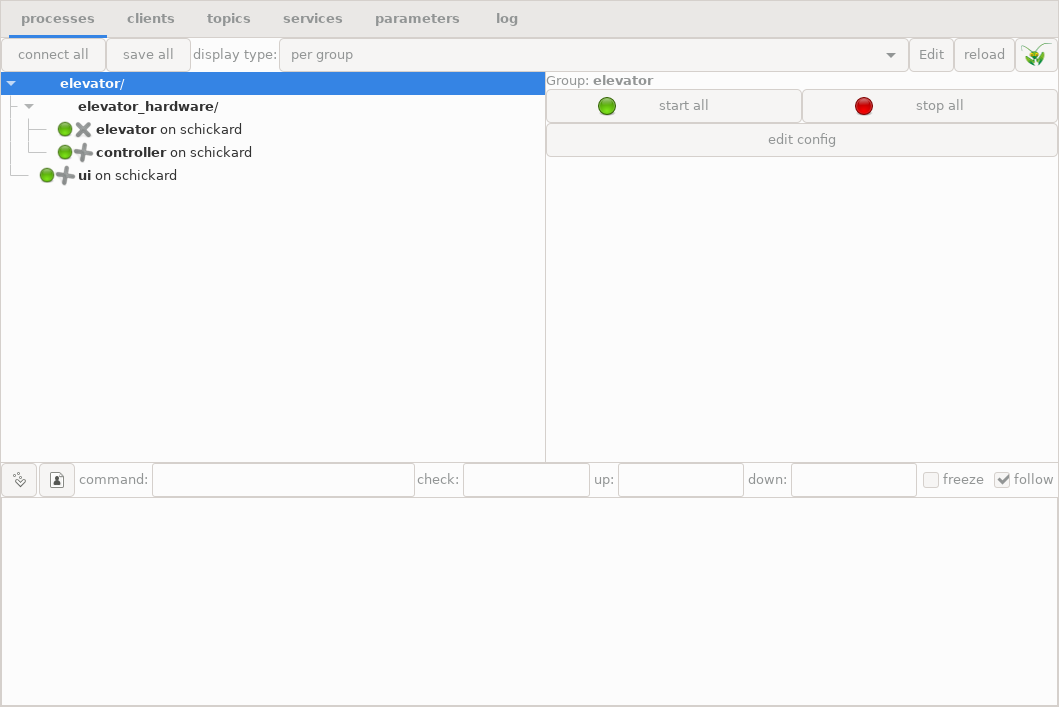
Elevator example after all processes have been successfully started
5.6.6.2. Inspecting the processes
We can click the “ui” process, and look at its terminal output:
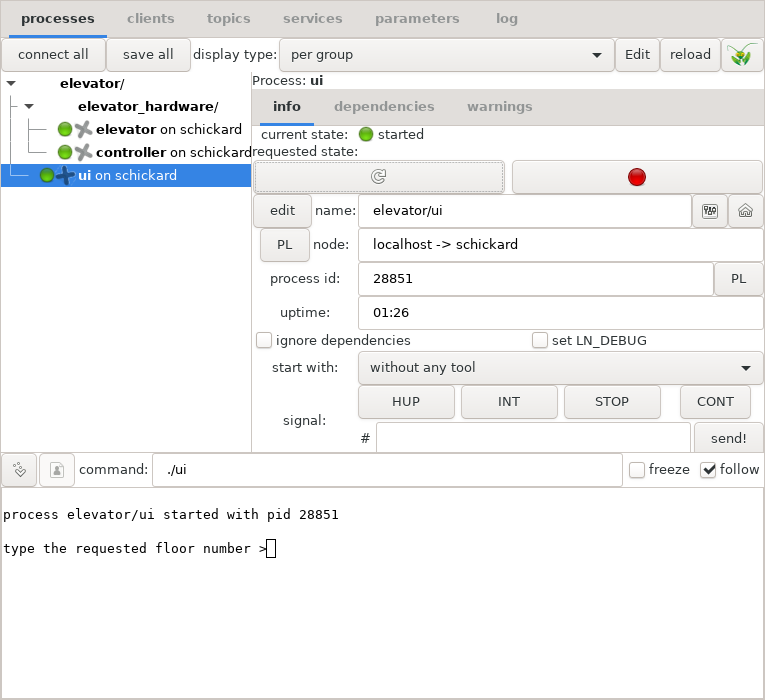
The console user interface of the elevator
Because the output window in the bottom half is a fully functional terminal, we can just click the pane, type in a number as an elevator request, and hit “Enter”. Here is what happens then:
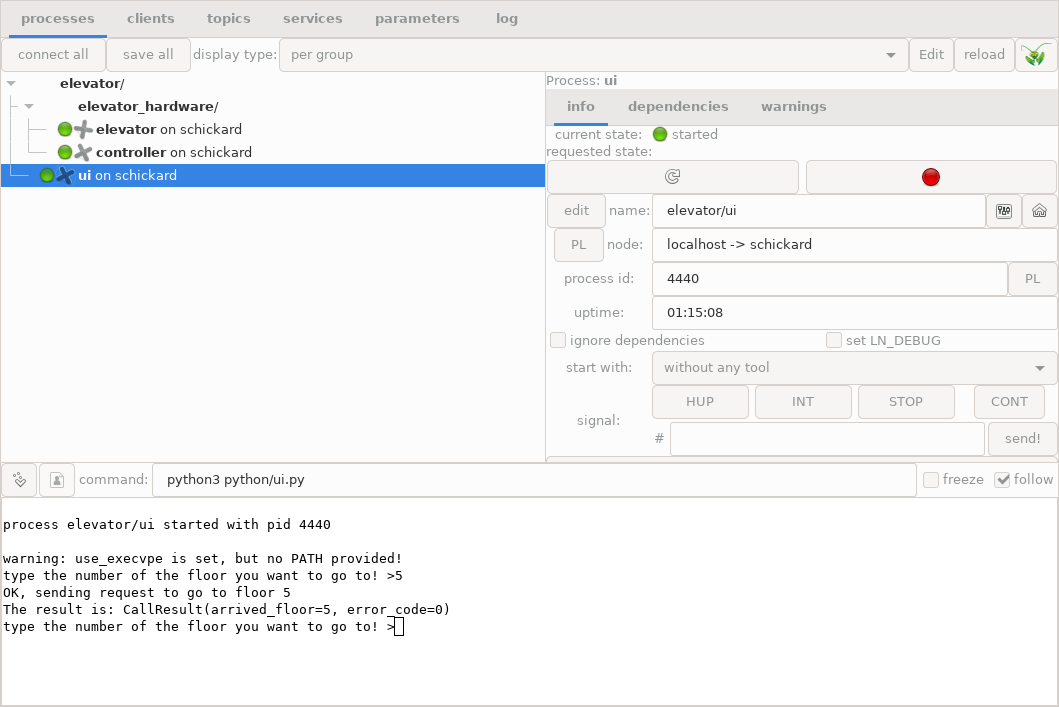
Result of elevator request in the command line interface
If we click the controller process, the terminal output is this:
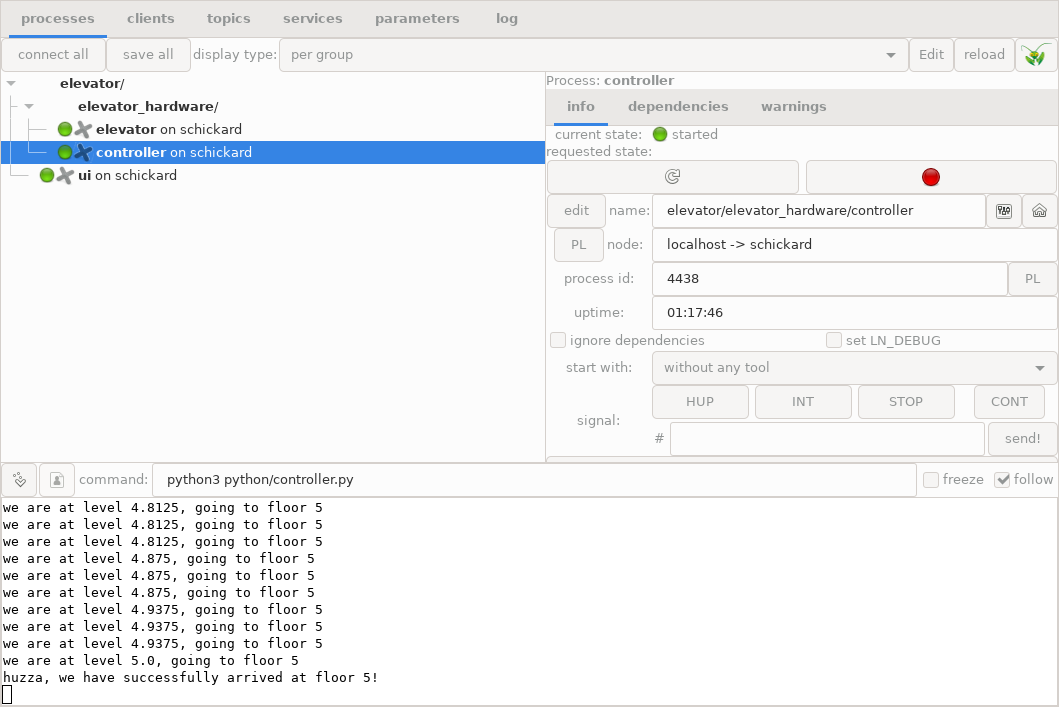
Terminal output of the controller process in the bottom pane
We might want to see more of the terminal output. In order to do that, we need to make the bottom pane a bit higher. We can do that by placing the mouse on the upper border of that pane, grabbing it and moving it upwards, like this:
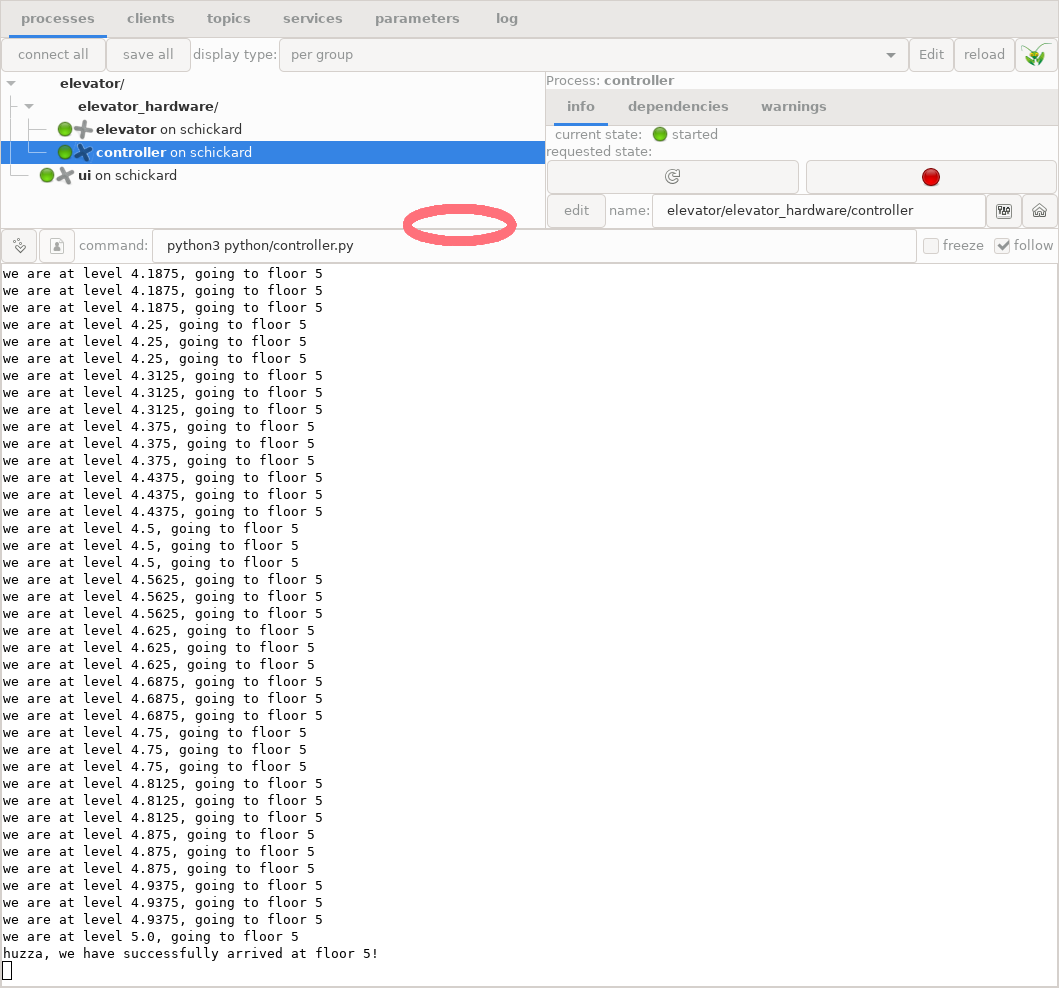
Enlarged terminal output of the controller process; the red circle shows where to grab the border
(Also, it is possible to detach a clone of the terminal window by clicking the leftmost button with the “>” symbol on top of the terminal window, which will open another window with the terminal alone in it, which then can be resized as is convenient.)
If we click the “elevator” process label on the upper left pane, we can see the elevator output:
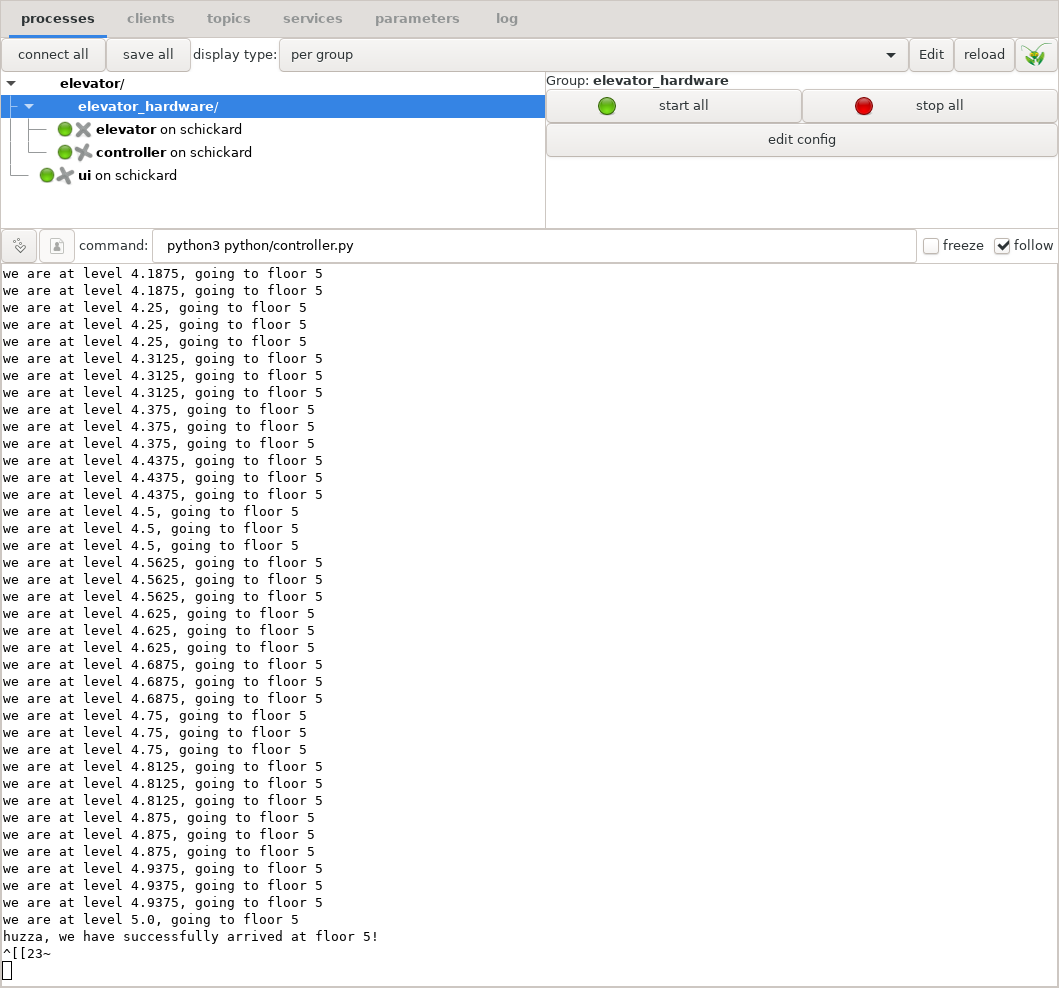
Output of the simulator
5.6.6.3. Inspecting Topics communication
If we click on the “topics” tab, we can inspect topics communication:
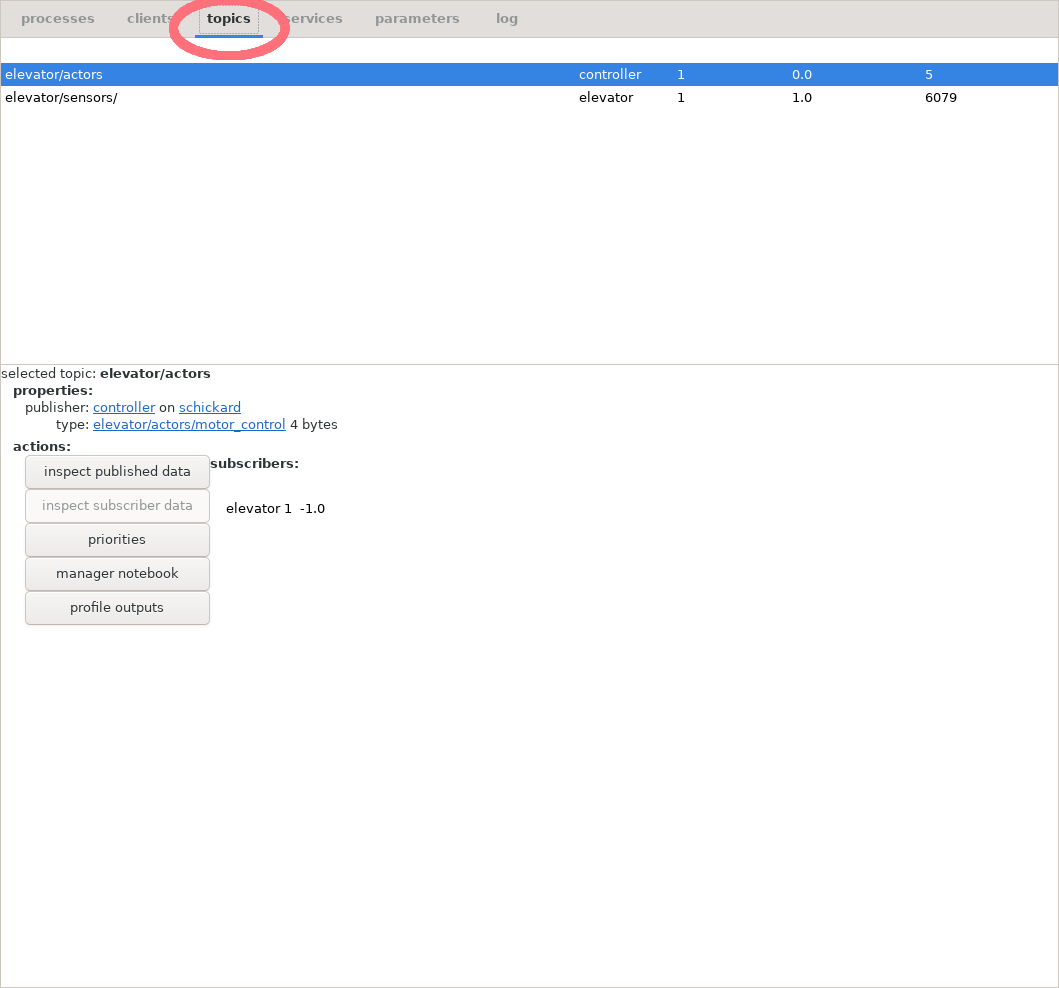
Topics tab and UI elements
Now, we can click for example the “elevator03.sensors” topic, and then the button “inspect published data”:
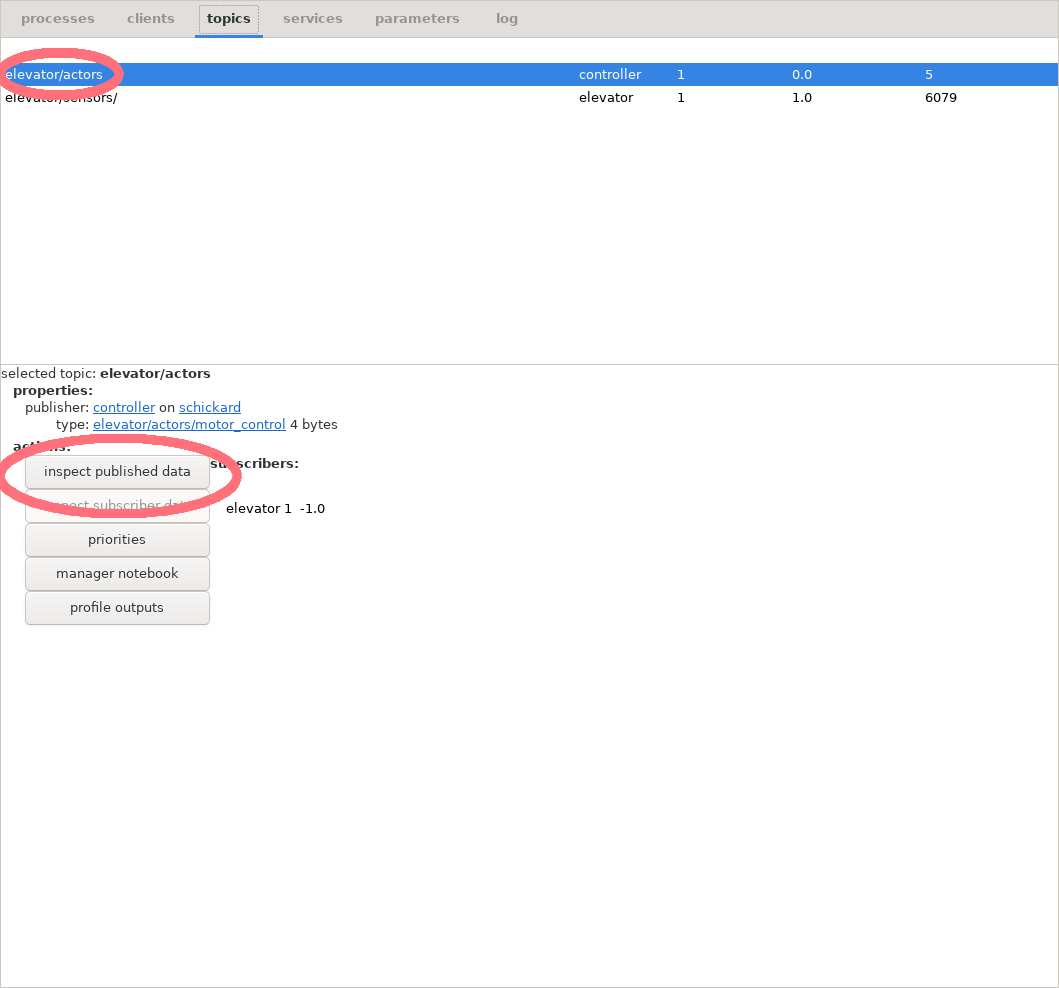
Button and label for inspecting sensors
We get this output box:
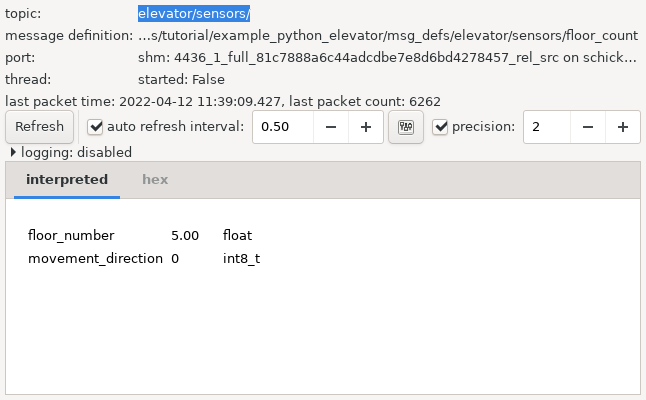
Sensor data from the elevator
5.6.6.4. Inspecting Service Calls
We can also run service and inspect calls from the LN Manager.
If we click the “services” tab, and then double-click the label “request_elevator”, we get a new ipython window which looks like this:
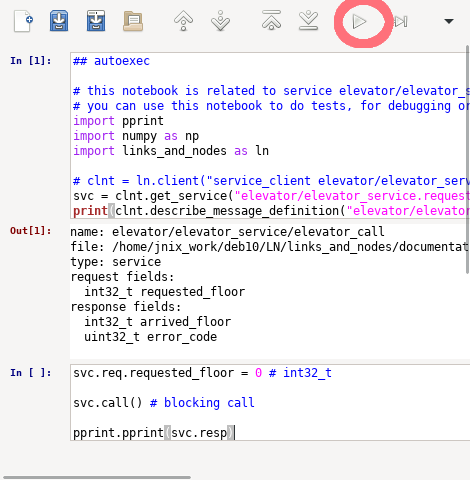
Inspecting the call_elevator service interactively.
We can, type interactive python code into the “In” panel. For example:
svc.req.requested_floor = 3
svc.call()
pprint.pprint(svc.resp)
After we press the triangular run button (symbol ‘▷’) which is marked with the red circle, this will request the elevator and print the response. In the other terminal windows, we can watch closely how our system operates.
The latter is also explained in more detail in chapter Components and their Usage in section Inspecting services.
5.6.7. Swapping C++ Components out for Python Components
We already showed that we can start the system with the command:
cd documentation/examples/tutorial/example_cpp_elevator
make
ln_manager -c elevator.lnc
Now, we want to show that we can swap out some or all of the C++ implementation with a Python program, without changing anything in the other parts. To do that, we just need to change the last command into:
ln_manager -c elevator-python.lnc
If we start this system in the LN manager, we can see that the command lines of the ui and the elevator processes use the C++ implementation as before, while the controller runs in Python.
How is this achieved? Now, we just changed a few lines in the LN configuration file for the system. Specifically, for the controller process. To be precise, we changed
1process controller
2pass_environment: PATH, LD_LIBRARY_PATH
3change_directory: %(CURDIR)
4command: ./controller
5node: localhost
6depends_on: elevator
7ready_regex: ready to receive service calls
to
 1process controller
 2pass_environment: PATH, PYTHONPATH, LD_LIBRARY_PATH
 3#pass_environment: PATH, LD_LIBRARY_PATH
 4add flags: use_execvpe
 5change_directory: %(CURDIR)
 6command: python3 ../example_python_elevator/python/controller.py
 7#command: ./controller
 8node: localhost
 9depends_on: elevator
10ready_regex: ready to receive service calls
This instructs the LN manager to start not the controller written in C++, but the python program developed and explained in the Python Tutorial example.
Also, we need to make sure that the run-time environment
provides a runnable python binary in the PATH
variable, as well as the LN library for Python; this
is why PATH and PYTHONPATH
environment variables, and the use_execvpe
flags are needed (otherwise, Python could not load
the LN module).
So, why does this work? It works because we have carefully defined both the Python and the C++ implementation to match each other, specifically in terms of:
the used message definitions
the exact topic and service names
the error codes and error handling
and the observable behavior of each implementation
5.6.7.1. Reloading the Configuration
After we have changed the configuration, we can stop the corresponding process, then re-load the configuration (as described in section Reloading the Configuration in the LN manager tutorial), and then start the changed process. This allows it to easily test and debug programs.
But what is this good for? In a nutshell: It allows for far easier and quicker implementation of experimental code, and testing and debugging of later implementations in C++. It also allows to re-use implementations in different projects, as long as we keep the APIs and interfaces stable and backwards-compatible.
5.6.8. Tips for compiling / debugging clients
If a C/C++ program was built in-place and has been compiled again, it can be simply re-started using the LNM GUI, by pressing the “restart” button in the process section (the circular arrow, or simply by stopping it and starting it again). Of course, client processes which need to register with a service provider need to be re-started, too. It is not necessary to re-start the LN manager, or all the other processes. This allows to quickly modify and run programs (for example, by temporarily adding print statements which clarify certain operations).
An extended guide on how to debug LN clients written in C++ is given in chapter Debugging an LN Service Provider written in C++. It explains, from a basic level, how to run LN clients under the GDB, how to use compiler warning and sanitizer options, and how to create unit tests.
5.6.9. Summary on the C++ Client API which we have used
This section takes up again the thread started in section Using the Communication Functions in the Client API: A First Overview at the start of this chapter.
While that section had the purpose of a bird’s eye view on the C++ API, here we will try to give you a kind of a more detailed road map useful to navigate it, condensing and sorting the information that was presented. It will provide only a little new information. Instead, in the next two sections, we will do two things: First, will briefly summarize the API functions which we have used, and how they fit together. And second, we will give you summary of the LN client API which gives you links to the details of each class and method in the Client API Reference part. In our explanation, we will also include generated functions, using the generated names of our example.
Because of the tutorial character of this chapter, the explanation will still be a bit simplified, and will leave out details that risk to distract you from the big picture. A deeper explanation of concepts will be continued in the Introduction on using the Client APIs part of the user guide.
5.6.9.1. Message Definitions
Message definitions are needed to initialize any objects that provide communication services (for example, publish/subscribe or remote procedure calls). Therefore, we want to quickly recapitulate what you need to know to start using them here:
They are small pieces of text which define data types and element names of message elements, very much like a struct or POD class in C, or C++. They allow to access the content of a communication buffer by using these named elements (also called “fields”), exactly like a POD struct in C++.
Message definitions do have names which are typically ASCII-encoded strings of the path name of the file in which they are defined, which serve to identify them [17] . They form part of a system’s API and should not be changed after they have been published to other users.
5.6.9.1.1. Topic Message Definitions
As we have seen above, message definitions for topics communication are simply a list of fields (or elements), one for each line, with the field type first, and the field name second.
One example of a message definition which we have used is this one:
1float floor_number
2int8_t movement_direction
3int8_t smoke_detected
4
See also
Message definition for hardware actors in the tutorial on message definitions.
5.6.9.1.2. Service Message Definitions
Service message definitions have a slightly more complex syntax. They start with the line “service”, followed by the line “request” and the request parameters, and finally the line “response” and the response parameters.
Request and response parameters work very much like function arguments and return values in a function call. In C++, both call parameters and response parameters are transported via POD structs.
As explained in section How to create Service Message Definitions, we can also use variable-length fields — for example, variable-length error messages — for returning service responses with an error, and these can also be used to return exceptions.
An example for such a service message definition with a variable-length array field is as follows:
 1service
 2request
 3int32_t requested_floor
 4
 5response
 6int32_t arrived_floor
 7
 8uint32_t error_code
 9char* error_message
10uint32_t error_message_len
11
12# The meaning of the error code is as follows:
13#
14#    NO_ERROR                     = 0  # no error happened
15#    FLOOR_NUMBER_TOO_HIGH        = 1  # the floor number was too large
16#    FLOOR_NUMBER_TOO_LOW         = 2  # the floor number was too small
17#    OUT_OF_ORDER                 = 3  # the hardware is not working properly
18#    FIRE_ALARM_OPERATION_STOPPED = 4  # Fire alarm, elevator has stopped at ground floor
The example shows also, that in order to form a useful interface, constants and parameters used in a message need to be clearly defined. For stable, backward-compatible interfaces, such message definitions should not be changed, nor should their name be changed (see [19] for an alternative way).
See also
Message definition for UI service requests in the tutorial on message definitions.
5.6.9.2. Code generation
Code Generation using Make
When we want to use the LN client API to enable real-time communication in C++ programs, we need to use code generation which turns the above language-independent message definitions into code that the C++ compiler can make use of. This code generation is done with a tool called ln_generate, that is part of LN.
For direct command-line and Makefile use, ln_generate has
two important options, "-o" and --md-dir. The former determines
the name of the generated output file, which is a C/C++ header file.
The latter is the name of a directory in which the program will search
for the message definitions. Several such directories can be provided.
The program needs to be called with parameters, which are the message definitions that we want to use in our client programs. Here is the command line which will generate the messages for our example:
ln_generate -o ln_messages.h --md-dir msg_defs/ elevator/sensors/floor_count elevator/actors/motor_control elevator/request/elevator_call
This command line will be invoked by the following make file, when we issue the command “make ln_messages.h”:
22NEEDED_MDS = \
23  elevator/sensors/floor_count \
24  elevator/actors/motor_control \
25  elevator/request/elevator_call
26
27OWN_MDS_DIR = msg_defs/
28
29VPATH = $(OWN_MDS_DIR)
30
31ln_messages.h: $(NEEDED_MDS) Makefile
32	ln_generate -o $@ --md-dir $(OWN_MDS_DIR) $(NEEDED_MDS)
Note
For an introduction into Makefiles, see [20]
Code Generation using CMake
When using CMake with Conan, use the
generate_ln_message_headers() helper from the
liblinks_and_nodes package. It wraps ln_generate, uses
the message-definition directories from the build environment, tracks
the involved message-definition files, and exposes the generated
include directory through an interface target.
The minimal CMake consumer example is located in
documentation/examples/guide/cmake_consume_libln/. Its
CMakeLists.txt is:
 1cmake_minimum_required(VERSION 3.16)
 2project(cmake_consume_libln CXX)
 3
 4find_package(liblinks_and_nodes REQUIRED CONFIG)
 5
 6generate_ln_message_headers(ln_messages
 7  OUTPUT generated/ln_messages.h
 8  MESSAGES
 9    ln2/pyobject
10    ln2/pyservice
11    ln/log_service
12    tests/time_service
13)
14
15add_executable(cmake_consume_libln main.cpp)
16target_link_libraries(cmake_consume_libln
17  PRIVATE
18    liblinks_and_nodes::liblinks_and_nodes
19    ln_messages_lib
20)
21
22install(TARGETS cmake_consume_libln DESTINATION bin)
The matching Conan recipe is:
 1from conan import ConanFile
 2from conan.tools.cmake import CMake, CMakeToolchain, cmake_layout
 3
 4
 5class CMakeConsumeLiblnConan(ConanFile):
 6    name = "cmake_consume_libln"
 7    version = "test"
 8    package_type = "application"
 9    settings = "os", "compiler", "build_type", "arch"
10    exports_sources = "CMakeLists.txt", "main.cpp"
11    generators = "VirtualBuildEnv", "VirtualRunEnv"
12
13    def requirements(self):
14        self.requires("liblinks_and_nodes/[~2]@common/stable")
15        self.requires("links_and_nodes_ln_msgdef/[~2]@common/stable")
16
17    def build_requirements(self):
18        self.tool_requires("links_and_nodes_base_python/[~2]@common/stable")
19
20    def layout(self):
21        cmake_layout(self)
22
23    def generate(self):
24        toolchain = CMakeToolchain(self)
25        toolchain.generate()
26
27    def build(self):
28        cmake = CMake(self)
29        cmake.configure()
30        cmake.build()
31
32    def package(self):
33        cmake = CMake(self)
34        cmake.install()
5.6.9.2.1. Using the generated header file
We use the generated code in C++ programs by including it via the #include
directive:
#include "ln_messages.h"
From the generated code, we can use type and class definitions that correspond to the messages which we have defined. It is useful to assign shorter names for them, as for example
using t_sensors = elevator_sensors_floor_count_t;
using t_motor_control = elevator_actors_motor_control_t;
which refer to the message buffers / structs defined for the
message definitions elevator/sensors/floor_count
and elevator/actors/motor_control, respectively.
5.6.9.3. Client Processes
Client processes are programs which use functions of the LN API for inter-process communication. Usually, such processes are started by the LN manager, but they can also be started independently, especially for debugging purposes. Such programs can be written in Python, C, or C++, and can inter-operate with each other.
When they are started, each process needs to contact the LN
manager to register. For this, it needs to know the host name
and port number of the LN manager. Both can be passed either
via an environment variable, or via command-line arguments (the
parameters of C++´s int main(int argc, char** argv) function),
which are passed to the LN API functions, namely the
ln::client() constructor, to evaluate the relevant
options.
But this is usually not needed: Setting the right environment variable values is done automatically when the client is started by the LN manager. This happens when the client process is configured in the LN manager configuration file to be managed by the LNM. In section Process Management, we explained how to do that. In this case, you do not need to worry about how they contact the LN manager.
(The specifics of connection to the LN manager, the LN daemon, and the LN arbiter are in detail complex, but we will not dig into that here - it is described in the Concepts chapter of the user guide, in case you need it).
5.6.9.4. Using the libln library
The name of the C++ header which contains the client API is
ln/ln.h. It is available for C11, C++11 and later.
To use the LN C++ client library, you have to include its headers into your C++ source file like this:
#include <ln/ln.h>
Important
If including the headers or (later) linking the LN library fails, this is almost always causes by either a faulty installation, or by a bug in the environment setup. See section Getting Started and Fixing Common Problems for how to diagnose and correct these.
See also
Required Headers in the reference.
5.6.9.4.1. Client Objects
ln::client() objects are needed for any use of the LN communication,
be it with topics, services, or parameters. Conceptually
one can think of that they establish some
connection to an LN manager, and can set up buffer
spaces and resources e.g. for topic communication.
5.6.9.4.1.1. Constructor
Client objects are created with the client
constructor, like this:
ln::client clnt("elevator, floor count sensor");
The client constructor can have a total of one, two, or three arguments.
As a required argument, the constructor takes a string parameter which
can be used by the LN manager for its internal name for the client
process. If the LN manager starts the process, it sets an environment
variable (LN_PROGRAM_NAME), that suggests the name
[21], and would supersede this parameter.
The two-argument form accepts a string that tells the client
how to contact the LN manager. The three-argument form
allows the programmer to pass the main() function’s argc
and argv parameters to the constructor, so that
command line options that define how to contact the LN
manager can be used. This would look like so:
ln::client clnt("elevator_service_client", argc, argv);
or so:
ln::client clnt("elevator_service_client", "justin:7777")
The standard case, however, is that the LN manager is contacted via
information passed in the LN_MANAGER environment variable,
which is a string that contains host name and port of the LN manager
in the form host.at.domain:portnum.
You only need one LN client object in a program (but you are allowed to use more, for example you could include and consume multiple libraries which independently use an LN client each).
The client objects use RAII, so all their resources are freed when their destructor is called. This includes any port and service objects.
Because of RAII, the client objects are also exception-safe.
See also
Client class in the reference.
Client Class Constructor in the reference.
5.6.9.4.2. API for Topics communication with publish / subscribe
5.6.9.4.2.1. Port Objects
Port objects are generated by member functions of a LN
ln::client object. When creating them, we need to
distinguish between subscriber ports and publisher ports.
5.6.9.4.2.1.1. Subscriber Ports
Subscriber ports are created using the ln::client::subscribe()
method, like here:
ln::inport* sensor_port = clnt.subscribe("elevator03.sensors",
                                         "elevator/sensors/floor_count");
Here, the first parameter is called the “topic” of the message, which is a string identifier for the meaning and context of the message, and the second string parameter is the name of the message definition which must be retrievable by the LN Manager somewhere along its configured search path.
The topic name can be separated into name spaces by using dots, and often corresponds to folder names in message definitions. This is useful to organize topic names.
Here, “elevator” can be viewed as a prefix, and “sensors” as a suffix for the topic name. Topic and service names are not allowed to contain slashes (for more information on topics and services names, see the tutorial section on Topics and Services Names).
The owner of the inport object is the ln::client instance. This means, that the life time of the port object ends when the client instance is destructed. Accessing oder using it after that point would lead to Undefined Behavior.
See also
Input Ports in the reference.
5.6.9.4.2.1.2. Publisher Ports
Publisher ports are created using ln::client::publish().
An example for a publisher port is this:
ln::outport* actor_port = clnt.publish("elevator03.actors",
                                       "elevator/actors/motor_control");
The parameters are the same as when creating a subscriber port: The first string is a topic name, and the second string is the message definition which the port will use to send messages. The only difference between the two types of ports are the methods which they provide in order to communicate (which we will describe soon).
As in the case of ln::inport objects, the owner of the outport object is the ln::client instance. This means, that the life time of the port object ends when the client instance is destructed.
See also
Output Ports in the reference.
5.6.9.4.2.1.3. Port Methods
Ports have specific methods, depending on whether they are an input
port or an output port: Publisher ports (also called “output ports”)
have a ln::outport::write() method, and subscriber ports (also called
“input ports” ) have a ln::inport::read() method.
5.6.9.4.2.1.3.1. outport.write()
The ln::outport::write() method transfers the data in
a message buffer to the LN messaging system. It always
returns immediately. We have used it like so:
t_motor_control motor_command.move_command = command;
actor_port->write(&motor_command);
The first parameter of the method is a pointer to a message buffer;
The programmer needs to make sure that it has the right type. The
port instance “knows” what the size of the message buffer needs to be,
from the initialization using ln::client::subscribe(),
which evaluates the message definition for the message size.
If there is any data in the message buffer which has not been read by a subscriber, it is overwritten. (it is, however, possible to increase the number of buffers).
The ln::outport::write() method has an optional second
parameter which is a timestamp value, a floating point number that can
be used to identify the message if similar messages have been sent
before. This can be a time value such as returned system functions
such as clock_gettime() in Linux [22],
with a measuring unit of seconds.
See also
Output port Methods in the reference.
5.6.9.4.2.1.3.2. inport::read()
inport->read(), including time-outs, explain return value
The ln::inport::read() method reads the data to a data buffer
from the LN communication buffer. The method has an optional
timeout parameter, which can be either a Boolean or floating-point
number.
In our example, we have used it as follows:
using t_sensors = elevator_sensors_floor_count_t;
t_sensors sensor_data;
double time_out = 1.0;

if (! sensor_port->read(&sensor_data, time_out)) {
        cout << "Warning: no sensor data was received!\n";
} else {
        cout << "getting state ... ok\n";
}
Its operation is defined as follows:
If data was already sent, the method returns without blocking and atomically. In this case, the data is always transferred completely, and copied into the receiving buffer. Otherwise, the buffer is untouched.
After such a successful transfer, the method always returns the value
true.
If no data is there, then one of three things happen, strictly depending on the type and value of the optional second parameter of the function:
By default, if the method has no parameter, then the call is blocking. This means that it waits for data an unlimited amount of time. When data arrives, it returns with the new data copied into the buffer.
If the parameter has the type Boolean and is set to
true, the call is blocking as well, and the method waits an unlimited time for data, just as in the case of no parameter.If the type of the parameter is Boolean and set to
false, then the read operation is non-blocking. This means that if there is data, the call returns immediately, and with a return value evaluating totrue. Otherwise, the call returns also immediately with afalsevalue.If the type of the parameter is a positive floating point number, the
read()methods uses its value as a time-out parameter: It waits for that number of seconds for data to arrive. If that happens, it transfers the data and returnstrue. Otherwise, when the waiting time expires, it returns withfalse.In case of a zero or negative floating point number, the call is also non-blocking, as if a Boolean
falsewas passed.
See also
Input Port Methods in the reference.
5.6.9.4.3. API for using LN Services from C++
5.6.9.4.3.1. Recapitulation of the Tutorial Example
LN services allow to call functions and methods that run in other processes or on other nodes. For using them in C++, we need to look at the two sides of the service call separately, the service client (which calls the service), and the service provider (which implements the service, for example by doing some computation, or moving an actor).
For exchanging request and response, both use the same data structure
defined by the service message definition. It is turned into C++ code
by ln_generate, and the name of the generated type depends
on the message definition name. In our case, the name of the service is
“elevator03.prompt”, and the name of the service message
definition is elevator/request/elevator_call.
When we run ln_generate on that message definition, it
generates a struct definition with the type name
elevator::request::elevator_call_t. This is the data buffer
structure which is used by both sides to communicate. It has two
members, one called req (for “request”) and one resp member
(for “response”).
In the C++ API Reference part, we will use names in all-caps to
refer abstractly to the auto-generated type and method names. For
example, our auto-generated name
elevator::request::elevator_call_t will correspond to
MESSAGE_DEF_NAMESPACE::SVMDEF_NAME_t. Occasionally, we
will use these all-caps names to link into parts of the C++ API
reference which refer to such auto-generated types.
Note
A table of these names is provided in the reference part.
In our example, the service client fills the request part of the data structure, and calls the service via a blocking call [18]. The service provider receives the data and invokes a method that is configured to handle the call; it does the requested processing, and writes the result back into the response buffer. Then the result is sent back.
For the initialization and wiring of the service, both sides have to
initialize an ln::client() object at the start of
the processing, exactly as for using topics communication.
Then, the communication is implemented in two somewhat different ways (and they also differ from the Python service client):
See also
For the request buffer type elevator::request::elevator_call_t, see
MESSAGE_DEF_NAMESPACE::MDEF_NAME_t, as well as its member elements
MESSAGE_DEF_NAMESPACE::SVMDEF_NAME::req
and MESSAGE_DEF_NAMESPACE::SVMDEF_NAME::resp in the reference.
5.6.9.4.3.2. Elements used in the Service Client
5.6.9.4.3.2.1. ln::client::get_service()
The service client needs to register a handle to
an object which is able to perform the service call.
This is done by using the client method ln::client::get_service().
In our example, this looks like this:
ElevatorClient(ln::client* _clnt) : clnt(_clnt)
{
        elevator_call_service = clnt->get_service("elevator03.prompt",
                                                  "elevator/request/call_elevator",
                                                  elevator_request_elevator_call_signature);
}
Here, the string "elevator03.prompt" is the name of the service,
“elevator/service/call_elevator” is the name of the message definition
which it uses, and elevator_request_elevator_call_signature is a
string that is auto-generated by ln_generate from the the
message definition and helps to copy the data correctly and
efficiently.
See also
For creating a client object, see ln::client() in the reference.
For creating a service handle, see ln::client::get_service() and
ln::service.
5.6.9.4.3.2.2. ln::service::call()
This handle has a method ln::service::call(), which is
called with the request data in the struct of type
elevator::request::elevator_call_t. What this method does is that
it sends the data to the registered service provider process, starts
the execution of the service in the service process, and returns the
result data back to the client. This happens independently from where
the service provider is located (be it on another host, or the same
host as the service client).
In our example, this is done by the following code:
data.req.requested_floor = called_floor;
elevator_call_service->call(&data);
std::string err_msg(data.resp.error_message,
                    data.resp.error_message_len);
Here, data is the response buffer with the request data;
data.req.requested_floor is the (only) input parameter, and
data.resp.error_message and data.resp.error_message_len are
output parameters (which are in the example copied into a new string).
The caller is always reponsible to initialize all elements of the
request data (for example by using memset()) to set all data to
zero. Otherwise, Undefined Behavior can be caused, as is
generally the case when uninitialized variable values are used in C++.
See also
For the service call function, see ln::service::call() in the reference.
For its parameter, see
MESSAGE_DEF_NAMESPACE::MDEF_NAME_t, as well as
MESSAGE_DEF_NAMESPACE::SVMDEF_NAME::req for
the request parameter buffer member and
MESSAGE_DEF_NAMESPACE::SVMDEF_NAME::resp for
the response buffer member
5.6.9.4.3.3. Elements used in the Service Provider
For the service provider, the approach can be summarized as follows:
5.6.9.4.3.3.1. Initialization
To handle requests, the service provider class defines a member of type
ln::service, and uses itsln::clientinstance (in our example, the latter was already initialized for using topics).This handler is set up by calling three functions:
the class member is assigned the return value of
ln::client::get_service_provider(), which has the same paremeters as the call toln::client::get_service()which was done in the client process [16].now, the method
ln::service::set_handler()is called, which registers a top-level handler function for the service.finally, the service is registered with the LN manager by calling
ln::service::do_register().
The resulting code looks like this:
class ElevatorServer
{

     ln::client clnt;
     ln::service* elevator_call_svc = nullptr;
     // ...

public:
     ElevatorServer() :
             clnt("elevator controller")
     {
                // ...

             elevator_call_svc = clnt.get_service_provider(
                                         "elevator03.prompt",
                                         "elevator/request/elevator_call",
                                         elevator_request_elevator_call_signature);

             elevator_call_svc->set_handler(handle_elevator_call, this);
             elevator_call_svc->do_register("default group");
             // ...
     }

     // ...
}
See also
ln::client::get_service_provider() in the reference.
ln::service::set_handler() in the reference.
ln::service::do_register() in the reference.
5.6.9.4.3.3.2. Top-Level Handler
To handle the request, we first have to define the top-level handler function, which looked like this:
private:

    static int handle_elevator_call(::ln::client& clnt, ::ln::service_request& req, void* self_)
    {
            ElevatorServer* self = (ElevatorServer*)self_;
            elevator::request::elevator_call_t data{};

            req.set_data(&data, elevator_request_elevator_call_signature);

            return self->on_elevator_call(req, data);
    }
This function uses the auto-generated type elevator::request::elevator_call_t,
which has the meta-type name MESSAGE_DEF_NAMESPACE::MDEF_NAME_t
in C++ API Reference. The top-level handler initializes
a variable of that type (which is done here on the stack),
and retrieves the data from the LN message buffers by calling
ln::service_request::set_data(), with the
address of the user-provided data buffer. The set_data()
function does two things, it copies the call parameters
into the variable data, and it registers its address
so that it can retrieve the return data when the
call is returned.
Depending on our requirements, the top-level handler function can also
call a const method, a static method of our server class, or even a C
function. The "self_" parameter might not be needed then.
Finally, the function calls into the bottom-level handler function,
which is user-defined, and in our case has the name ElevatorService::on_elevator_call().
To this function, the service request object is passed, and
the data buffer for the call.
See also
Service calls (client side) in the reference.
ln::service_request::set_data() in the reference.
5.6.9.4.3.3.3. Request Handling in the Bottom-Level Handler
The types of
on_elevator_call()parameters are as follows: One is a reference to a struct of the typeelevator::request::elevator_call_t, which we already explained above, which is named&data.And the other parameter, named
req, is a reference of an object instance of the typeln::service_request.That class has a method with the name
ln::service_request::respond().The service provider class first needs to process the request (normally, by using using parameter data from the request data buffer), then fills out the response data structure in
data.respas needed, and finally calls theln::service_request::respond()method. This finishes the service call, and returns the response data to the service client.
We have to implement the code that processes the service in
on_elevator_call() ourselves. Before the method
on_elevator_call() returns, it needs to call the method
ln::service_request::respond(). This method transfers the
response to the caller. Any communication errors will raise an
exception here. When respond() returns, the provider can be sure
that the response has arrived at the caller, and that both processes
have reached the corresponding point of their execution (in other
words, the respond() method provides synchronization).
The top-level handler (here, handle_elevator_call()) should always
return zero (in the code we show, the return value is inherited from
on_elevator_call() and passed on.)
In our example, the lines of the implementation which send the response data in the “normal” (non-error) code path are:
int on_elevator_call(ln::service_request& req,
                     elevator::request::elevator_call_t& svc) override
{

// ....
                svc.resp.arrived_floor = arrived_floor;
                svc.resp.error_code = 0;
                svc.resp.error_message = (char*)"";
                svc.resp.error_message_len = 0;
                req.respond();

}
When calling response() with a message definition which contains
pointers to data with variable length, we need to make sure that the
objects that are pointed to still exist during the call - otherweise,
our program could crash because it accesses memory of objects past
their life time.
See also
For the parameters of on_elevator_call(), see
ln::service_request and
MESSAGE_DEF_NAMESPACE::MDEF_NAME_t in the reference.
For the req.respond() method, see ln::service_request::respond() in the reference.
5.6.9.4.3.3.4. ln::client::wait_and_handle_service_group_requests(): Running the Service
After defining the provider class with its service request handler, it
needs to be run. The default method is to start service processing via
a blocking function call in the main thread. In our example, this
happened by defining a new method run() which called the method
ln::client::wait_and_handle_service_group_requests(), and
calling run with an instance of our new class after program start-up,
like so:
int run()
{
        while (1) {
                /// processing...
                double time_out = -1; // means blocking
                clnt.wait_and_handle_service_group_requests("default group", time_out);
        }
}
This code starts the service processing with a blocking call in the
current thread. In our example, the main() function calls the
run() method of the service provider class. Using this function
is mutually exclusive with using
ln::client::handle_service_group_in_thread_pool(), which starts
one or more own threads to handle service calls in the background.
Do not use multiple application threads to poll the same service group
with wait_and_handle_service_group_requests(). LN serializes such
calls internally as a safety measure, but the recommended design is
one dispatcher thread per service group. If handlers should execute in
parallel, use the service-group thread-pool API instead.
The advantage of the simpler single-threaded method is that no additional synchronization is required when handling requests. For example, it is not necessary to place locks around global resources.
The processing of service handlers in multiple threads has the advantage that the handlers can run in parallel, which can allow for faster responses.
See also
Service calls (client side) in the reference.
ln::client::wait_and_handle_service_group_requests() in the reference.
ln::client::handle_service_group_in_thread_pool() in the reference.
5.6.9.4.3.3.5. ln::client::handle_service_group_in_thread_pool(): Thread Configuration for the Service
Furthermore, the service provider class can explicitly define in which
thread service requests will be run. This is optional and can be
defined via this statement (replacing
client::wait_and_handle_service_group_requests()), which then
needs to be called in the constructor of the service provider class:
clnt.handle_service_group_in_thread_pool(NULL, "main_pool");
It tells the thread system to use a new hread pool, called “main_pool”, for executing its requests. Because this causes the execution to take place in several threads, and potentially with multiple threads running at the same time, any resources which are accessed by the service handler need to be locked and protected to prevent simultaneous modification.
This should cover for most simple cases. For more complex cases however, it should also be possible to use the direct API for calling service messages, which is described in the Introduction on using the Client APIs chapter.
See also
Using the direct API for calling LN services in C++ for using the direct API in the user guide.
Using Service Wrappers from C++ as description of the “wrapped” API for C++ in the user guide part.
Footnotes