to manage processes which depend on each other, and to start them
in the right order, and, if the systems runs on multiple hosts, on
the right node.
to facilitate communication between these processes
and to allow inspection and diagnosis what they are doing.
The Links and Nodes Manager, which we often abbreviate as LN Manager
or just LNM, is a component that centrally manages a few key
aspects of these functions: First, it “knows” the dependencies
between the processes, so it knows which processes need
to be started before others which depend on them.
Second, it knows where in a network – on which hosts – these
processes need to be started and where they are running, so it can
pass on commands and data to the hosts that run them.
Third, it knows which messages formats and data types can be used,
that are used to transport messages, and which ensures a common
understanding of what is a valid message of a given type.
All this is achieved by the LN manager being a central, top-level
component of the system. Almost all of the LN system behaves
passively, that means, it does not do anything until the user
instructs it to do stuff, which makes the system easier to
understand. For example, the client functions are just library
functions which are called and to specific stuff, and when they
return, their operation is finished. And, the GUI elements do not
start programs until the user presses a “start” button.
In the following section, we distinguish somewhat finicky between
clients and processes. Clients
are programs which use the communication facilities of LN to
communicate with each other; processes are programs which are started
and controlled by the LN manager. Because LN clients also need some
central bits of information by the LN manager, it is easiest to also
run them as LN processes, but this is not mandatory.
To facilitate this central control, the LN manager needs a helper
process, the LN daemon, which runs on every host
on which LN clients and processes managed by LN are running. The
start-up of the daemon is normally completely automatic, and it does
not have any specific configuration, which means that it is sufficient
to configure the LN manager.
See also
For more information on how processes are started on remote
nodes, please refer to section
The LN Daemon in the user guide part.
The different clients need to somehow contact the LN manager and
daemon. It achieves this by a network connection. So, in order to run
and contact the LN system, the client need to know the host name
where the LN manager is running, and the port number which it uses
for its control connection. If the LN manager starts the clients, they
receive this information automatically, via the environment variable
LN_MANAGER, where the first part is the host name,
optionally followed by a ‘:’, followed by the port number. One can
also use the symbolic name “localhost” to execute a process on the
current system that is running the LN manager.
Also, the system is designed such that several instances of LN can run at the same time. In order to do that, the LN
manager (and also the LN daemon processes), needs
to be able to distinguish between the different instances, and this is
done via the instance name. Every instance of an LN system has
an instance name, and this name needs to be different for any LN
instance which runs on the same hosts at the same time. The different
instance names are what ensures that LN daemons do not confound which
processes and clients belong to them.
Because of their importance, both the port number and the instance
name are always required to be explicitly defined - they do not have
any default values.
With this information, we can show a minimal configuration for the
LN manager (if you tried the quickstart examples, you have already
seen it in Starting the LN manager with a minimal configuration, which we
explain here in a bit more detail):
The file name extension of the configuration file is *.lnc which
is just a convention we use to indicate that it is an LNM
configuration file.
The configuration file has several sections. They are grouped by a
section name, similar to an INI file. This file has only one
section with the name instance, which indicates the instance
configuration. And this section defines two configuration parameters,
the instance name in line 2, and the port number of the LN manager
in line 3.
With this, it is possible to launch the LN manager GUI in the
command line, like that:
$ln_manager-cmy_config.lnc
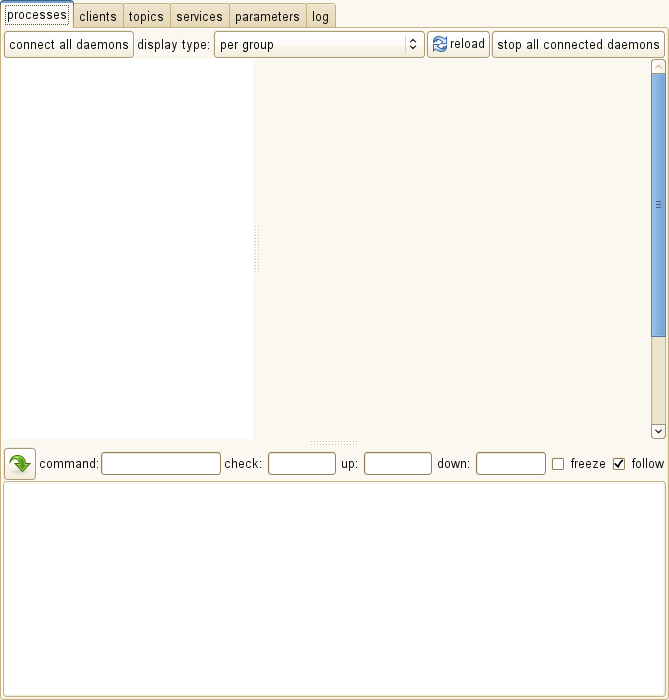
A GUI window will show up, which will display an empty list of
processes, like this:
The empty LN manager window when started with a minimal configuration.
At the moment, we can not do very much, but we will show and explain
more soon. We can close it by hitting the closewindow button
from the X11 windowing system.
The syntax for the configuration file provides some powerful abstraction
capabilities. For the moment, we will not dive into this, but just
show you one single aspect which you are likely to encounter soon:
When we define configuration entries, we can make use of functions and
parameters in the definition. For example, we can re-write the minimal
configuration file we just saw like that:
1instance2name: test_instance for %(envUSER)@%(hostname)
3manager: :%(get_port_from_string"%(instance_name)")
This uses several pre-defined parameters and functions:
The expression %(envUSER) retrieves the name of the current user
name from the process environment of the LN manager,
and places its value there. In other words, we call a function env
which returns the user name from the environment variable"USER".
The function %(hostname) returns the host name.
With this, we set the instance name to testinstancefor<username>@<hostname>.
For example, if the user name is “paul”, and the host name is “lefthandcontroller”,
then the instance name would be "testinstanceforpaul@lefthandcontroller".
In line 3, the port number of the manager is set to the result of the
function %(get_port_from_string...) with the argument
%(instance_name). The latter is a parameter of the instance name
which we just defined. The function get_port_from_string, in turn,
takes a string, and computes a suitable port number from it which
depends on the string value (technically, a hash value with a suitable
range). This ensures that for any unique instance name, a unique port
number is generated, which is computed from the instance name.
Note
At the moment, we will not go further into details, but stop
here. In the case that you need to look up functions or parameters
at a later time, you will find them in the chapter
Configuration in the top-level contents of the
documentation.
In the next sections, we will look at the basics of process management
in the LN Manager: How to define processes in the configuration, how
to start them using the GUI, how to stop, restart, signal and
terminate them, and how to stop the system. (How to do that from the
command line is explained in section
The LN Manager CLI Interface of the User Guide part).
After these basics, we will look into how to define process
dependencies, how to use them, how to appropriately evaluate the
exit status, and how to synchronize processes by their output.
We will first focus on starting a few processes which are not
particularly related or dependent on each other, and which are
continuously running.
In your real robotic system, processes will of course be specific
programs which you have written. For the purpose of this introduction,
however, we will some common system monitoring commands. To make
things simple, we assume that you are running Linux [6] and
have the ubiquitous watch, uptime, and top commands
installed. Because these are continuously running, this will also make
things a little simpler to explain at the moment.
As configuration, we use the following file, named lnm_configuration/three_processes.lnc:
In addition, it features three process sections. Each of these
sections start with the keyword process, followed by the
process name. The process name is a label which allows you to
identify the process in the GUI (and also in the error messages) of
the LN manager.
Following that first line comes the command by which the process is
invoked, together with its command-line arguments. As you see, we have
the command /usr/bin/watch/bin/date, /usr/bin/watch/usr/bin/uptime, and /usr/bin/top. The first command shows the
current date every other second, the second shows every two seconds
how long the system was running, and the third shows a current list of
running processes, together with properties like the amount of CPU
time they consume, and so on.
In addition to the process name and the command line, each process
definition has to specify a host or node which a process runs
on. This is done by the node entry, which is followed by a network
name of the computer on which the process shall be started. The name
localhost is the standard denomination for the computer on which a
program is running.
Important
If a process should run on a different computer, the LN Manager
needs to be capable to run commands on that host. This is done via
the ln daemon. If no daemon is present, it is started using
the ssh or the “Secure Shell”. Specifically, if no daemon
is present, the LN Manager needs to be able to run commands via a
password-less login on each named host. See section
starting processes on remote hosts in part
Components and their Usage.
Also, by default, starting process on remote computers requires
authentication to the LN daemon. Normally, it starts
automatically, but if you have any difficulty, please refer to
section The LN Daemon in the user guide part.
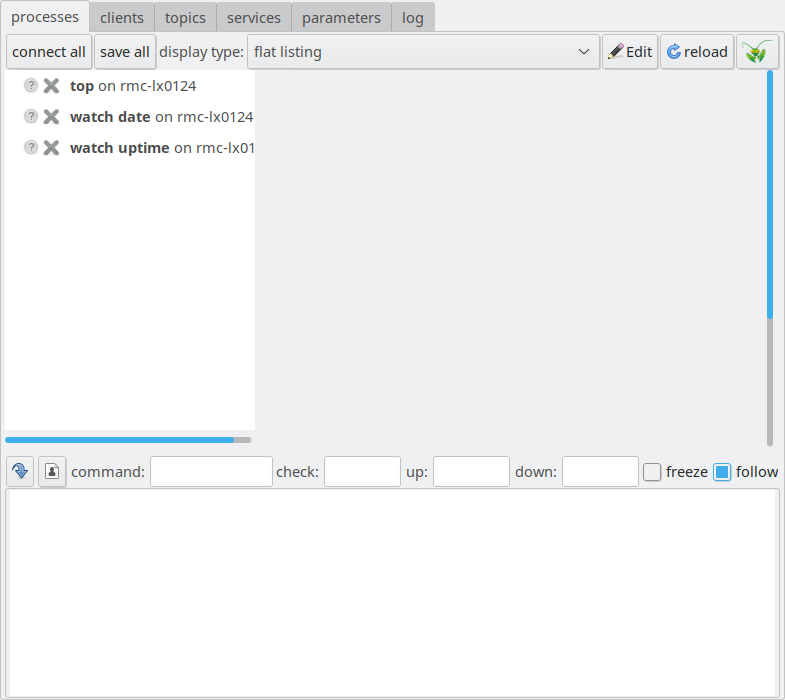
Having done that, we will see the following picture:
The LN Manager GUI with three configured, but inactive, processes.
You see a horizontal division with a bottom half (the terminal output
pane), and in the bottom half a vertical division between a panel at
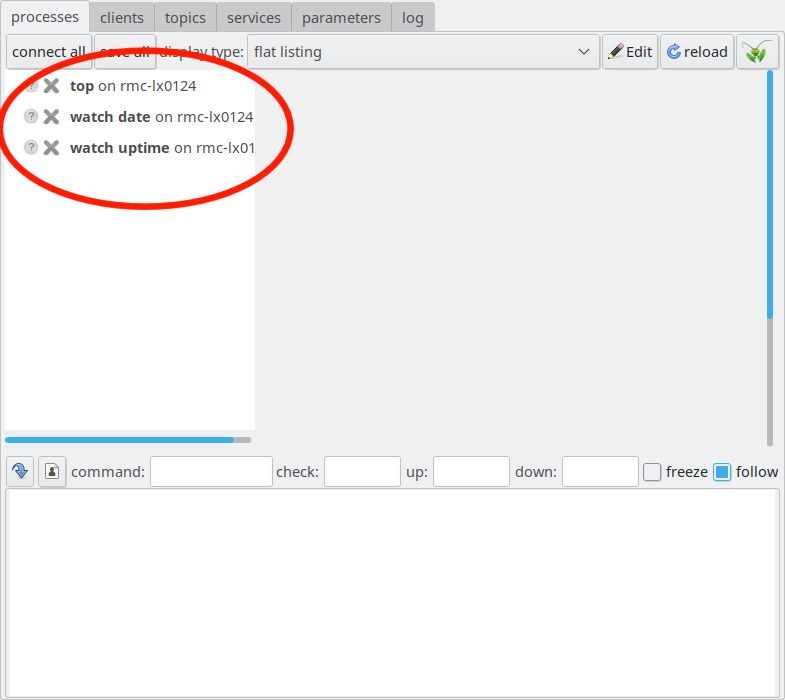
the left, and a pane on the right, which is empty right now. The panel
on the left is marked in the following picture, it is called “process
pane”:
The LN Manager GUI with the process pane on the left marked
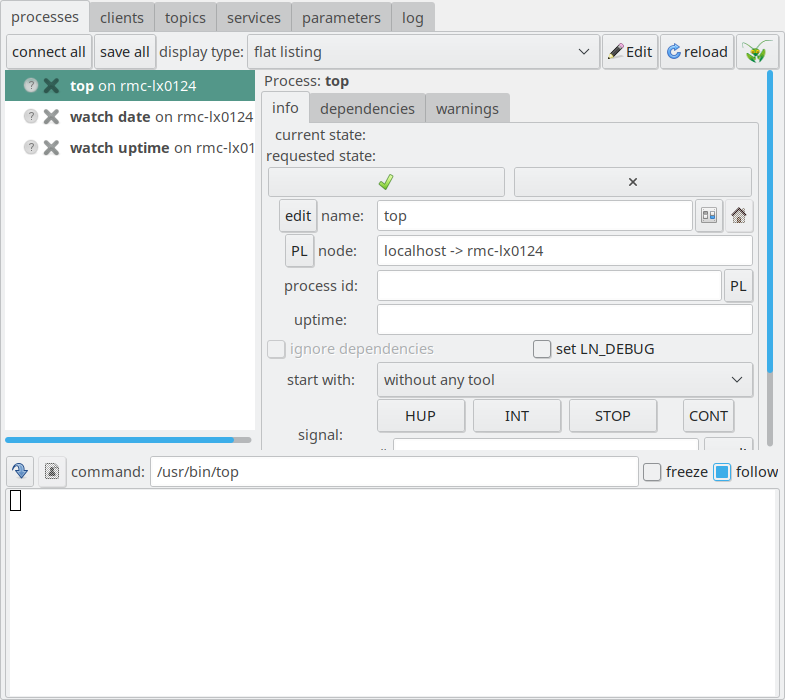
If you click on the process entry “top” as the topmost entry in the process pane, you see several options in the left panel:
The LN Manager GUI with the topmost entry of the process pane clicked.
After you click an entry in the process pane, in the pane at the right, there are
several UI elements which allow to control this process. We will just list them here:
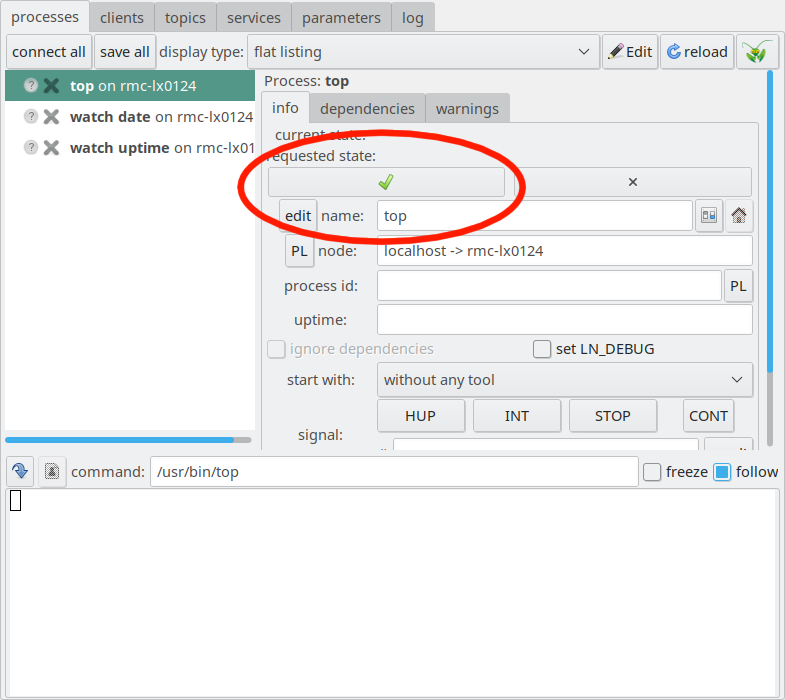
The button with the green check mark is the start button. It is
marked with a red circle here:
The process control panel with the start button marked.
If you click that start button, the LN manager will start this process, and indicate
whether it is running. So, let’s do this:
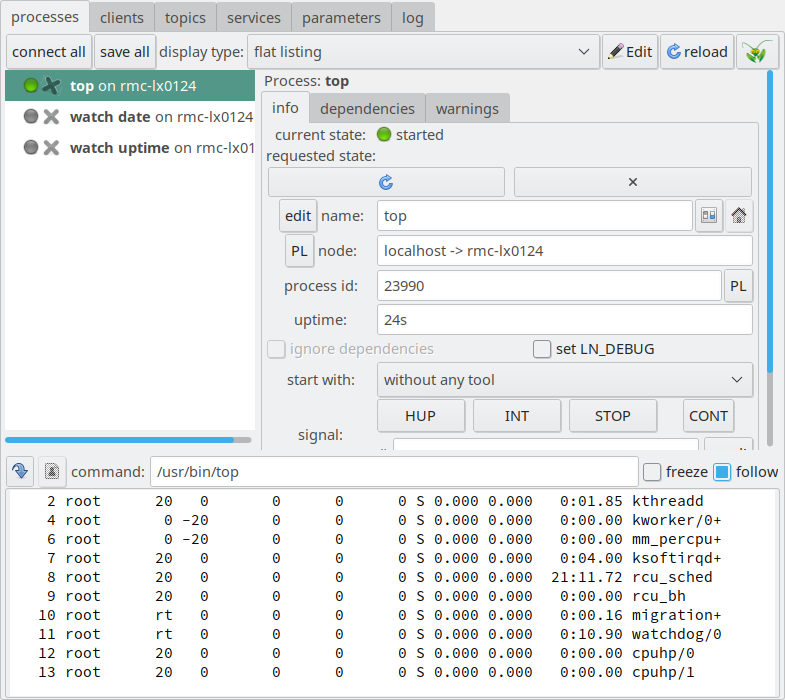
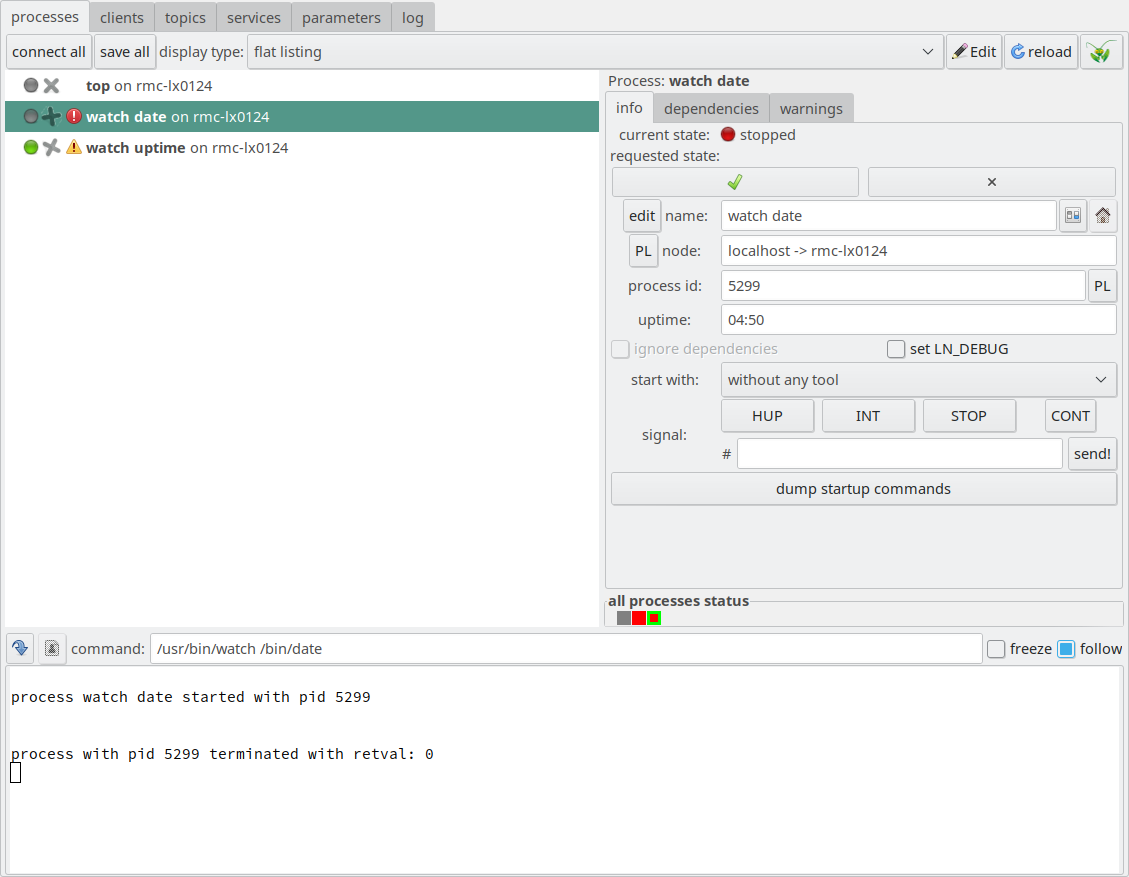
The LN manager GUI after the topmost process was
started. Here, the start button has changed to a “restart”
icon, and the terminal output of the process is shown in the
bottom pane.
Now, several things happen:
The gray LED indicator at the left from the process name in the process list changes to green. This indicates that the process is running.
The start button changes to a circular arrow, indicating that its function changed to optionally re-start the process, which means stopping it and starting it again.
The bottom pane now shows the terminal output of the process, which
is the output that you would expect from top, the command that the
LNM has started.
If you press the “start” button, now with the circular arrow again,
the process will be re-started.
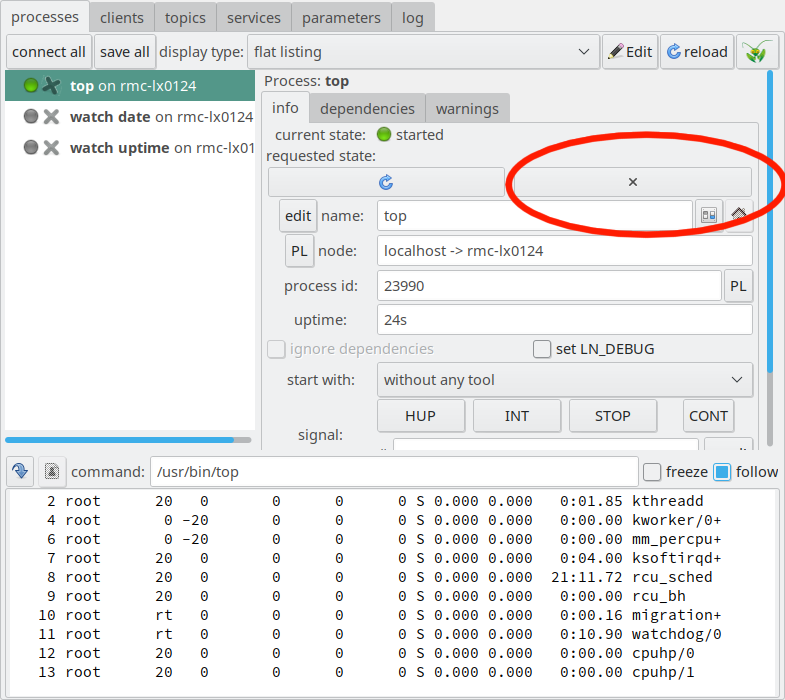
LN Manager GUI with process controls and the “stop” button marked.
If you press the stop button (which is marked here left from it, as shown above)
then the process will stop, the LED indicator in the process pane
will change to Gray, and the “current state” entry in the process
control pane will change to red.
In this way, you can start and stop all three processes as you like. The
terminal output pane at the bottom will always show the output from the
process which is selected in the process pane at the left.
Hint
In fact, the bottom pane is a full-fledged terminal which is
also capable of accepting input. For example, you can type “M” in the
panel for the “top” process, and it will change the order of the
listing to a list sorted by memory size, just as the top command
would do when running within an xterm.
Restarting Processes
You might wonder what is the purpose of the “start” button becoming a
“restart” button when the process is up and running?
The answer is simple: When you develop a system, you might very often
want to re-start a process whose source code you have changed, but
without re-starting the whole system. If you use the restart button,
the process will just be stopped and started again, without affecting
other parts of the system, which makes it convenient to change and
debug code. If, for example, the program is a script written in
Python, it is sufficient to save it and press “restart”, and then the
new version will run. Equally, you could re-compile a changed
C++ program, and re-start it.
Sending Unix Signals
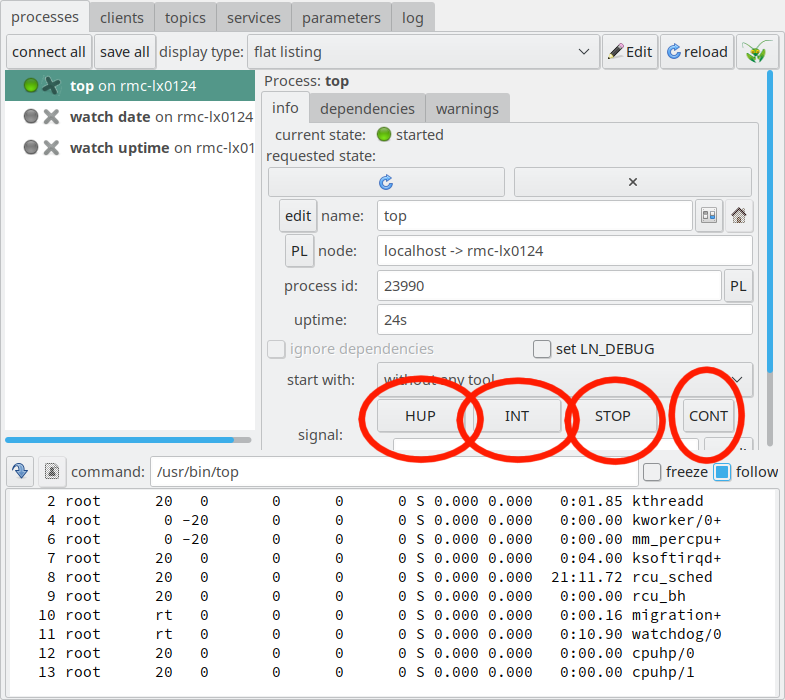
The process control pane also has some buttons which allow to send signals:
LN Manager GUI with the signal buttons “HUP”, “INT”, “STOP”,
and “CONT” button marked.
These buttons allow to send UNIX Signals to each process. Unix signals are
OS-level facilities which allow to send processes a specific message,
which can be configured to trigger execution of a specific
piece of code - be it an instruction to exit a program,
or to print some specific debug messages. The “STOP” and “CONT” signals
are special: “STOP” has the effect that a process will stop to
execute, and “CONT” (or “Continue”) has the effect that execution
is resumed.
To exit the GUI, simply stop all processes, and click at the “close
Window” button at the upper left of the window frame.
(In the case that there are still processes running which are also LN
clients, the program might show you a dialog box asking how to
proceed, giving you the option to cancel the operation, or to just
quit the GUI but leaving the processes running.)
In the general case, exiting the LN Manager GUI does not mean that
all running processes will be stopped. The reason for this is that the
GUI is just an interface of the LN manager proper, but the manager can
both continue to run, or be controlled by a command-line interface.
If the LN Manager has active LN clients which use the
communication facilities of LN, the LN Manager GUI will ask
a confirmation question before exiting the GUI. Otherwise,
the GUI will just exit, but it is possible to re-connect to
running processes after starting the GUI again, by using the
“connect all” button (see section
Re-Connecting to running Processes).
As mentioned in section Starting simple Processes,
we chose to start our explanation with processes which run
continuously, without exiting. By now, we have enough background
knowledge to explain why this was the case, and how we
handle processes that terminate.
First, Links and Nodes assumes per default that processes
are continuously running. The reason for this is that most processes
that are relevant in robotic systems are structured in the following way:
when it receives some kind of stop signal, it does some
ordered shutdown process, for example bringing
robotic arms to a safe resting position, or
slowing a moving robot down to a standstill,
and then exits.
In this scheme, a process that terminates is not the normal
case, but is probably due to an error. For this reason,
Links and Nodes assumes by default that processes
should run continuously.
We can demonstrate this by taking the configuration file
which we used before, and changing the commands a bit
to processes that stop normally, like this:
When we start the LN manager and start each process, the resulting
state will be shown like this:
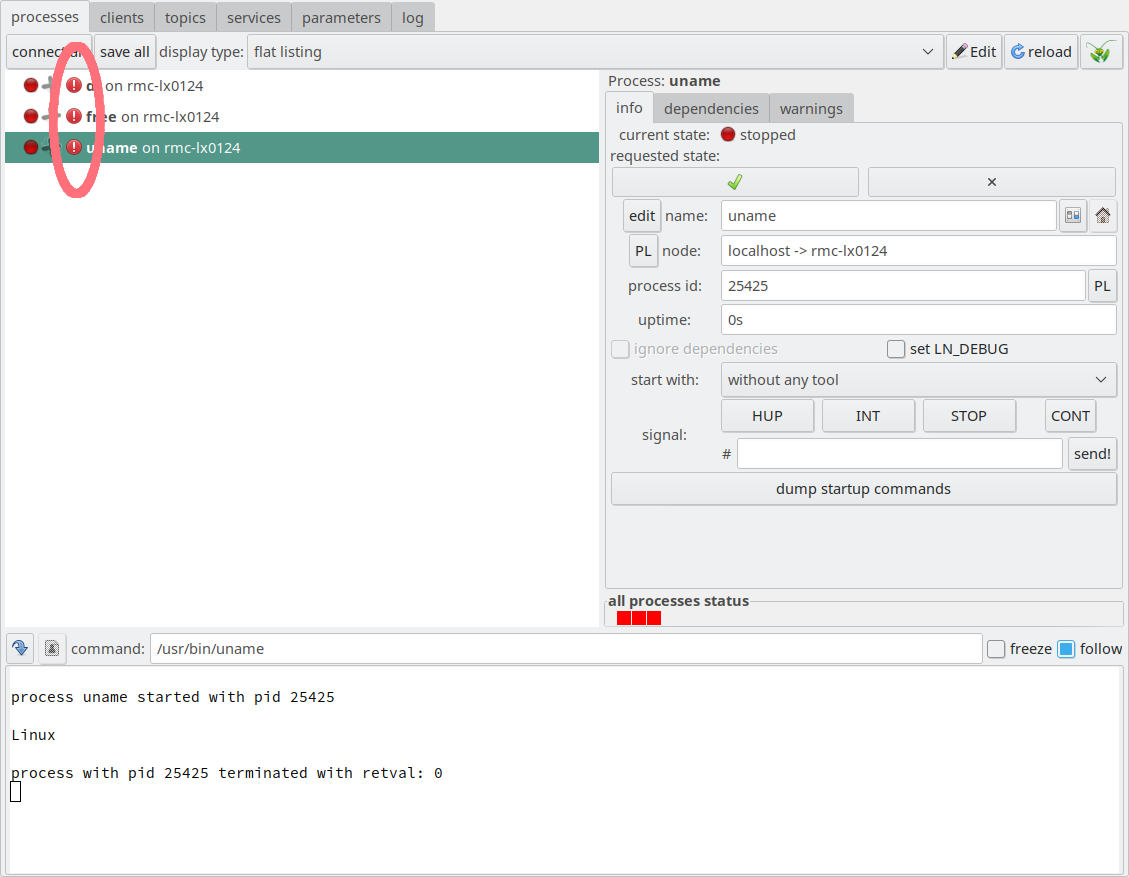
State of the LN manager GUI after three terminating process have been run
As we see, in the process pane, left from each process name, there is
a red LED button indicating that the process has stopped, and
right to it, for each process there is another read warning symbol
with an exclamation mark, which indicates that an error has occurred.
Also, if you look closely at the very bottom of the process control pane at the right,
you see three red indicators which show that some processes have stopped.
These indicators have the purpose to give you an overview on the system’s state.
The reason for these indications is, of course, that the LN manager interprets
terminating processes by default as errors in the system, because normal processes
just should run continuously. To inform the LN manager that all is right,
we need to change the configuration a bit, like this:
You see that in the lines 7, 12 and 17, we have added each time a line
with the setting: addflags:no_error_on_successful_stop. This
setting tells the LN manager that it is not an error if the process
stops, if the exit status of the process says that no error
occurred.
The exit status is, by convention, zero if no error occurred. If this
is the case, the LN manager will be happy and display the terminated
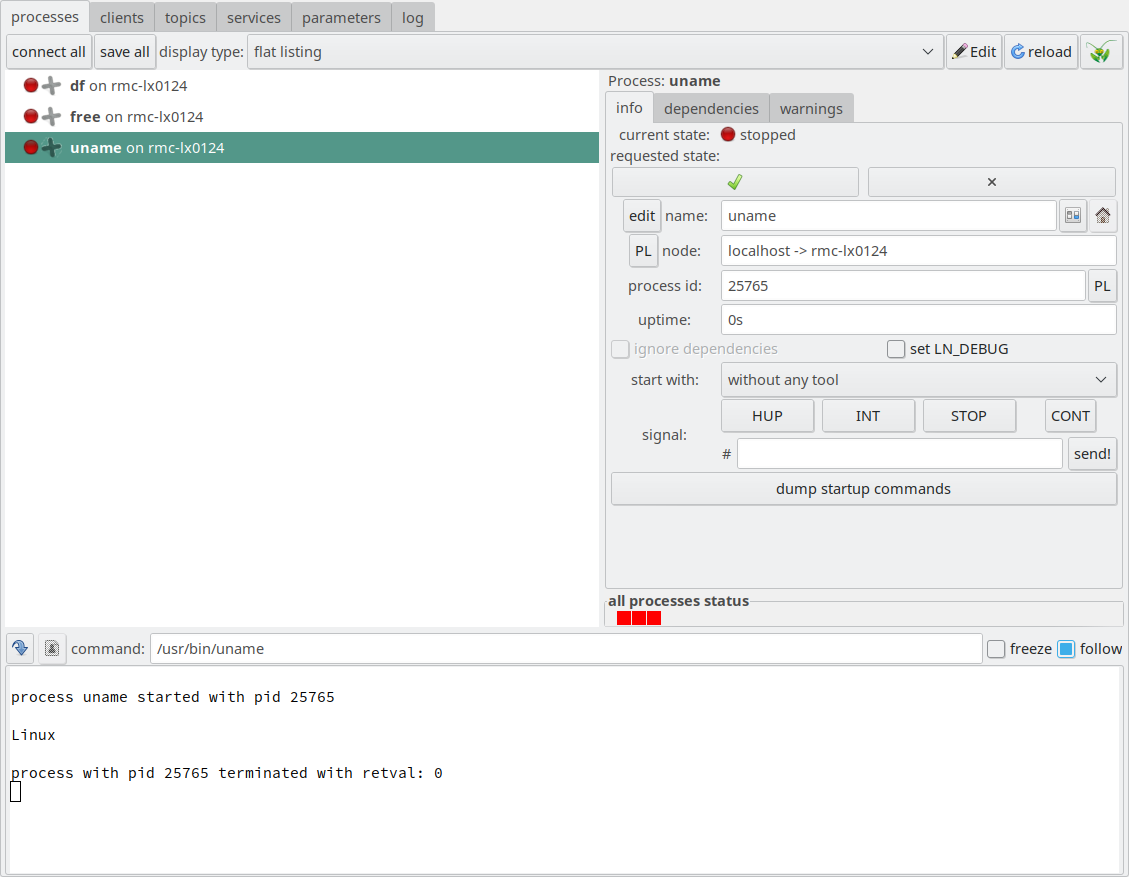
processes like this:
State of the LN manager GUI after three terminating
process have been run, with the flag
no_error_on_successful_stop added. You see that the
red warning symbols with the exclamation mark to the
right of the red LEDs are not visible any more.
Now, we still see the red status LEDs which indicate that the
processes have stopped. However, the LN manager does not mark them any
more with error indicators which have the exclamation mark.
See also
There is also a different LN facility for processes which
just run for a short moment with the objective to configure or
adjust something in a system and set the right system state before
a robotic control process can start. These are so-called
state objects, which tell the LNM how to set and
check a state. They are basically a specialization for
short-running configuration processes. Describing these is beyond
the scope of this tutorial, but you can find more information in
the section on defining LN state objects and what they are good for in the User Guide.
Note
If you want to learn more about how flags can be used to
configure processes, you will find a complete description in the
section flags in the
process section reference page.
As explained in the Introduction, splitting up systems into different
processes can make them easier to develop and debug. However, with this
modularization comes the need to orchestrate all these processes: They need
to be started and stopped in the right order.
Typically, processes contain some initialization code, which sets up
the program and connects to other parts of the system, and then it
enters a work loop, that usually provides a functionality to another
part of the system. In a well-designed system, the dependency
relations between processes can usually be presented as a kind of
hierarchical graph.
So, we need to make sure that for each process, the other system parts
which it depends on, are started and ready to process data before we
start that process. Typical init systems achieve this with many
separate configuration files, which are a bit cumbersome to inspect as
a whole. In Links and Nodes, the dependency description is done
differently, as a part of the LN manager config file, so that it is
easier to inspect and view how processes depend on each other.
To make sure that a process is started after another process, we add
dependency directives to each process section. For example, if we
want to continue from the example in section
Starting simple Processes, we can change the
process entries for watchuptime and top as follows:
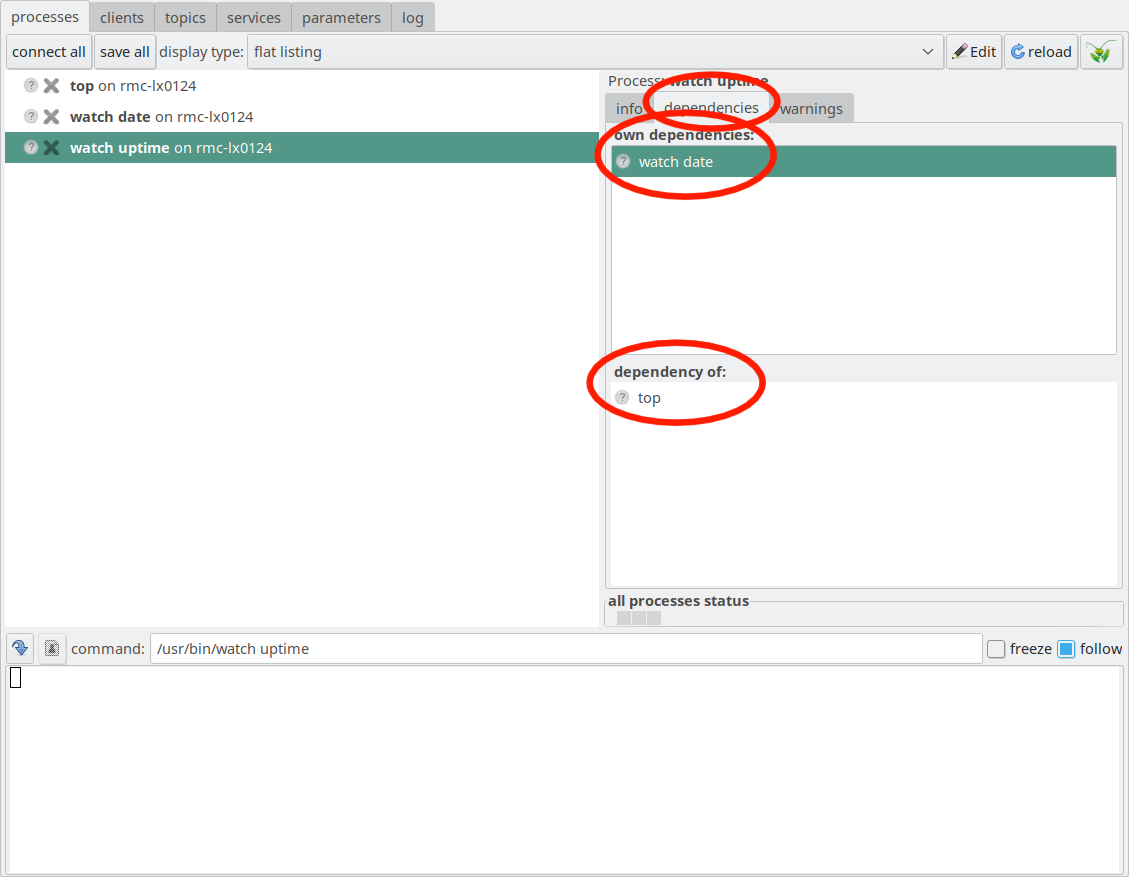
Everything looks almost like before. However, we can inspect
the dependencies which we defined, by clocking at the watchuptime
entry in the process pane at the left, and then clicking at the
dependencies tab in the process control pane. The LN manager
will then display the dependencies of that process, as well as
a list of the processes which in turn depend on watchuptime:
Dependency tab in the LNM GUI, with the list of own dependencies, and a list of dependees.
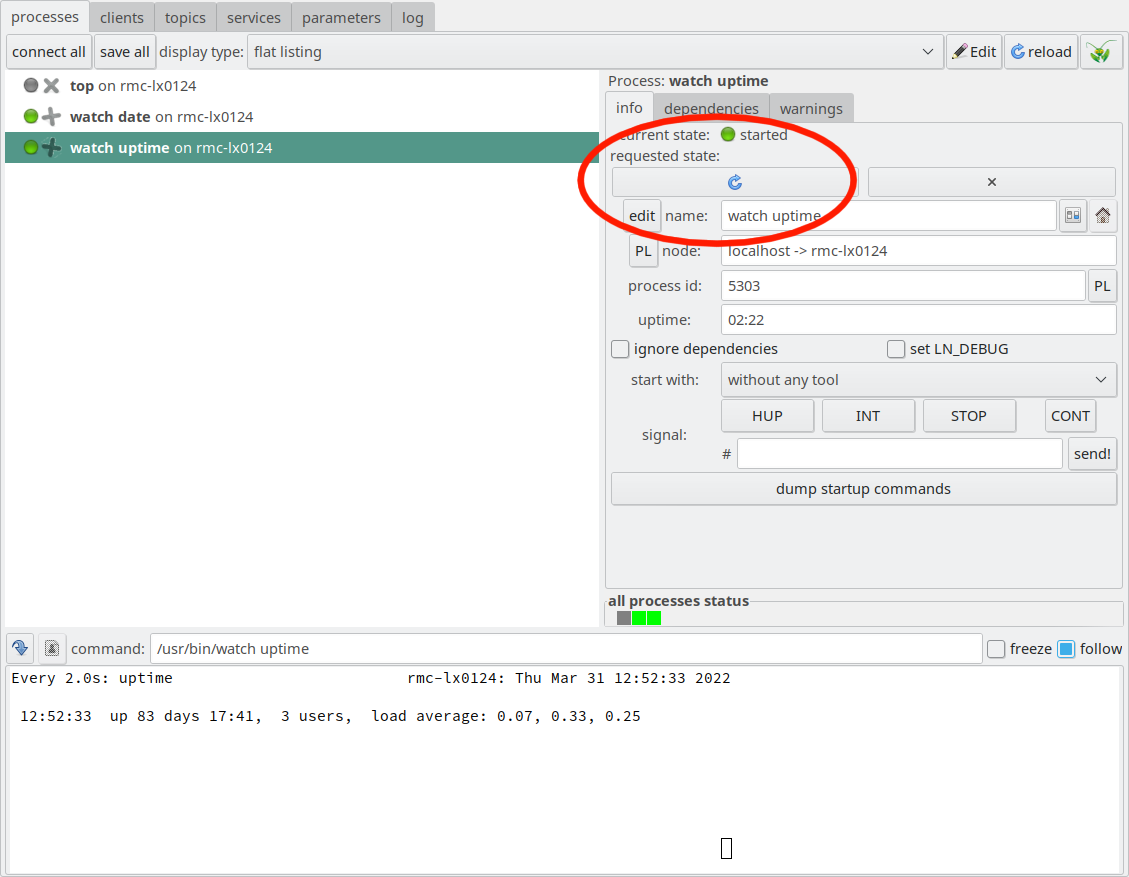
Now, if you click first the info tab, and then the “start” button with the green check mark,
you will see that uptime will start, and the process “watch date” will also be started.
(Actually, it starts before, but we cannot see this because “watch date” starts
very fast):
After starting “watch uptime” using the green check mark “start” button, both the process “watch uptime” and “watch date” have been started.
Now, if you click the process pane entry for “watch date” and stop this process, it stops, but now an error mark with an exclamation mark is displayed in the process pane:
When “watch date” is stopped but “watch uptime” still
runs, this is marked as an error because of the failed
(and therefore, missing) dependency.
Because larger systems are composed out of many subsystems, it is often
helpful to group processes with dependencies so that they become a bit
ordered. Also, grouping enables some additional functionality of the
LN manager, especially the capability to start and stop a number of
processes, that belong to a common sub-system, together. To add
grouping, we can simply add a new directive, push_name_prefix to
the process section, like this:
Here, we add the prefix “time/” (including the slash, ‘/’)
to the names of the two processes “watch date” and “watch uptime”.
When we refer to these processes in the dependency definition
of the process “top”, we need to include that prefix,
because top is not part of this group. This still does
not look overly interesting. But now, we can nest groupings,
and instruct the LN manager to display this nesting,
with a little more configuration like here:
The flag setting enable_auto_groups in line 4 instructs the LN
manager to display the processes in groups. In addition, we put all
processes into an outer nested group called “monitoring”. The result
looks like this:
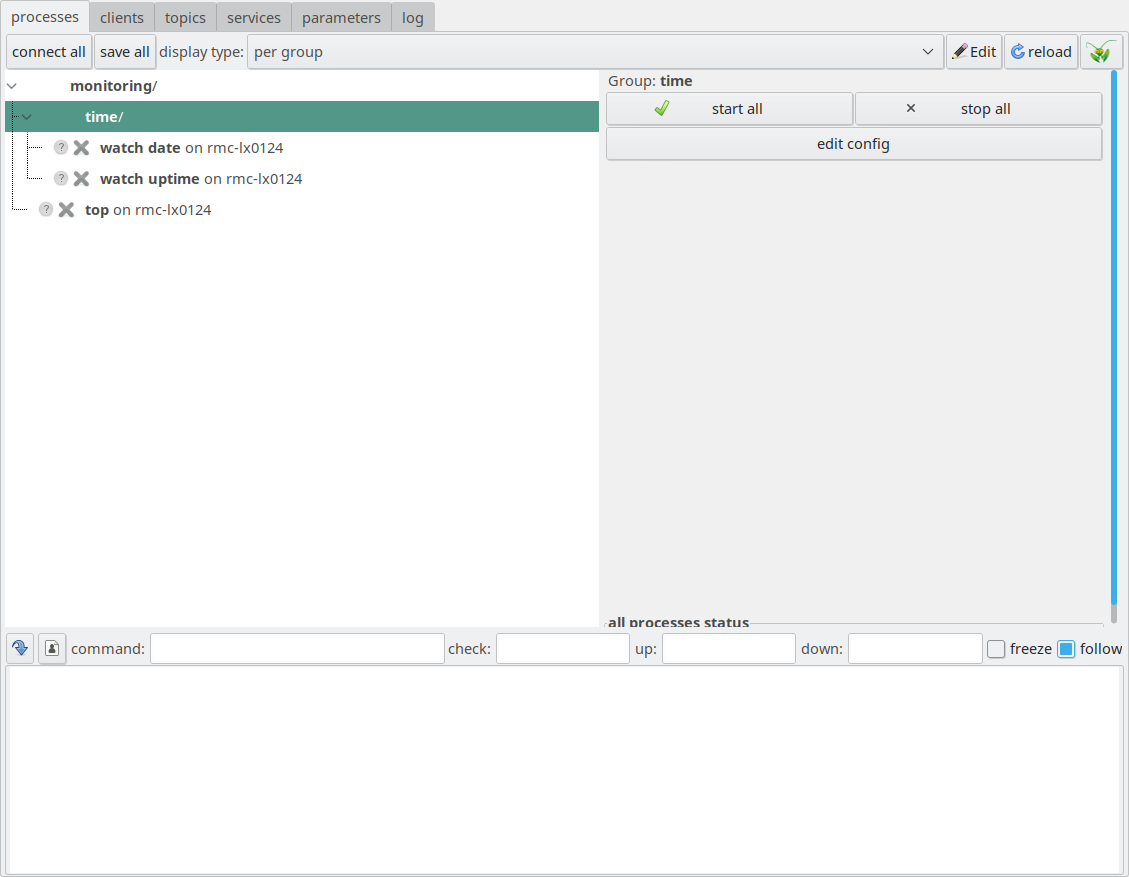
Processes with hierarchical grouping, with an inner “time”
group, and an outer “monitoring” group, with the “time”
group selected in the processes pane.
Because it belongs to the instance, this configuration item
goes right below the instance parameters.
Now, we see a tree of grouped processes in the left pane, with an inner
group “time”, and an outer group “monitoring”. The “time” group is
selected here in the process pane on the right, and we see that it
also has a “start” button. In this way, it is possible to start all
processes in that group at once, while observing their
dependencies. This is quite useful for starting components of a
complex hierarchical system one by one.
It is also possible to collapse and expand the groups, so that we can
comfortably navigate between a much higher number of processes.
In the case we have shown here, the resolution of the dependency
is done in a very simple way: The LN manager starts each process
in order, and the assumption is that just starting each process
once is sufficient to met the requirements. One could
stop and re-start some processes, but this would not
invalidate the initialization sequence.
Actually, there are two ways in which the startup dependencies
can be resolved, indicated by the respective keyword:
depends_on, the default configuration, which we were using
above. This means that another process needs to be running, and, by
default, also needs to continue to run, for the process that uses
the declaration to start and run.
depends_on_restart: This setting means that a process B depends
on another process A such that it needs to be started after
process A. If process A is stopped (e.g. killed, or terminates with
an error) after process B was started, process B is marked with an
error flag in the process list, which is only cleared if A is
re-started and B re-started after that. If one stops process A
manually in the LN manager using the control buttons, process B is
automatically stopped as well, to avoid the erroneous state.
The main purpose for this kind of dependency is when process A is
something like a TCP server, which sets up a connection which
process B requires to work. If process A gets killed or terminated,
process B will get into an error state, because the connection is
broken. In this case, restarting process A will not fix the error
state of process B, because it first needs to re-initiate the connection
and set again up its state with the server.
As an example, if the code for the example above would
use this setting, the section for the process top would
look like this:
       process top
       command: /usr/bin/top
       node: localhost
       depends_on_restart: time/watch date, time/watch uptime
Now, if we stop the time/watchuptime process, the process top
stops, and if we re-start time/watchuptime, we need to
re-start top manually to get it running again.
In the default configuration and using the depends-on directive, it is
assumed to be sufficient that this process was started, for starting
other processes that depend on this one. However, this is often not
very robust. For example, the initialization of this process could
depend on other processes or resources on a network, or be delayed if
a system is very busy. This requirement is called synchronization.
In many cases, it is not sufficient to just start processes. Rather,
we need to start first one process, then this process needs to set up
some services which are needed by other processes, and only then the
other processes should be allowed to start.
There are several ways in which the start-up of a process can be
synchronized with further options:
To synchronize processes by their terminal output, we can add a
directive “ready-regex” to a process section. It defines a string or a
search pattern which the LN manager uses to decide at which point in
time the execution of that process has finished its start-up: Only
when that string or pattern appears in the standard output of a
process, the process is considered started. This can be signaled by
the program with simply printing that string to the standard output
(“stdout”, in C) when the program in question has finished its
start-up chores.
The setting for ready_regexp can be a regular expression
which specifies which output lines will be considered as a finished
start-up.
This way to synchronize process startup is normally very robust and simple.
See also
The section ready_regex
in the configuration file reference.
start-on-ready is an additional keyword which can start
additionally specified processes or configuration utilities when a
process is running.
Note
The use of this keyword overlaps somewhat with so-called
states, which can be described as one-shot configuration
setting which set up some part of system configuration,
for example they could initialize a specific network interface.
More explanations on this topic in the defining LN state objects and what they are good for section
of the User Guide.
It is also possible to start processes on different hosts. So far, we always used the directive:
node: localhost
This just tells the LN manager to run the process on the same host
on which the LN manager itself is running. It does not need
a network connection or configuration to do that.
Alternatively, you can specify another computer as node on
which the process will run. To do that, a few requirements
need to be met:
on the other host, an ssh daemon package, for example
openssh-server, needs to be installed and configured to be
accessible. Possibly, the access rules in /etc/hosts_allow and
/etc/hosts_deny need to be configured to access the ssh daemon
also, the ssh server and client need to be set up to
allow for password-less login, usually via public key
and challenge-response authentication. To explain the
details would go beyond the scope of this tutorial,
but you should be able to issue a command like:
sshmyotherhost
and this should, without requiring a password, open a shell
connection on the other computer named “myotherhost”.
also, the remote computer needs to have an installed Links and Nodes
LN daemon program. This program manages remote
connections and starts processes on the remote host.
the LN manager can also be configured to secure the LN daemon so that they cannot be accessed without
authentication. See section Daemon Authentication for
further information on this.
After these set-up steps, it is sufficient to specify the desired host
name for the node parameter in the process section. It is also
possible to specify an IP address in place of the host name
(though it is in generally preferable to use symbolic names).
See also
For more information on how processes on remote hosts are started,
please refer to section The LN Daemon in the user guide
part.
The LN manager configuration can also separate logical node names from
physical host names. A physical host name is the real machine name you would
use with DNS, SSH, or /etc/hosts. A logical node name is the role used by
the LN configuration, for example compute_node or vision_node.
Use physical host names in the hosts section. Use logical node names in
process definitions. The node_map section connects the two. This makes it
easier to adapt set-ups to changing hardware, and to focus on the logical
structure of a set-up.
In TCP networks, a host name is associated with an IP address which
in turn is bound to a network interface. So, it is not only
possible to have several symbolic names that point to the same IP
address, but also to have several names and IP addresses that refer
to different network interfaces on the same host (a bit like if you
have one flat with more than one land-line phone and different
numbers for it). For more basic information on the principles of IP
networks, the Linux Networking HOWTO might be a good
starting point.
Links and Nodes has the explicit goal to define
the process environment in an unambiguous and deterministic
way. The reason for this is that the standard Unix way
to adapt and tweak configurations in user-specific files
is very flexible, but it makes it also very hard
to oversee all the effects of a setting, and even harder
to know where a specific setting value comes from. This means,
a specific configuration can be hard to reproduce.
For example, the file .matlabrc in a user home directory can affect
the behavior of Matlab. This is undesirable if the user wants to share
complex software with other people which do not have the exactly
identical setup: His Matlab programs may work or not, and worse, they
can stop working without any obvious reason (and by experience, this
will usually happen at the least desirable time). For these reasons,
in Links and Nodes, the environment in which processes are started is
mostly restricted (for example, the USER and HOME
environment variables are unset).
Here are three directives which manipulate the most important
environment parameters of processes. The need to be set in the process
section of the LNM config file:
environment
The directive environment allows to specify values of
environment variables which will be
passed to a process. For example:
processpython service clientenvironment: PYTHONUNBUFFERED=True, PYTHONIOENCODING=UTF-8
will set the environment variable PYTHONUNBUFFERED to the value
“True”, PYTHONIOENCODING to UTF-8, and pass it to the python process.
pass environment
pass_environment will just pass an existing, inherited environment
setting, with which the LN manager was started, to the LN process. For
example:
processpython service clientpass_environment: LD_LIBRARY_PATH
this will pass the value of LD_LIBRARY_PATH with which the LN Manager
was started, to the python process.
append environment
The “append environment” setting will append a string to an existing
environment variable, without deleting the old content or values of
the variable. It is for example suitable for extending the PATH
environment variable.
add environment
In the same way, the directive addenvironment will add a new
variable with a specific value to the process environment. In
difference to “append environment”, it will not preserve the old
inherited value, which might have been set when the LN manager was started.
As an example, we show what happens if we use the first example with
three processes (section Starting simple Processes)
without absolute paths. First, we modify the configuration of the
commands a bit like this:
1instance 2name: starting_processes_unresolved for %(envUSER)@%(hostname)
3manager: :%(get_port_from_string"%(instance_name)") 4 5processwatch date 6command: watch date 7node: localhost 8 9processwatch uptime10command: watch uptime11node: localhost1213processtop14command: top15node: localhost
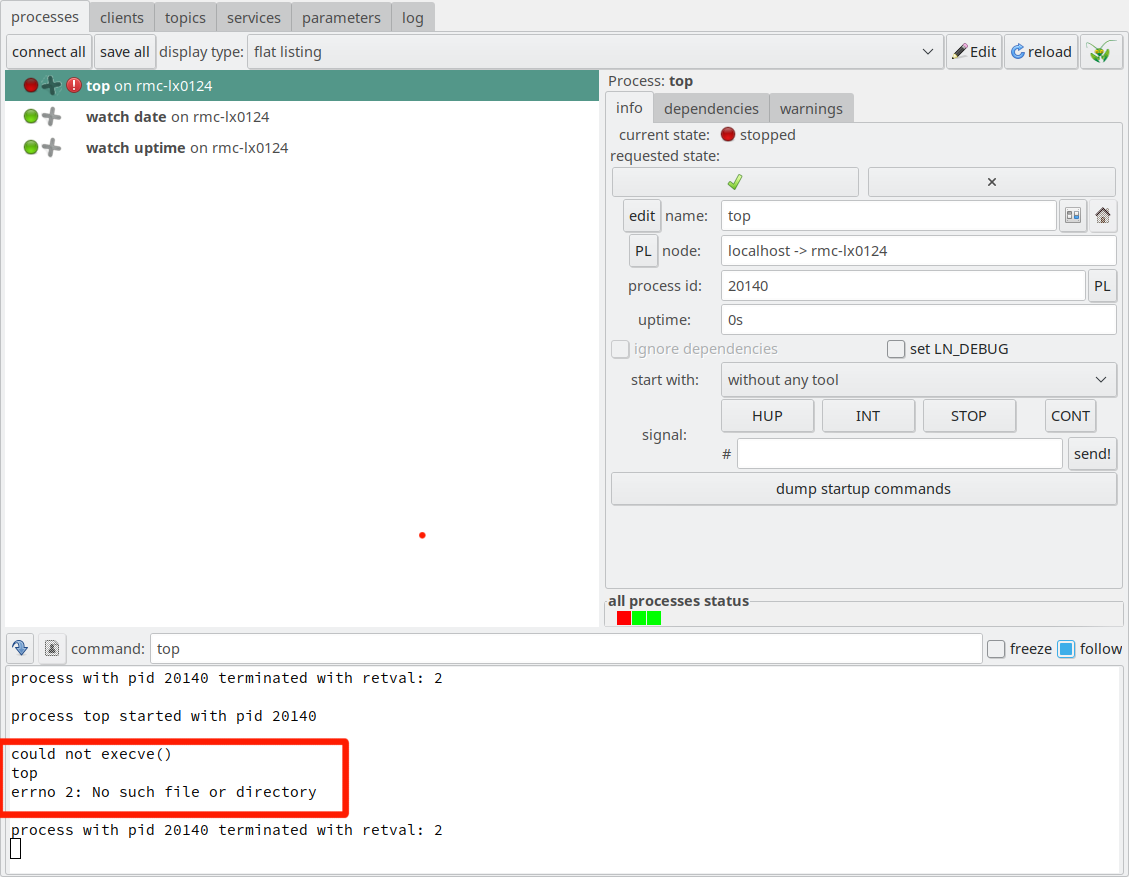
Note that the absolute paths were removed from the command definitions.
If we run this, we see an error message in the process output pane
in the bottom left, like this:
LN manager after an attempt to start a command with a
relative path, and no PATH environment variable being set
To fix this, we change the process settings in the following way:
Here, we have added the PATH environment variable, which now contains
only these folders. Also, we need to add the line flags:use_execvpe. It instructs
the Linux kernel to search the PATH environment variable to find the process, and to
pass the specified environment values to that process. (Otherwise,
the Linux kernel would complain that it did not find the executable specified
in the command directive, unless its full path name was specified.) [5]
For this change to take effect without re-starting the whole LN manager and all processes, we have to re-load the configuration, which is shown in the next section.
See also
A detailed list of possible settings is available in section
process section of the reference part, so we do not need to
repeat these here.
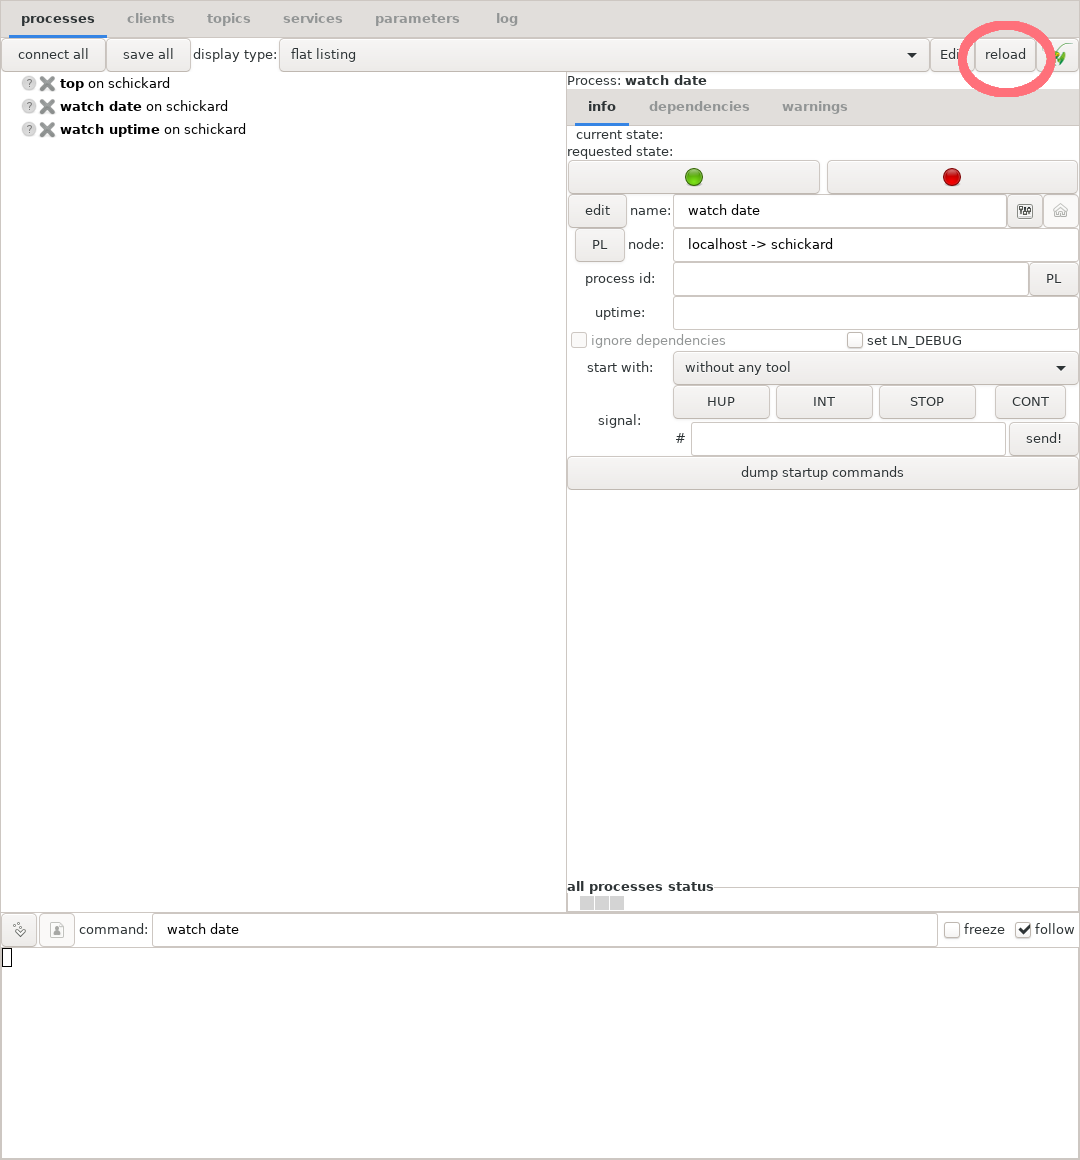
Reload button of the LN manager, allowing to re-read the configuration
If we, as shown in the figure above, press the “reload” button, the configuration
file fill be re-loaded without the need to exit and re-start the LN manager.
This will not affect running processes. It is also possible to change
a configuration of how a process is started - of course, when that process
is running, it needs to be stopped and re-started itself.
Important
Re-loading a configuration with topic communication
with processes on remote hosts is an operation that is
well-defined, but also internally very complex. It is
possible that such complex operations still trigger
some bugs. If you absolutely need a reliable operation,
you should stop such processes first and initialize
them after re-loading the config.
The LN Manager also defines a number of environment variables itself,
which can be helpful to set up processes. The most important is the
LN_MANAGER variable. It is passed to processes and allows
LN clients to contact the right manager.
Also, the LN manager sets the environment variables
LN_PYTHON and LN_PYTHONPATH. These allow to use
the settings for the LN manager to execute python scripts. However, if
Python programs have more complex requirements, it is better to the
the information from the package manager to find Python libraries,
because this allows to control the Python and library package versions
which your program will run with.
Another important parameter of the process environment is the work directory
of the process, also called CWD. We already have seem one piece
of code which sets it in the quickstart examples, the essential lines being these:
processpython service clientchange_directory: %(CURDIR)
command: python3 client.py
These instructions tell the LN manager to set the work directory of the
python command to the folder in which the currently evaluated LNM
config file is placed [4]. This in turn allows to
specify the python script which the python command should execute, as
an relative path name “client.py”. The name of the script is searched
by the python interpreter in the current working directory, so it is
sufficient to place it there.
As the last important topic in our overview on process management with
the LNM, we look at setting process priorities. Priorities are parameters which adjust how much CPU time
the operating system gives to different processes. Generally, for
real-time processes, the higher a priority is, the more computation
time it will have allocated (this is different from so-called nice
values which are used to manage normal processes). In Linux real-time
processes, the maximum priority value is 99.
Important
In order to change the scheduling of processes to
real-time scheduling, you need
proper administrative permissions [3].
In addition, it is possible to change the scheduling policy. In a
general-purpose operating system, the policy is optimized for batch
processing and GUI input so that all processes make progress and
appear to run smoothly even if a system is highly loaded. This is
achieved by quickly changing between each process, and let them
progress for a tenth of a second or so.
However, this is not the needed behavior for real-time
processes which need to meet strict timing and latency
requirements, often in the range of milliseconds. When managed with
the normal algorithm for CPU time allocation, they would often
respond too late. Therefore, it is necessary to adjust the
scheduling policy, so that such processes are always run first
if they have work to do, taking precedence over all others.
Here, we set the scheduling priority of “watch date” to 15, and the
priority of “watch uptime” to 10. In addition, we set the priority of
“top” to -10, and the scheduling priority to SCHED_FIFO, which is a
real-time scheduling policy.
Warning
Depending on the system version, numbers of processors
etc, you need to be very careful that a real-time
process does occasionally block and that it specifically
does not become CPU-bound (for example, it must
not enter an endless loop). Otherwise your system could
become completely unresponsive and
uncontrollable. (This is less of a issue with more
recent multi-core systems which reserve some minimum
time for other processes.)
See also
Real-time programming on Linux is a bit of a specialist
area, and it can be hard to find good introductory information on
it. If you look for essential information beyond what is available
on the web, some recommended reading is Linux System Programming
by Robert Love, Chapter 6, the section on real-time scheduling,
pages 190-204. (Reilly, 2013, Second Edition, Sebastopol / CA,
ISBN 978-1-449-33953-1).
This section gives an introduction to inter-process communication
(IPC) in Links and Nodes, both on the general aspects, and
what one needs to know in respect to IPC for the central component,
the LN Manager.
To use IPC, one also needs to use certain API functions from
the client API library, which are slightly specific for
the used programming language. How to use these API functions
will be explained in the following part, for both Python
and C++.
This section will build upon source code snippets taken from the
quickstart section Topic Communication in Python, but
in difference to the code examples shown there, it will present more
an explanation from the ground up.
Message-passing is a very successful and
well established method of communication in distributed systems.
One might wonder why it is so widely used? There are a number
of good reasons for that:
message-passing is easy to use - one only needs a few functions
for sending and receiving messages, which is a small API
message-passing exposes very little ‘state’: Sending and
receiving messages is “atomic”, a process does not
need to deal with half-sent messages. Less state means less
potential error conditions which have to be handled, so this
leads to more robust programs.
message-passing is useful for real-time components because
it can be made both reliable and very fast (at least as long as
senders and receivers are on the same computers). Messages
with a few hundred bytes in size can be transmitted in
nanoseconds time.
it does not require the use of multiple threads, but makes
it easy to separate software into processes, which
are mostly protected from each other, and therefore
more robust and also easier to debug.
message-passing is also a useful and flexible building block
for more complex patterns of communication.
The communication paradigm which Links and Nodes uses
is the publish/subscribe pattern. This means:
One process, called the publisher, announces its intention
to provide messages with a certain data format, content, and
meaning.
One or more other processes, called the subscribers,
register to receive these messages.
To send a message, the publisher fills out its data, and calls an
API function. This function will usually return instantly.
To receive data, subscriber processes also call an API function. If
data is already there, it will return immediately. Otherwise,
depending on the used function and options, thee call might block
until data is available, or it might return right away or after some
specified waiting time (called time-out).
At the fundamental level, messages are compound data types which the
used programming languages can deal with. They can contain basic
elements like integer numbers, array data, or also strings with a
specific encoding. Having a fixed data type makes it possible to send
messages to programs which use static typing, like C or C++. In
languages like Python, messages can be represented as object instances
with data members, or as entries of a dictionary.
Separately from the aspect of the data type of a message, messages
also have a context which is necessary to interpret them and give
meaning to the data. If versatile data types, like for example a
three-element tuple of floating point values, are used – for example,
to represent a place vector with units in meters – , we need to
register this context to interpret the data properly.
This is done by topics, which are essentially a label with a name
that is attached to a data stream. They are a bit like the frequency
at which a radio station will broadcast, in that they label and select
which information is listened to.
Relation of Message definitions and Topics
Because message definitions define an abstract data type, and topics
define an actual stream of data in a particular distributed system,
they are distinguished, and both can and do have separate names.
Message definitions are persistent, while topics and their
names only exist for the life time of a distributed system - they are
set up dynamically. Topics can use message definitions which are
defined by a system library (say, a general three-element vector of
floating point values to describe a position in space, or a quaternion
type to describe rotations), or very specific message definitions
which are tied to a particular piece of hardware or even a chip set
(like a motor controller).
For that reason, message definitions and topics in general do have
different names. However, where this is useful and makes a system
simpler, their names, as discussed in more detail below, can be made
to match each other.
Since messages are essentially compound data types with fixed element
types, defining them is similar to defining structs
in C.
Here are some simple example definitions:
doubletimeint32_tvalue
This message definition has two elements - a time element, which is a
64-bit floating point number in the standard IEEE-754 format, and a
two’s complement 32-bit signed integer value.
Equally, it is possible to use C’s float values:
floatxfloatyfloatz
which would define a three-element tuple or vector of 32-bit floats in
IEEE-754 representation.
We can also use unsigned integer values, like so:
uint32_tauint32_tbuint32_tc
It is also possible to use 7-bit ASCII characters, or strings with a fixed size:
If you need to use UTF-8 Unicode strings, they need to be encoded by you in
ASCII strings of suitable length.
(In service message definitions, which are explained below, we can also use a string type.)
It is also possible to nest message definitions, just as a struct in C
can contain other structs. however, we will leave the details on this
to the User Guide (you can read the details in section
Nested Message definitions).
Message definitions do have persistent
names. These names are used to look up message definitions in the file
system, similar to how Python modules or C++ include headers are
looked up in the file system. The search path of message definitions
usually contains several places, like the PATH environment
variable, and the message definition names do not specify an absolute
path, only the relative paths.
Note
In any API that is used, names of message definitions should never
contain a trailing slash, or leading dots or dot-dots (some out-dated
library versions might accept them, but that is not guaranteed for the
future and should be avoided).
Apart from message definitions, also topics and services have
names. However, these names are conceptually different: They are not
persistent, but assigned at run-time, and one can define several
topics with different names but pointing to the same message
definitions (for example, hardware units at the left and right sides
of a humanoid robot, or the four wheels of a robotic vehicle).
To illustrate the difference: A file on the disk has a name and is
persistent - it continues to exist if a program has terminated. A file
handle in a program refers to that file, but exists only during the
life time of the process, and several processes can access and read
the same file at the same time. (However, one difference between a
topic and a file handle is that a file handle exists only in a single
computer (and frequently only in a single process), while a topic might be
shared between different processes and computers of a distributed
system).
Also, the names of topics and services can be modified and rewritten
by the LN manager. This is useful because the same code can be used to
control several identical or symmetrical parts of hardware, just by
addressing it with different topics. In contrast, message definition names
specify interfaces, and therefore they should not be changed at all,
just be superseded by a newer version (if necessary).
There is another important difference: Both message definitions and
topic and service names can use name spaces. In the case of message
definitions, these name space parts are separated by slashes (“/”),
since they are file names. In the case of topics and service names,
they are separated by dots (“.”).
Message definitions are normally ASCII text files which are
stored in specific folders that can be found by the Links and Nodes
programs and the LN client library. By convention, these folders have
the name msg_defs. Within these folders, message definitions are
usually grouped by sub-folders, which might (but do not need to)
represent topic names (remember that the definitions refer to the
type of message data, while the topic names refer to their
meaning, which is a different thing). The file name of the
definition are also parts of the message definition’s name. So, a file
with the path msg_defs/orbiter/landing_coordinates would specify a
message definition with the name orbiter/landing_coordinates.
(Details on how message definitions are stored and looked up can be
found in the reference chapter Message Definitions.)
Names of message definitions often correspond to topic and service
names, as both can be hierarchically structured. While message
definitions typically correspond to files on the disk, topics and
services do not have such an equivalent; they exist only within the
program that form a specific distributed system as names. It is also
possible to re-used general-purpose message definitions in other parts
of a system, which forms a powerful support for interoperability. For
that reason, message definitions must not be changed once they have
been shared.
Also, where paths of message definitions can contain slashes
(‘/’), topics and services should always use dots
for name-spacing.
The LN Manager is the central component which registers
and managers message definitions. This central component
is needed because different parts of a system need to
share a common definition of the messages they send
and receive - and they might not share a common
file system.
To make the message definitions known, the directories which they are
stored in need to be told to the LN manager via the LNM config
file. There can be many directories added cumulatively. Adding such a
folder is done with the global directive
add_message_definition_dir, which should be placed before the
process definitions. The path name needs to be an absolute path. If
you want to use a relative path, you can use the LN parameter
%(CURDIR) to indicate the directory in which the LNM config file
resides. This allows it to include message definitions as
version-controlled source code, together
with a config file.
It is also possible to tell the LN Manager folders in which message
definitions can be found via an environment variable with the name
LN_MESSAGE_DEFINITION_DIRS.
These parameters define a search order for message definitions which
allow to provide global, widely uses definitions, together with
component-specific and project-specific definitions. The purpose of
facilitating a layered structure is to support the composition of
larger modules and whole projects out of smaller units.
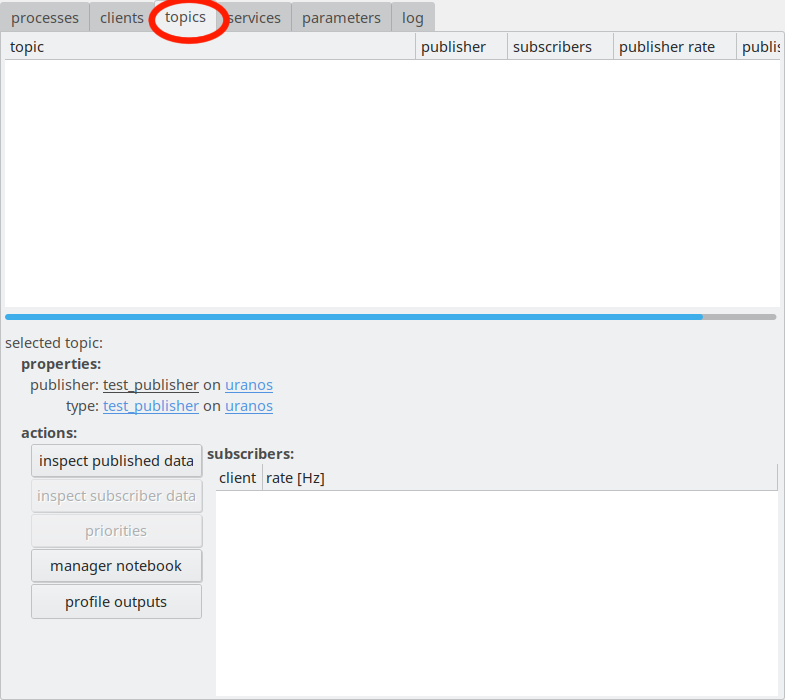
As indicated, the LN Manager allows to inspect message
data for a topic after selecting the “topics” tab.
The LN Manager allows to show message definitions and also to inspect
current data of the messages for a topic, as shown above. This will be
discussed in more detail in The LN Manager GUI in the chapter
Components and their Usage. However, first we will
have a deeper look on how to get LN clients running which use this
inter-process communication.
When you use messages and message definitions with the goal to connect
individually developed, reusable components to create a system, there
are a few points which you should keep in mind:
Message definitions are part of the interface of software
modules. When you change the interface of a component in a
non-backwards compatible way, you break backward compatibility of
that component. Consequently, you should never
change message definitions which you have published and
which are used by other people.
Message definitions can be arranged a search path and type
definitions can be re-used. Try to build complex definitions form
general basic types as this makes it easier to achieve
interoperability of components.
If you need a different message definition, always add a version
number to the name of the change message definition, so that the new
version has a different name. Ideally, also make the old message
interface and internal API just a special case of the new one, so
that you can continue to support both variants in the long term with
little extra effort.
The same is valid for subtle or not-so-subtle change of meaning of
interfaces. For example, assume you have a robot which can
automatically fill an airplane’s tanks, if you send it a message
which tells it how much kerosene it should tank. If you change the
meaning of the quantity e.g. from gallons to liters, you need to
make that change visible in a new version of the message definition,
because you essentially have a new, incompatible interface version,
or the planes might run out of fuel.
This section introduces LN services, their basic
concept and when they are useful.
Services can be described basically as a generalization to function
calls or method calls. They allow to call functions, object methods,
or procedures in another program’s environment, written in another
programming language, running on another CPU, or on another host which
is connected via a network. This makes it easy to connect pieces
of software.
In that regard, services are a kind of remote procedure call,
and they are also similar to web APIs.
With services, components are split in two parts: A service
provider, which offers the service, and a service client, which
uses them.
Services have a number of advantages and disadvantages which should
be considered when using them. On the one hand,
they are easy to use
can be used to synchronize provider and client with each other: The
client is guaranteed to be told when a provider is done processing its
request.
they can quickly glue together a complex system written in different
languages and by different people
can make system components easier to re-use
can transport arrays with variable (non-fixed) lengths, for example
character strings.
provide high throughput / efficiency
point-to-point data transfer between provider & client (private connection)
make a system’s design less dependent on hard limit
on CPU resources, because it is easy to re-arrange functions
abstract from the timing of a computation and from the thread it is running in
avoid difficult-to-identify concurrency bugs
On the other hand:
due to reliable-transport guarantees, services are usually not
suitable to be used in a real-time context (an optional
non-blocking API exists, which can be used from an real-time
context, but is more cumbersome).
they need to be used in a structured and orderly way to avoid
creating a spaghetti-like mess
the simple API of services glosses a bit over the handling of
errors, which, as soon as components or networks become unreliable,
becomes potentially much more complex than invoking a function
call. This is especially relevant if you try to build complex, very
robust systems, and less so if you are creating rather a
proof-of-concept.
the first request after the start of a client/provider pair needs
extra time to establish connection (an lnm round-trip). Following
requests will reuse the existing connection and respond much faster.
they also could cause problems with inter-dependencies and locking
(if one is not careful, one can cause deadlocks)
In the same way as topics, services require message definitions which
are centrally registered and made accessible. In some places, they are
also called Interfaces or Interface Definitions. They use a
slightly extended syntax. Here an example for a service call which
takes two floating-point parameters, and returns another floating point
number as a result, just like a function call. Just assume we provide
a service which computes the area of an triangle. It has two input
parameters, base length and height, and one output parameter, the
area.
Here, the message definition starts with the keyword service,
followed by a line with the keyword request. After this, a message
definition of the input parameters follows. In a second part, we have
the keyword response, followed by the return parameters.
Service message definitions have two special features. First, they can
use variable-length strings like in this example:
Second, in service message definitions it is also possible to use
arrays with a dynamic number of elements, like this:
char*error_messageuint32_terror_message_len
In this case, the variable-length part should always
be followed by a length indication which
has the same name with the suffix “len”,
which will tell the LN system how much data it
has to transmit [1].
Important
Keep in mind that while in C, for example,
strings are terminated by a null character
(often written as '\0'), no such
convention is used for variable-length message
elements in LN. If you want an array of
characters to contain a final zero,
you need to add it yourself.
The field name error_message as a return parameter triggers a
special behavior in some Python LN client API functions: If such a
message is returned which has a non-zero length of the error message,
an exception is raised which has the error message as its argument.
Just as message definitions for publish/subscribe messages,
message definitions for services need to be made known to the LN
manager; they are managed in the same way as the former.
Within a client program, both the service provider and the service
client(s) have to register for the service, and then clients can call
functions of the messaging API which call a service, and return the
result. Parameters are sent in the same way as messages, and are
returned as part of the same message type. The service API
can, too, be used from different languages.
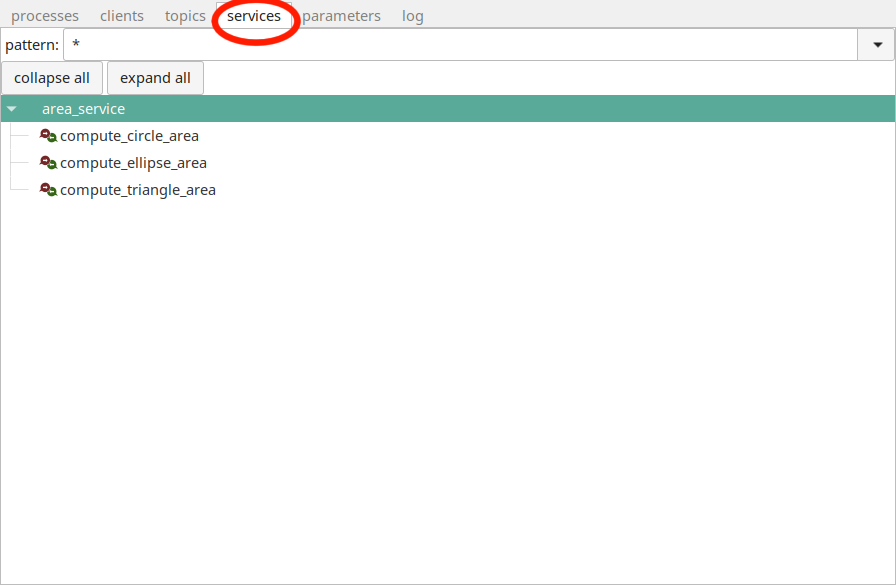
The names of registered services and the content of service
communication can be inspected in the LN Manager GUI. Here we show an
example on how to do this:
LN manager GUI with the “services” tab clicked, which
allows to inspect registered services.
Here, you can see the service “compute_triangle_area”, which is just
an implementation of the service which interface we have seen
above. If you double-click at the service name, you get an ipython
console where you can type and send service requests manually. This
functionality is described in more detail in the part
Components and their Usage in section
inspecting services interactively. We skip this to describe quickly a
few remaining facilities so that we can complete this overview.
LN parameters are simply configuration values
which can be set, for example, in the LN manager GUI, and are on
request sent to different parts of a system. They take into account
that complex systems frequently have many variables which are used to
select and tune behavior, especially if components are designed as
multi-purpose parts. Based on services, they consist in a definition,
a registration, and some means to set and influence them in the
running program.
There are many other additional features in the LNM configuration
mini-language. We cannot cover them all at this point (they are
covered later in the Configuration reference part).
However, we want to highlight a few which are likely to be useful for
you at an relatively early stage:
If you are using many similar processes, it is likely that they also
have similar configuration and process environment options. This leads
to repetitions and boilerplate code in the LN manager
configuration file, and violations of the don’t repeat yourself principle. That is undesirable because changes in one place
probably need to be mirrored by changes in other places, in order to
be consistent.
In the LNM configuration file, this can be addressed by
using templates. They work as follows:
Assume, you have two process definitions like these [7]:
processpython service provideradd environment: PYTHONPATH=%(LN_PYTHONPATH)
pass_environment: LD_LIBRARY_PATHchange_directory: %(CURDIR)
node: localhostcommand: %(LN_PYTHON) "provider.py"ready_regex: readyprocesspython service clientflags: no_error_on_successful_stopdepends_on: python service provideradd environment: PYTHONPATH=%(LN_PYTHONPATH)
pass_environment: LD_LIBRARY_PATHchange_directory: %(CURDIR)
node: localhostcommand: %(LN_PYTHON) "client.py"ready_regex: running
And with this, you can re-write the two definitions from above like this:
processpython service provideruse_template: python_script("provider.py", "ready")processpython service clientflags: no_error_on_successful_stopdepends_on: python service provideruse_template: python_script("client.py", "running")
Note
If you think that this looks almost like a programming language, it
is one! You can express a lot of things with it easily. The main
thing you have to consider that the effect of the program is the
declarations produced by the result of the evaluation of the
configuration file, and the values and expressions with which you
compute are always strings, very similar to the Unix shell.
This compares the value of the parameter named OS_VERSION with the
string constant “2.6”. If both are equal, the expression evaluates
to “warp_drive”. Otherwise, it evaluates to “ionic_engine”. The
result of this expression will be assigned to the
definition with the name driver_type.
Sometimes, it can be useful to include all files from a set of files,
for example if part of the configuration is automatically generated.
This can be achieved by a include_glob directive:
include_globcissygen/**/*.inc.lnc
This directive takes a path name pattern — in this case, all files in
the sub-folder “cissygen” which have a suffix of “.inc.lnc” in their name —, and
includes these files by inserting their content at the
current place in the configuration. This is especially
useful if package management tools define the environment
for some command to run.
Because the configuration language has limited capabilities,
it can sometimes be easier to generate some complex
configuration, for example with a shell script or
a python script, and use this configuration. This
could be achieved by automatically generating
include files, however these need to be saved
and managed each time the configuration is ran.
To make this simpler, one can simply write a
script that outputs the desired configuration
to standard output, and instruct the LNM
to run this script and use the output
as configuration input. Here an example:
pipe_includepython generate_ln_config.py
Here, the LNM will run the command “python generate_ln_config.py”,
and insert the result. The script could also take parameters
for more complex cases.